KegWorks Homepage
Choosing and Installing Wooden Bar Rail Molding: A Complete Guide
By Kegworks | 31 October, 2024
home bar architectural metal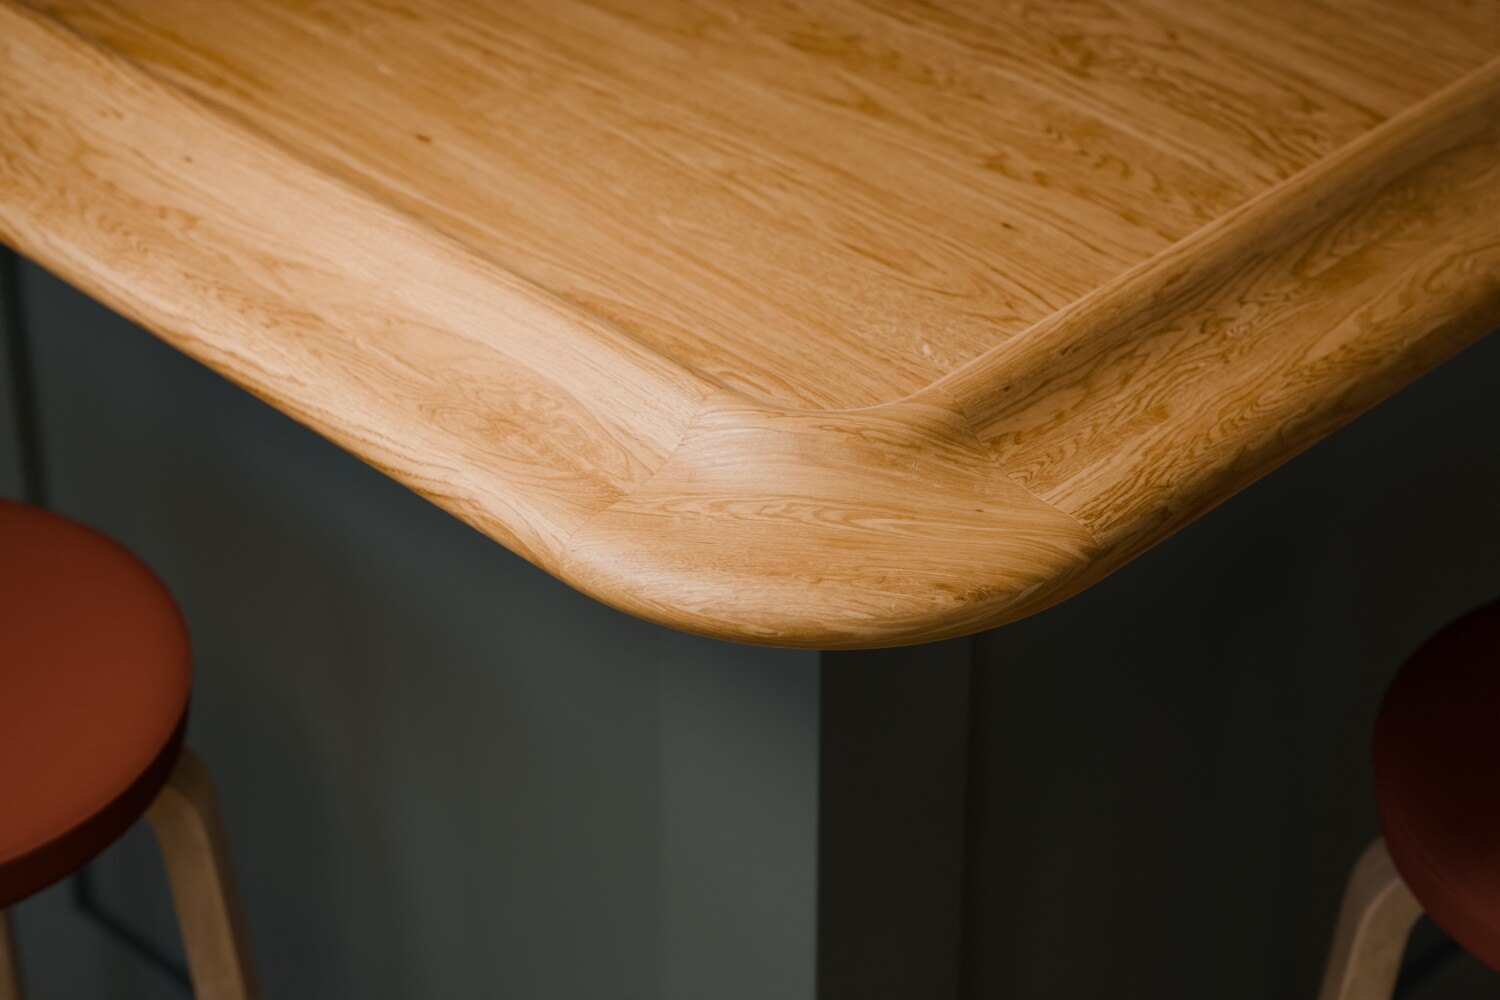
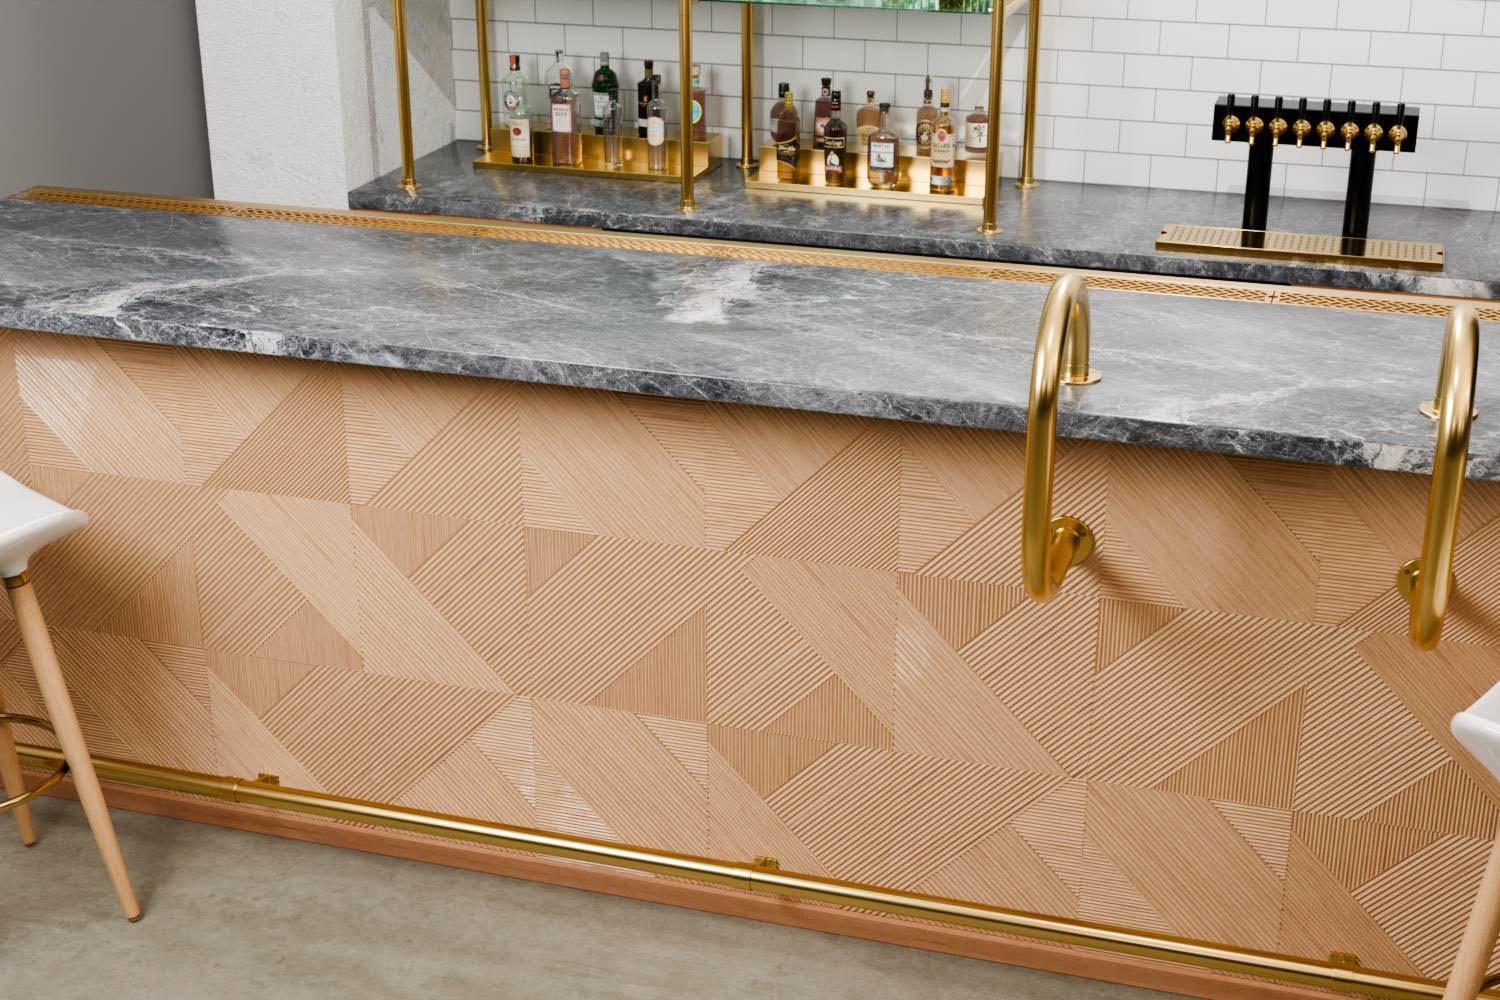
Adding bar rail molding, also known as Chicago bar rail or wooden bar armrests, lends a polished, professional finish to any DIY home or commercial bar project. Primarily, it provides a comfortable perimeter for guests, whether seated or standing, and creates a protective lip to contain glassware and spills on the bar top, keeping the floor clean and safe.
Choosing the wood for bar arm rests
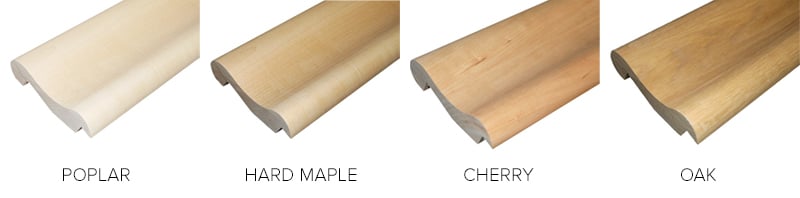
Our wooden bar rail molding is available in four types of wood: cherry, hard maple, red oak, and poplar. Each option offers a different color, density, and grain pattern.
- Poplar: Creamy white with occasional dark streaks, poplar is easy to cut, sand, and paint. However, it is softer and more prone to dings and scratches than other hardwoods.
- Hard maple: Off-white with yellow-brown and pink tones, hard maple has a close grain and is highly resistant to dents and wear.
- Cherry: Known for its rich, reddish-brown color and smooth, close grain, cherry resists humidity and generally doesn’t warp. It darkens with sun exposure and stains beautifully.
- Red oak: Light brown with a slight red tint and an open grain, red oak is exceptionally durable and well-suited for high-traffic areas. Its strength and nail-holding capacity make it a popular choice for furniture and bars.
All of our wooden arm rests come unstained so that you can match the arm rest to your bar or choose a complementary stain or color if you are looking to create contrast. Be sure to stain, varnish, or paint your arm rail and let each piece dry fully before installation.
Choosing between mitered and rounded corners
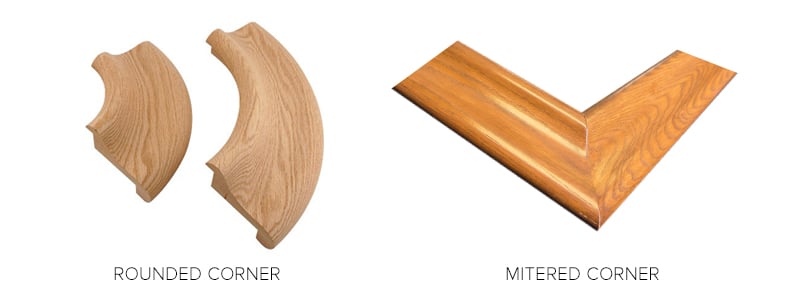
When planning any armrest project, consider how to address the bar's corners:
- Mitered Corners: The most economical option is to make mitered corners using two straight molding pieces cut at an angle.
- Rounded Corners: Rounded or radiused corners offer a customized, polished look, reducing sharp edges and minimizing the risk of accidents. Crafted from a single piece of hardwood, radius corners are a premium option, with pricing varying by wood type and radius size (1.5", 3", or 6").
Installation tips for bar rail molding
1. Give yourself enough length
If your bar is 12 feet long, don’t just buy 12 feet of molding. Buy some excess length to give yourself room for cuts and errors.
2. Measure, measure, and then measure again
Triple-check your numbers before you start cutting. Trust us on this one.
How-to install wooden bar rail molding
You received your arm rest order and are ready to install. Here’s how you go about it.
Tools needed
- Electric drill
- Screws
- Miter saw (chop saw)
- Clamps (for securing molding while drilling)
- Wood glue
- Measuring tape
1. Prepare the bar top
Our wooden arm rails rest at an angle over two pieces of stepped wood. The top piece of wood is your finished bar top; the bottom piece of wood juts out further and provides structural support.
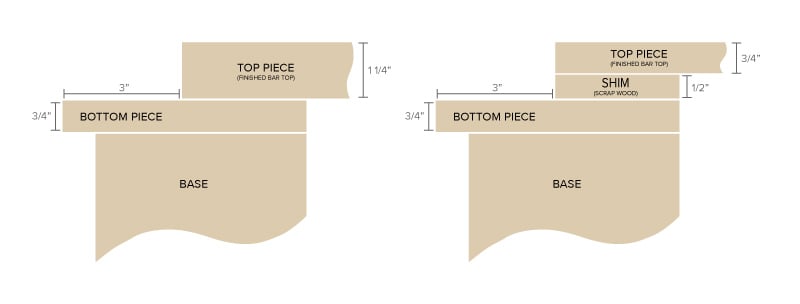 As you can see in the figure above, the bottom piece of wood should measure ¾" thick and extend three inches past your finished bar top. Your finished bar top should measure 1 ¼" thick. If your bar top is thinner, shim it with a piece of unfinished scrap wood (you won’t see the shim when the installation is complete). Use glue and pneumatic staples to adjoin the structural wood, finished bar top, and any shim you might use.
2. Cut molding to length
Our wooden arm rails come in 2', 4', and 8' lengths. We recommend buying the next largest rail length for each straight run of your bar and cutting it down to size. This will reduce the number of seams in your finished product. If you have a run longer than 8', you must seam two pieces of rail together.
We recommend using a scarf joint if you are seaming together two lengths of arm rest in a straight run. This requires cutting a beveled edge so that the two pieces fit together at an angle, making for a tighter seam.
If your bar has a corner or corners, and you decided to go the miter joint route, cut the ends of your adjoining molding at a 45-degree angle. Note that arm rest has a wide profile, so cutting it to a precise 45-degree angle is difficult. If you are new to woodworking, you may want to seek the help of someone more experienced. You might also find this video on cutting precise miter joints helpful.
If your bar has a corner or corners and you opted for radius corners, you could cut a beveled edge to form your seam. However, cutting a radius corner on a miter saw can be particularly difficult. Instead, we recommend a simple butt joint. You may choose to cut clean ends, but no special cuts are necessary.
3. Dry fit all pieces
You want to be sure everything fits together as intended before you start drilling and gluing. Don’t skip this step.
4. Pre-drill holes
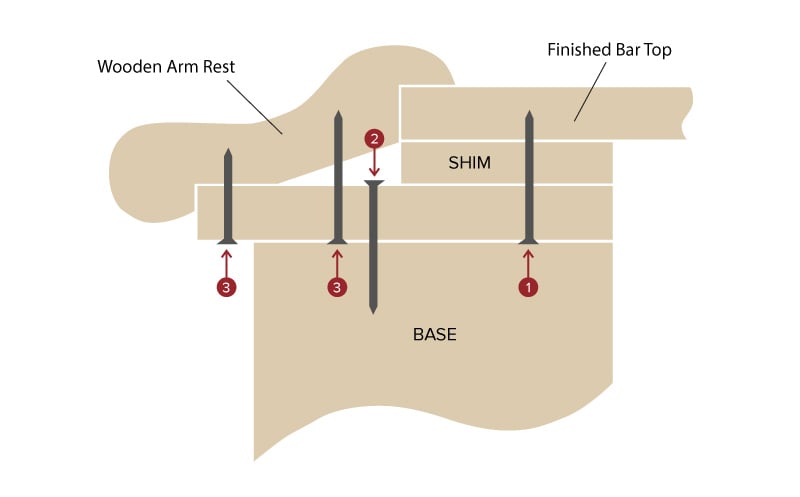
Wooden arm rests are fastened in regular intervals from the underside (see above figure for screw placement). To secure the molding, pre-drill holes in the underside, taking care not to drill through the wood. Use clamps to hold the molding in place.
5. Assemble and finish arm rest
Once your holes are drilled, you can begin attaching your molding. With glue on the seam where the arm rail meets the bar top, align and screw the molding into place. Wipe away excess glue for a clean finish. If your arm rail does not end at a wall, attach bar rail molding end caps for a finished look. These should be glued on to avoid visible nails.
Once installed, your bar will boast a professional, finished appearance with added comfort for your guests. Enjoy the results!
Kegworks
Kegworks has been transforming hospitality spaces since 1998 with expertly crafted architectural metalwork and professional draft beer equipment, helping designers, architects, and bar professionals bring their visions to life.Comments
Dan
December 1, 2017, 1:51 pm
Please explain how I put in the inner screw #3 after #2 is in place.
Michael D'Amore
January 30, 2018, 9:52 pm
How do I plan for rounded corners ? I will be building the bar from scratch .
thomas parnaby
April 18, 2018, 2:11 pm
can this molding be used with a granite bar top
Jim
September 27, 2018, 10:15 pm
From under the base, thats how I did mine
Dale Reeser
October 17, 2018, 12:52 am
I like the look of a wood arm rail. Im a older
gentlemen. Im trying to find the old fashion
Padded leather arm rail. I did find a company in Los Vegas, they make them for gaming tables.
Please send me recommendations. Thanks
george Bechtel
October 31, 2018, 6:54 pm
excellent information
Chris
April 5, 2019, 8:38 pm
Hi Thomas,
Installing bar molding does require your bar top to be on a bit of a "stepped wood system", meaning that a top piece of wood, or the finished bar top, is supported by a bottom piece, which juts out further. This provides structural support. This likely wouldn't be doable with granite bar top. Also, the wood probably wouldn't attach very well to the granite, so we wouldn't recommend it.
Chris
April 5, 2019, 8:42 pm
Hi Michael,
To plan for turning corners in your bar molding, make sure you choose the proper radius in either Oak, Hard Maple, or Cherry wood. Map out each turn, and be sure to factor in the length of each piece in your bar molding to be sure you have the proper amount of space to make it work.
Randy Mitchelson
June 4, 2019, 4:27 pm
Hello! I am going to install a bar rail on an existing bar at a Social Club. I need two lengths 14 ft. and one 18 ft. in order to allow for two miter ends. Can you please provide me with pricing and dimensions of your product. The club has not decided on a wood as of now, but I believe they will choose either oak or maple. Please feel free to call me if you have any questions. I am downstate in Taylorville IL. Cell# 217-971-4615
Katie Johnson
June 5, 2019, 1:27 pm
Hi Randy, thanks for the info! One of our bar rail specialists will reach out to you directly. Cheers!
HG Jenkins
November 9, 2019, 12:04 am
Do you guys have any photos of installed end caps? Trying to decide what this needs to look like. Thanks -
Higgie
Dave Buchanan
November 11, 2019, 2:16 pm
Hi Higgie:
I've attached an image below. Feel free to reach out to our Customer Care department if you have any questions at 877-636-3673 or email us at customercare@kegworks.com. Cheers!
Doug
March 23, 2021, 12:46 pm
Am looking at different bar rails and how to attach. Your picture is helpful except there is no way i can see to attach the inner screw #3 from below after attaching screw #2 to the base. Can you please describe better how to attach all the components of the bar top and rail securely.
Nader Javid javid
June 24, 2023, 10:34 pm
I am open in bar and grill restaurant and I like to make my bar top which is 65 feet in 7 cuts. How much or how many pieces do I need to order? And do you have mahogany color?
David Buchanan
June 26, 2023, 12:49 pm
Hi, Nader. Unfortunately, we do not sell molding in mahogany. You could stain it to match your bar. I would order 9 or 10 sections of 8' molding just to make sure you have enough or order a little more than you need to cover the length depending on the size of the pieces you want.
Dave Seubert
January 22, 2025, 9:21 pm
Would like to order like 80 ft of bar railings
David Buchanan
January 22, 2025, 10:07 pm
Hi, Dave! You can contact us through this page about placing a order: https://www.kegworks.com/customer-service/contact
More Topics
Related Posts
Fast Shipping
Quick Turnaround Times
Hassle-free Returns
60-Day Return Policy
Secure Shopping
Through SSL Protection
Expert Support
Call 877.636.3673