
There’s nothing more frustrating than getting that new cool item in the mail, setting it up, and then realizing it’s not working right. For those of you that are new to the kegerator game, or starting a project from scratch, here’s a simple step-by-step process for completing your kegerator setup:
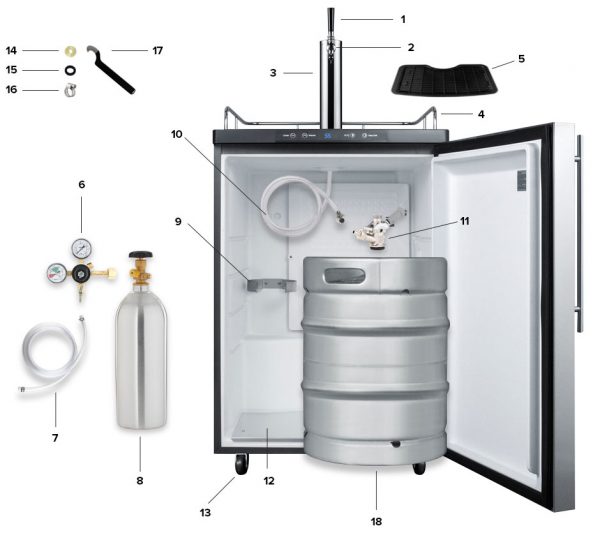
Kegerator Parts
1. Faucet Handle2. Faucet
3. Beer Tower
4. Guard Rail
5. Drip Tray (not pictured)
6. Double Gauge Regulator
7. Air Line - 5/16” ID
8. CO2 Air Tank
9. Air Tank Holder
10. Tower Beer Line - 3/16” ID
11. Keg Coupler
12. Metal Keg Floor Support
13. Casters (optional)
14. Nylon Washer
15. Rubber Washers
16. Screw Clamps
17. Spanner Wrench
18. Half Keg (not included)
Tools You'll Need
Other than of course, the kegerator, you'll definitely want to have a spanner wrench, hex nut wrench, and CO2 air tank wrench on hand for your kegerator setup. Rubber washers, screw clamps, and nylon washers for CO2 regulators are optional, but can be very useful at creating a tight seal throughout your system to prevent leaks. Rubber washers should be attached in any location where two pieces of metal are coming into contact with one another throughout your draft beer system. Screw clamps can be used to fasted both beer and air line connections to ensure no liquid or compressed air is escaping the system as it works. The nylon washers are specifically built for creating a tight seal between your CO2 regulator and compressed air tank. A flathead screwdriver is also needed, depending on the keg regulator you're using. With just those tools, you're ready to go!
Video: How to Set Up a Kegerator
Step 1: Install top railing.
No tools needed here, the top railing will easily snap on kegerator. There are holes on top of the kegerator fridge for the railing to snap into.

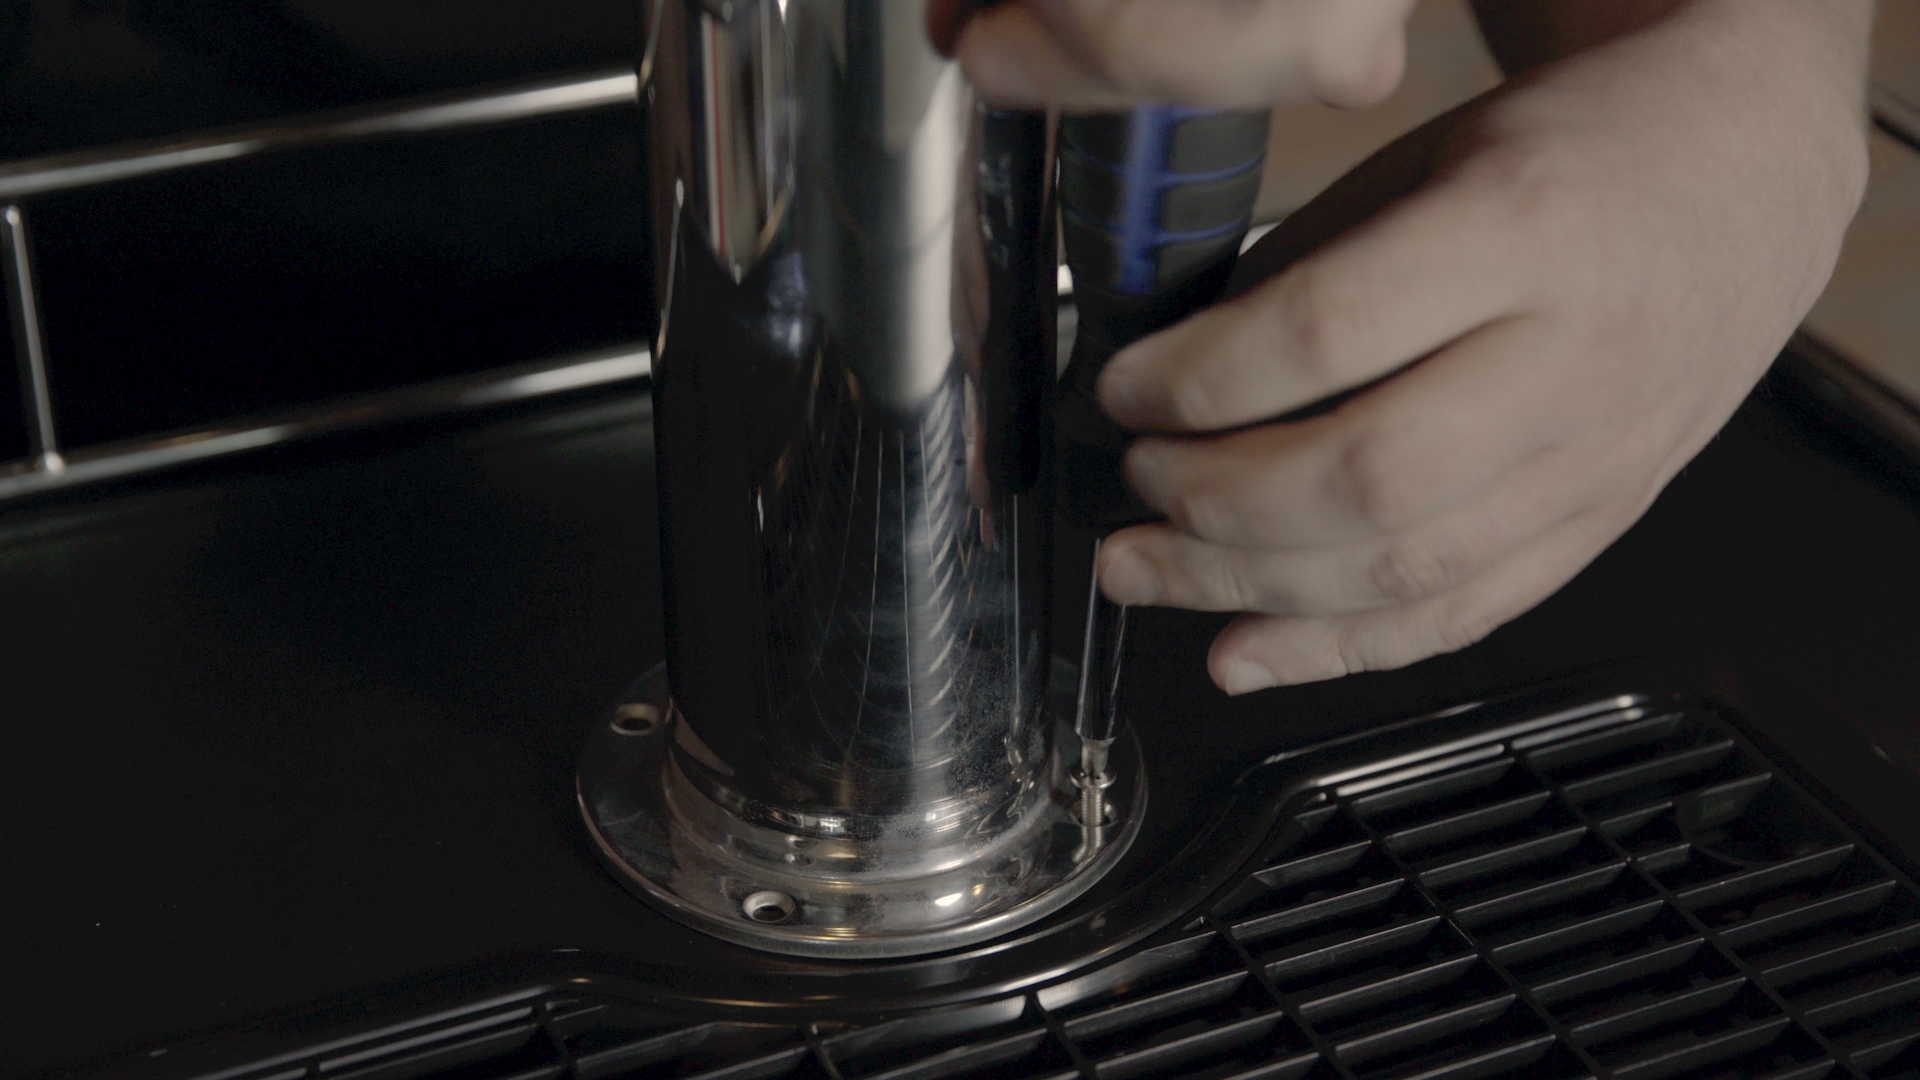
Step 2: Install draft tower.
When you receive your kegerator, it will have a plug covering the hole where the draft beer tower will be inserted. It can be removed by hand or the flathead screwdriver. To install the draft tower, line up the circular gasket holes to the screw holes on top of the kegerator fridge. Feed the vinyl beer line all the way through the opening, and then screw in the tower screws through the gasket and holes atop the keg fridge.
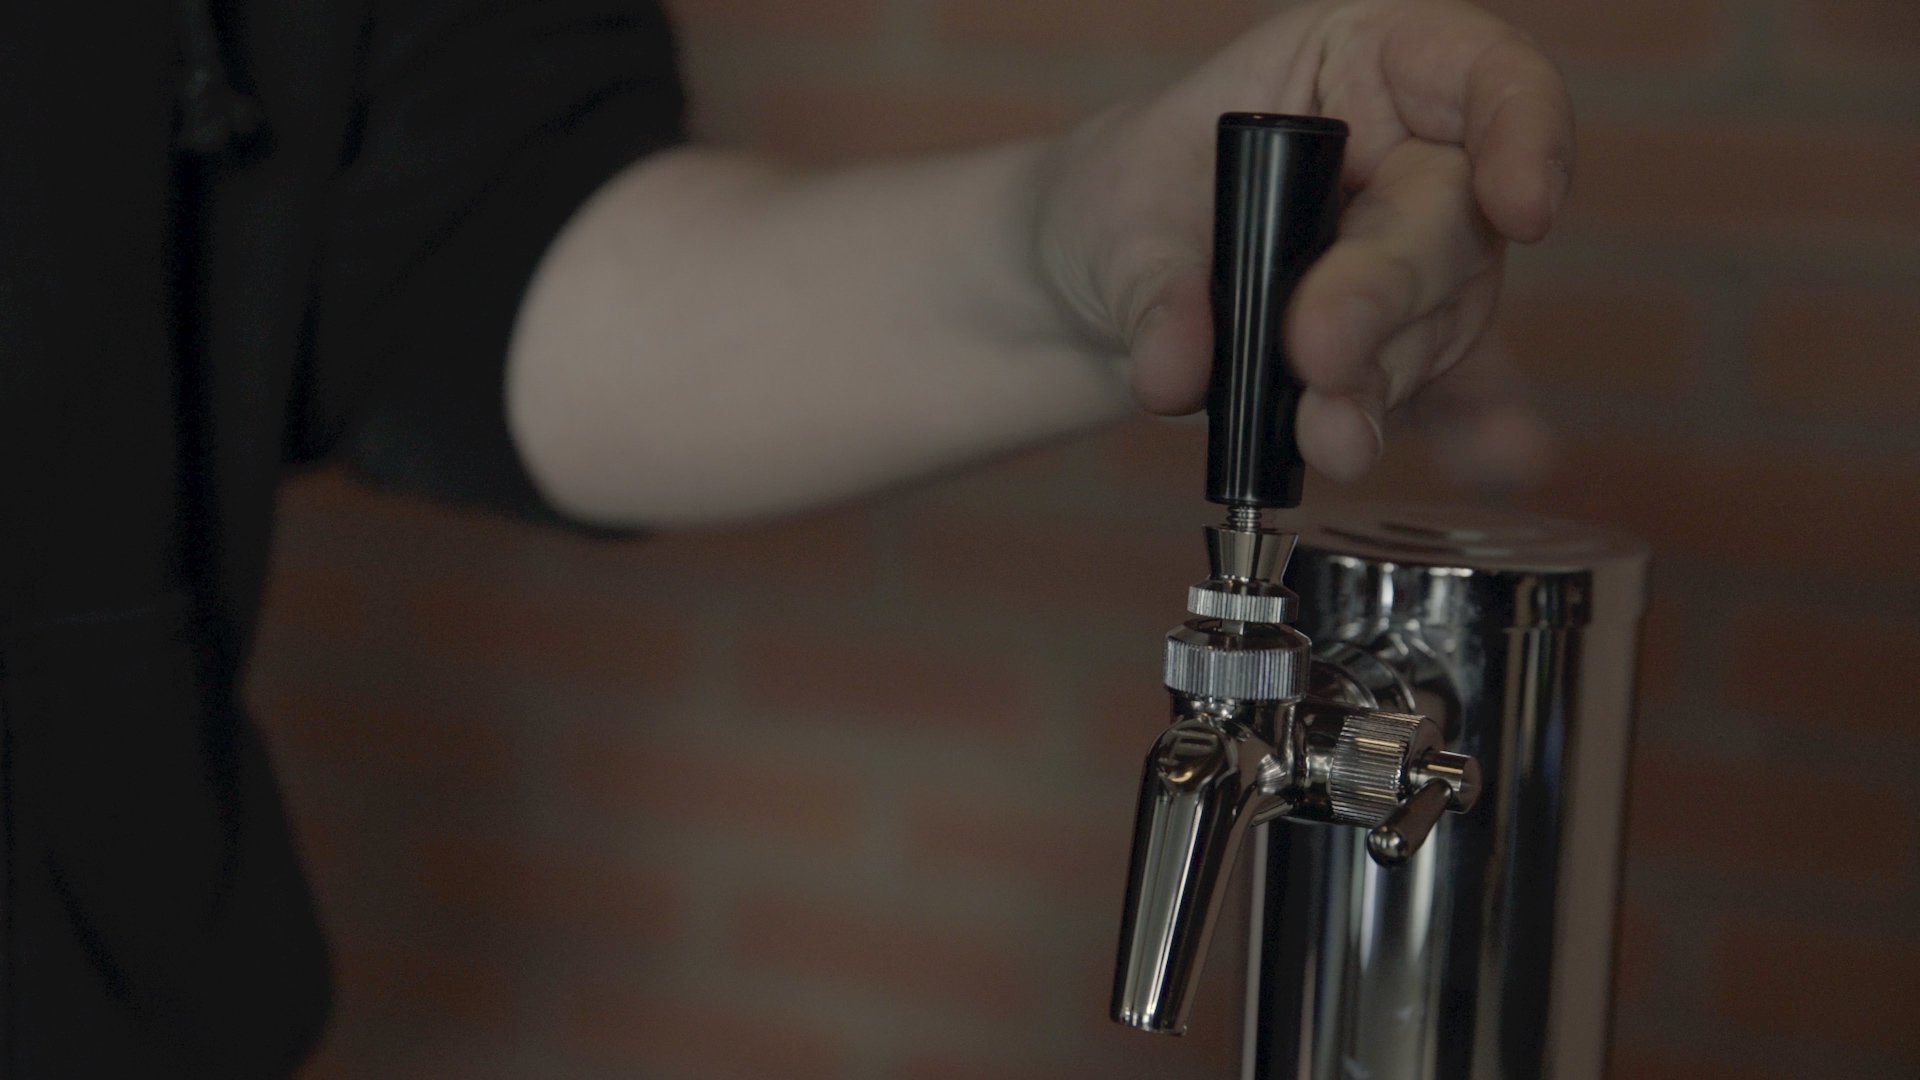
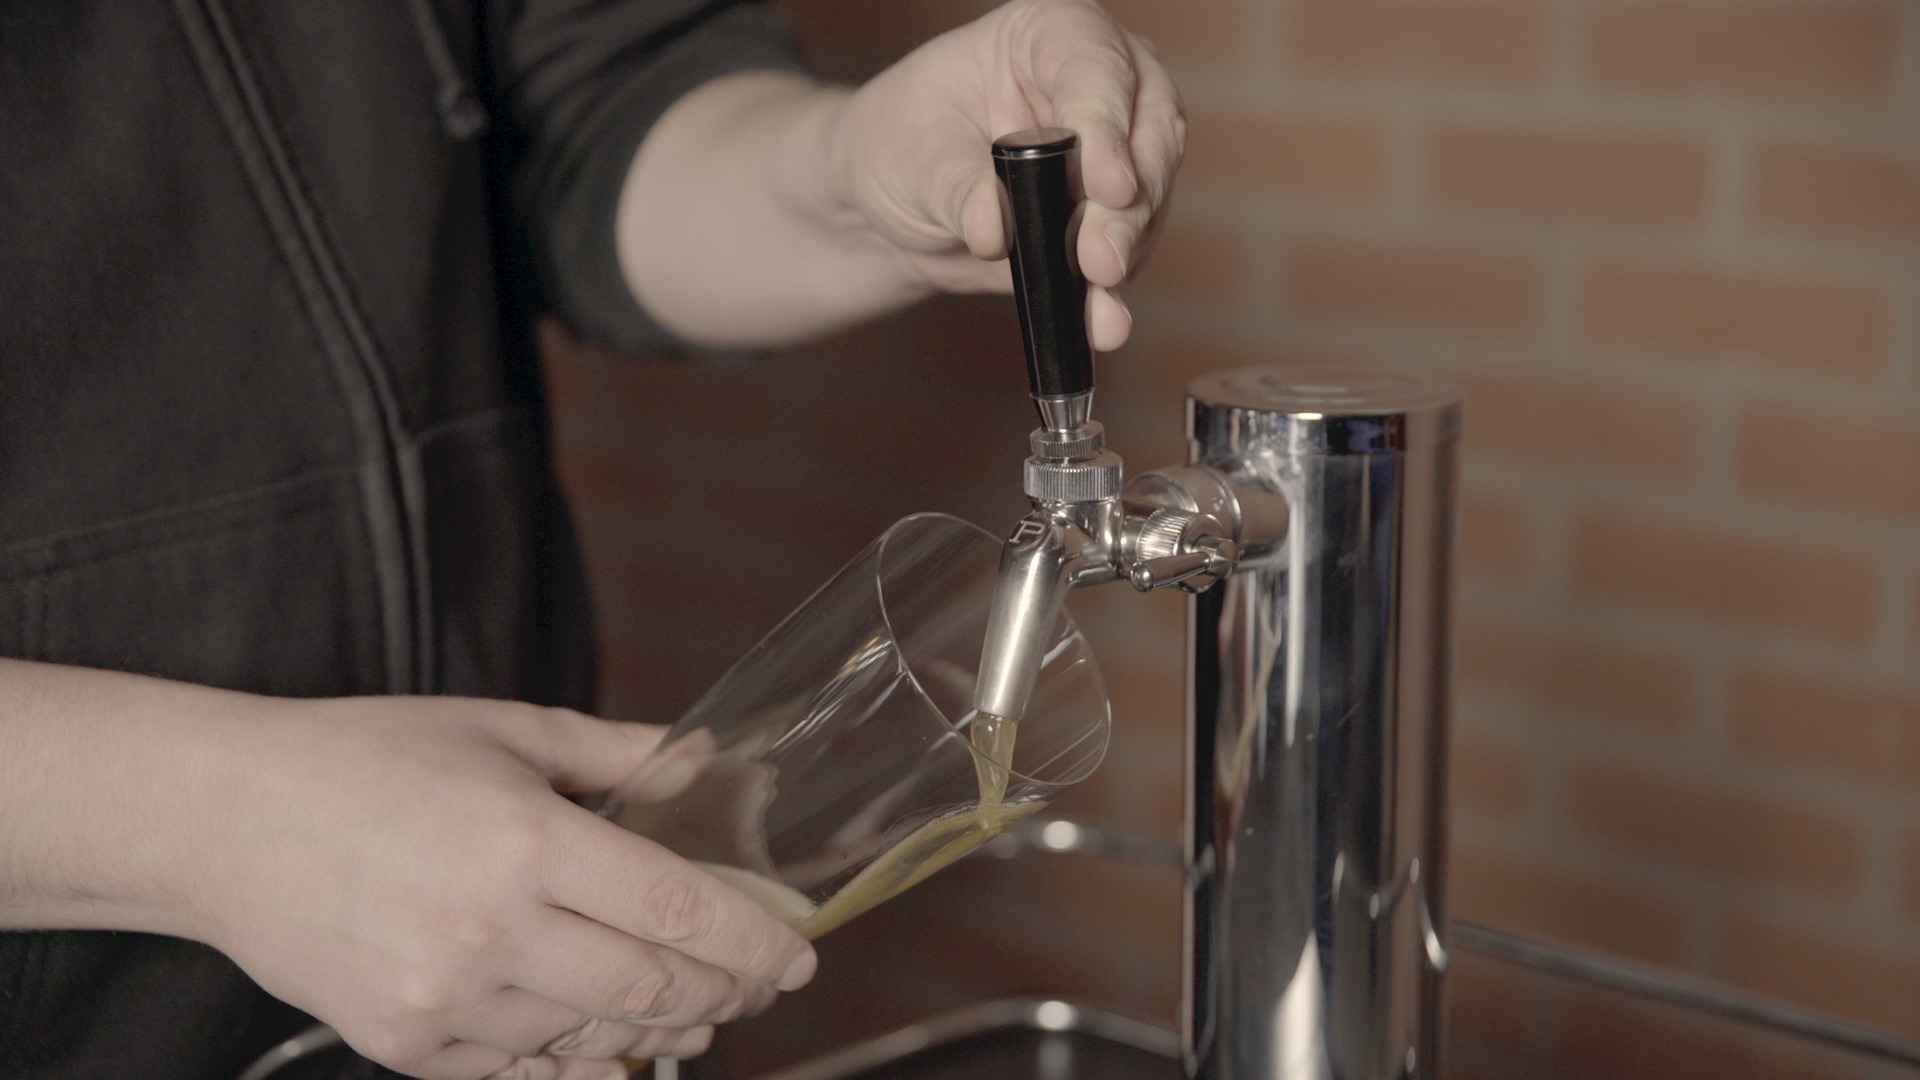
Step 3: Attach tap faucet.
Use the spanner wrench and rubber washer when securing the faucet tap in place for a firm attachment to the kegerator tap tower. The spanner wrench will fit directly into the holes on the side of the beer faucet. This will help to avoid any leaks in your draft system. Check out our Guide to Draft Beer Faucets to determine which one is right for you. Perlick Flow Control faucets can speed or slow down the rate of your pour to help put an end to overly foamy beer.

Step 4: Attach tap handle.
Standard tap handles screw easily into place on top of the faucet tap you're using. You can also screw in from the bottom of the tap handle, while holding it in place so it ends up facing in the desired direction. This is perfect if you're using a custom tap handle to decorate your bar. A standard black plastic tap handle is included with each kegerator. If you want to add some extra character to your bar, check out our selection of Novelty, Generic, and Custom tap handles.
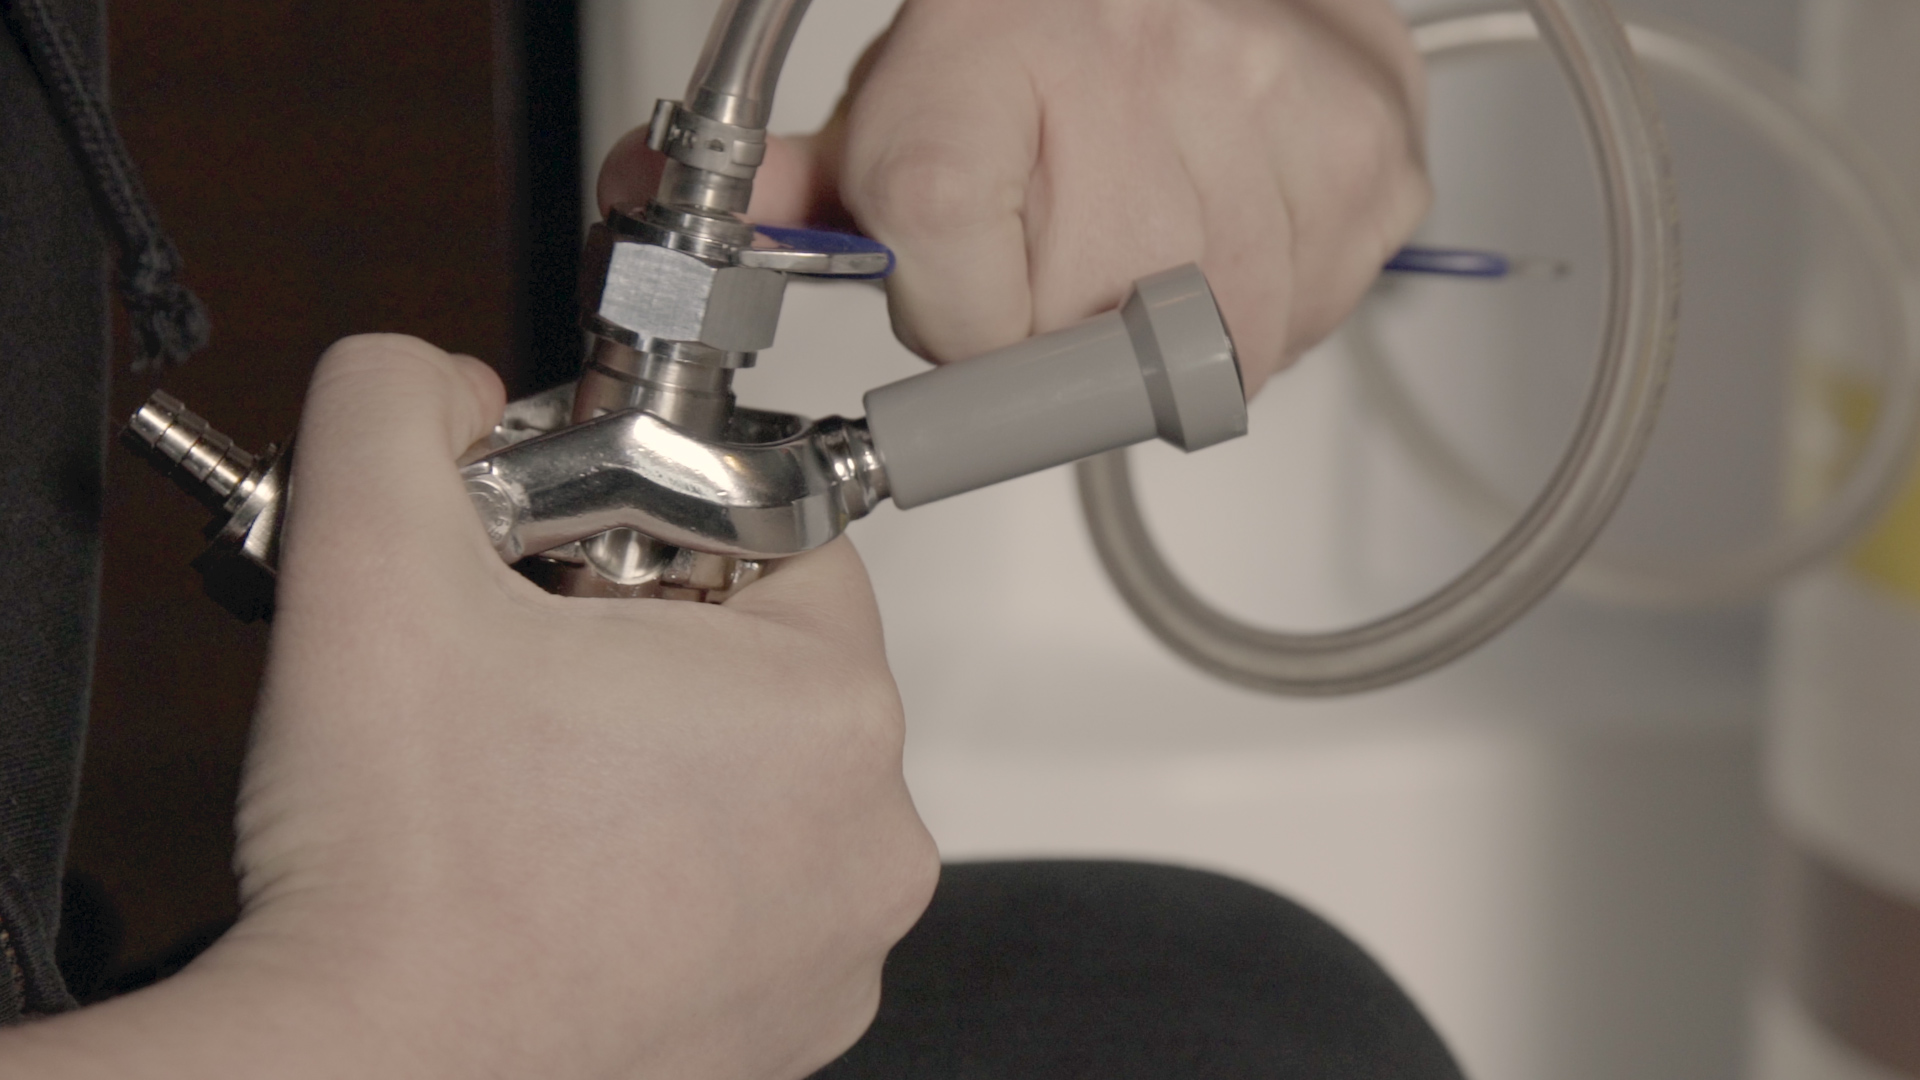
Step 5: Connect beer line to keg coupler.
As with any connection where two pieces of metal come into contact, a rubber washer should be used to attach the beer line to the keg coupler. Attach the washer before connecting the line. Firmly screw the line onto the top of the coupler, and use a hex nut wrench to ensure a tight seal. If using the wrong coupler, your kegerator will not pour out a drop. Before attaching your coupler, consult our Keg Coupler List to be sure you’re using the right one for your beer style.
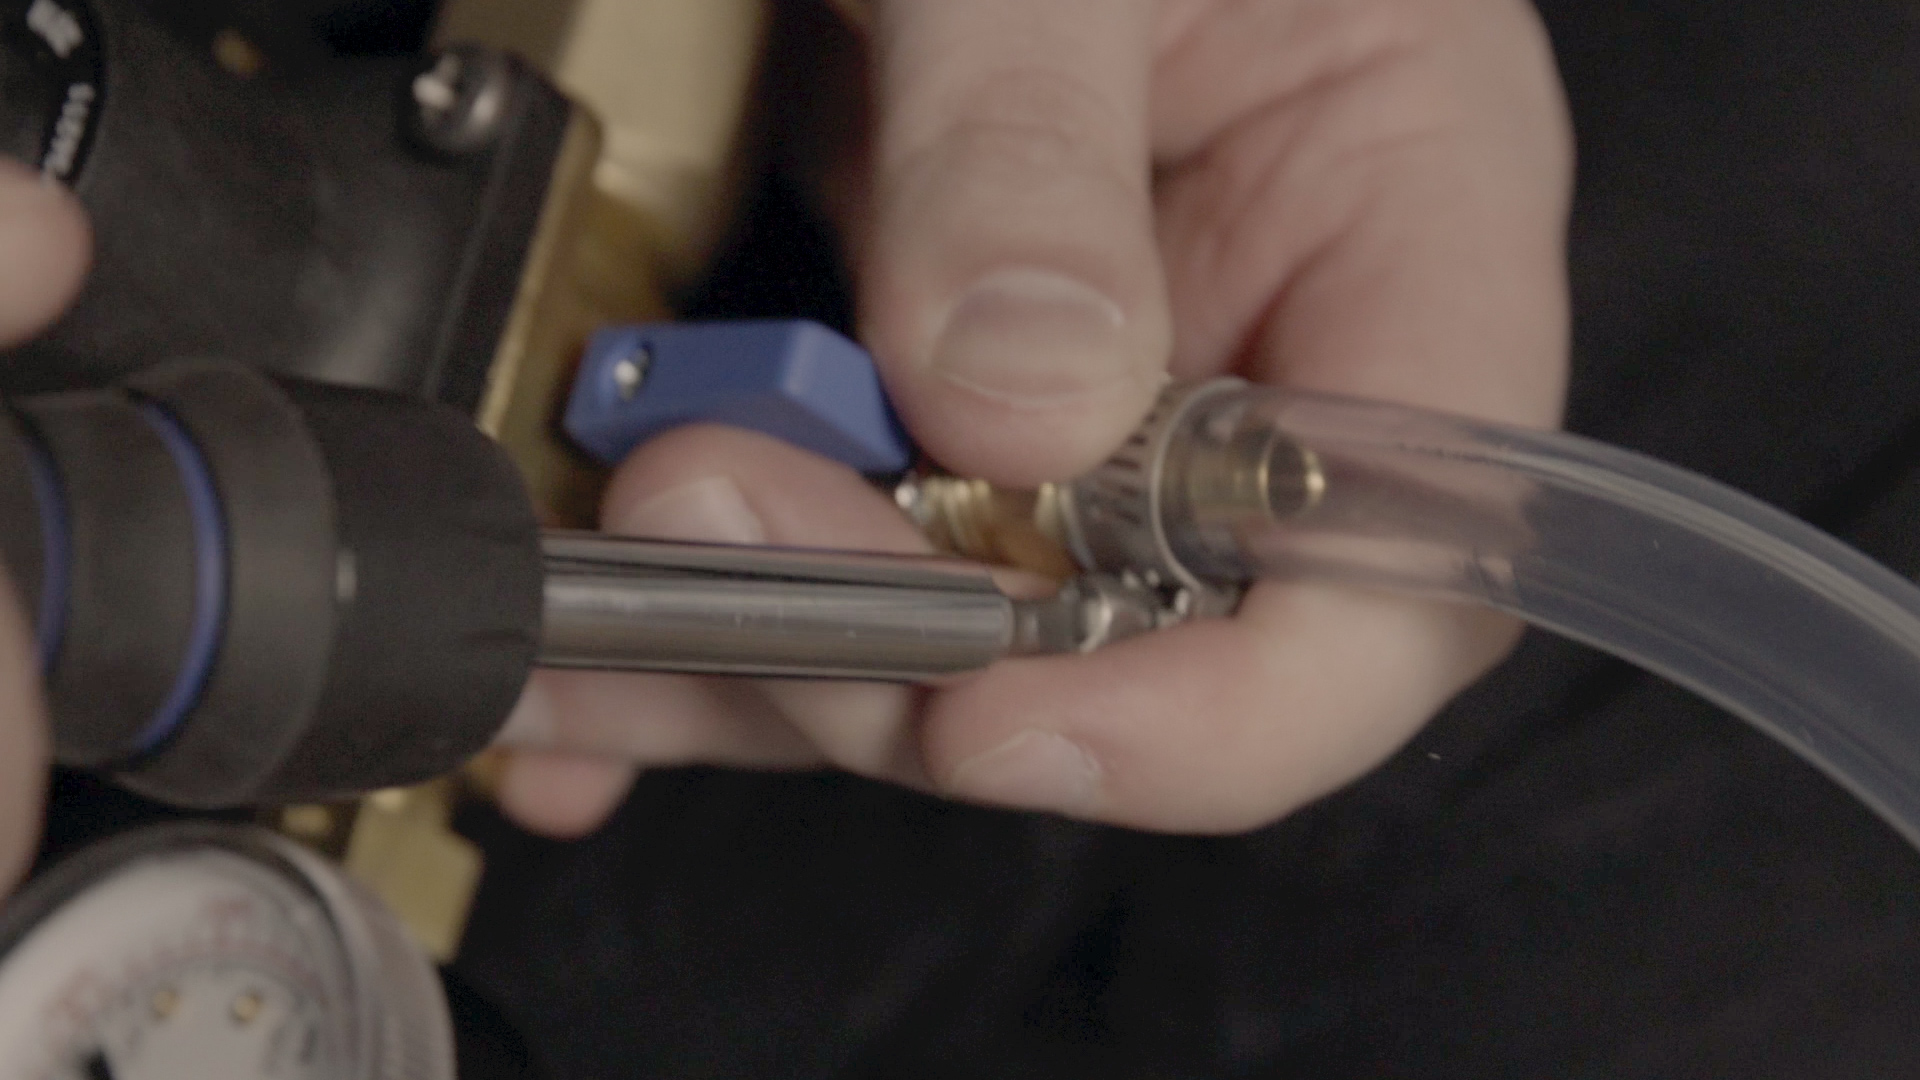
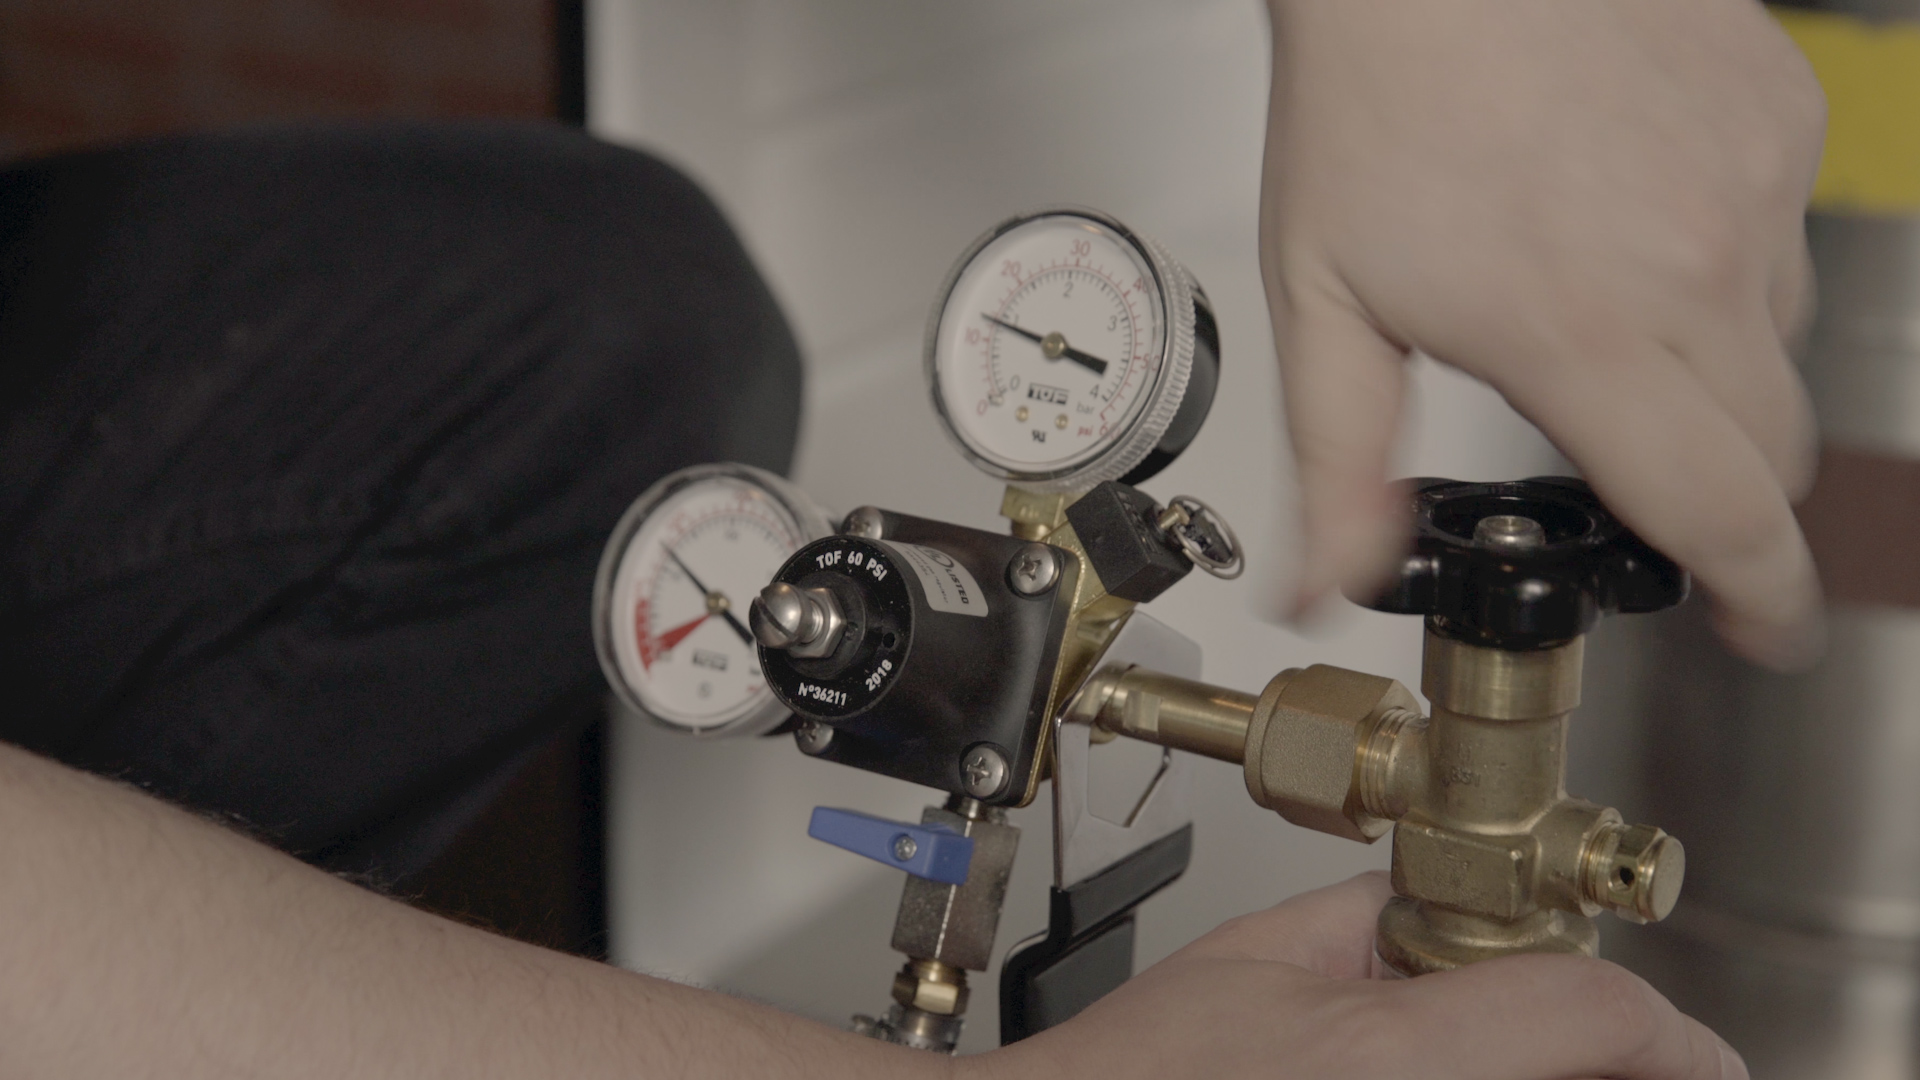
Step 6: Attach one end of air line to regulator.
Attach one end of the air line to the CO2 regulator. The end pictured is the regulator output barb, which is also the end where the shut-off valve is. Push hard to securely attach the CO2 line to the regulator. Also, we strongly recommend using a screw clamp on this connection to ensure proper seal and avoid CO2 leaks. The keg regulator lowers the pressure of the compressed air tank to a usable level before the gas reaches the keg. Learn more about CO2 and Nitrogen regulators in our Regulator Guide.
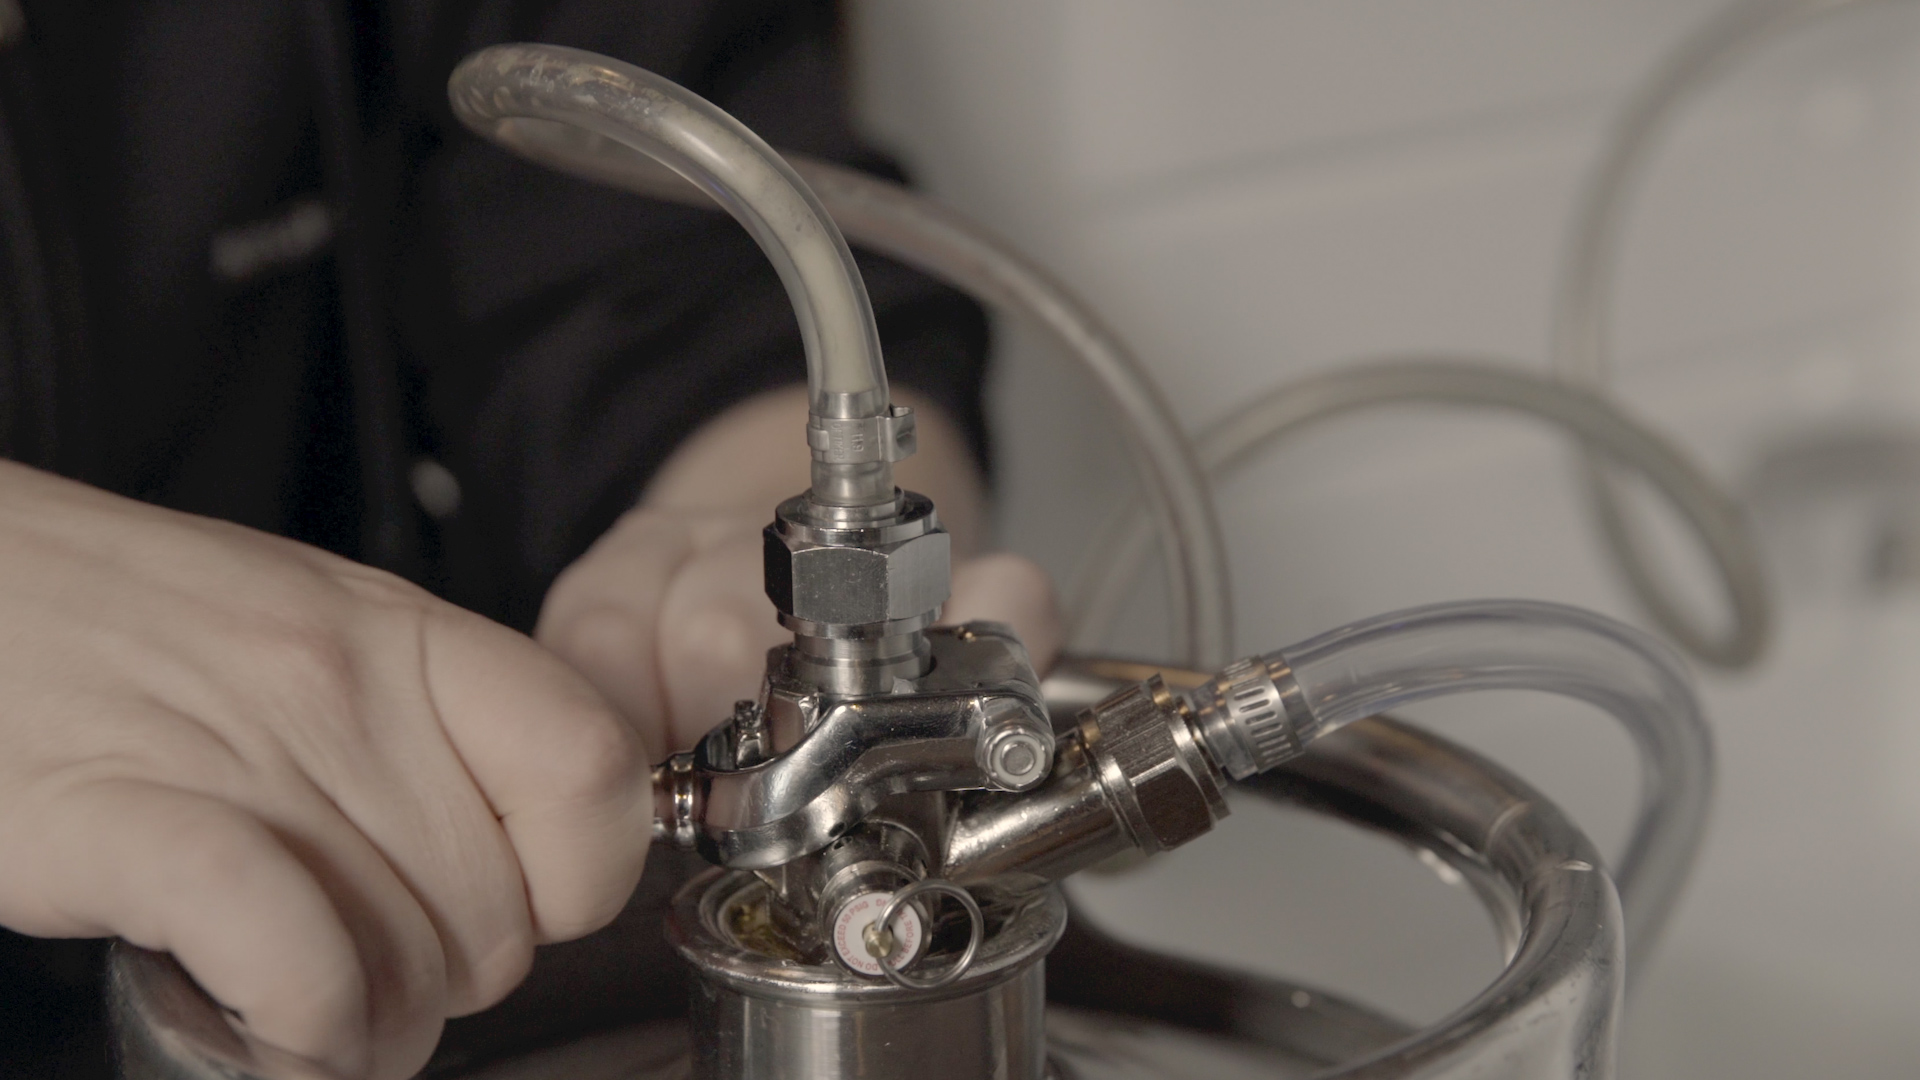
Step 7: Connect opposite end of air line to keg coupler.
Attach the opposite end of the air line to the hose barb, which is the opening on the side of the keg coupler. As with other beer and air line connections, you may have to use some force as you attach the line to the hose barb for a secure seal. Also, use a screw clamp to further strengthen this seal. Maintain the quality of your keg coupler by cleaning it consistently, troubleshooting problems, and learning about its parts from our Keg Coupler Guide.

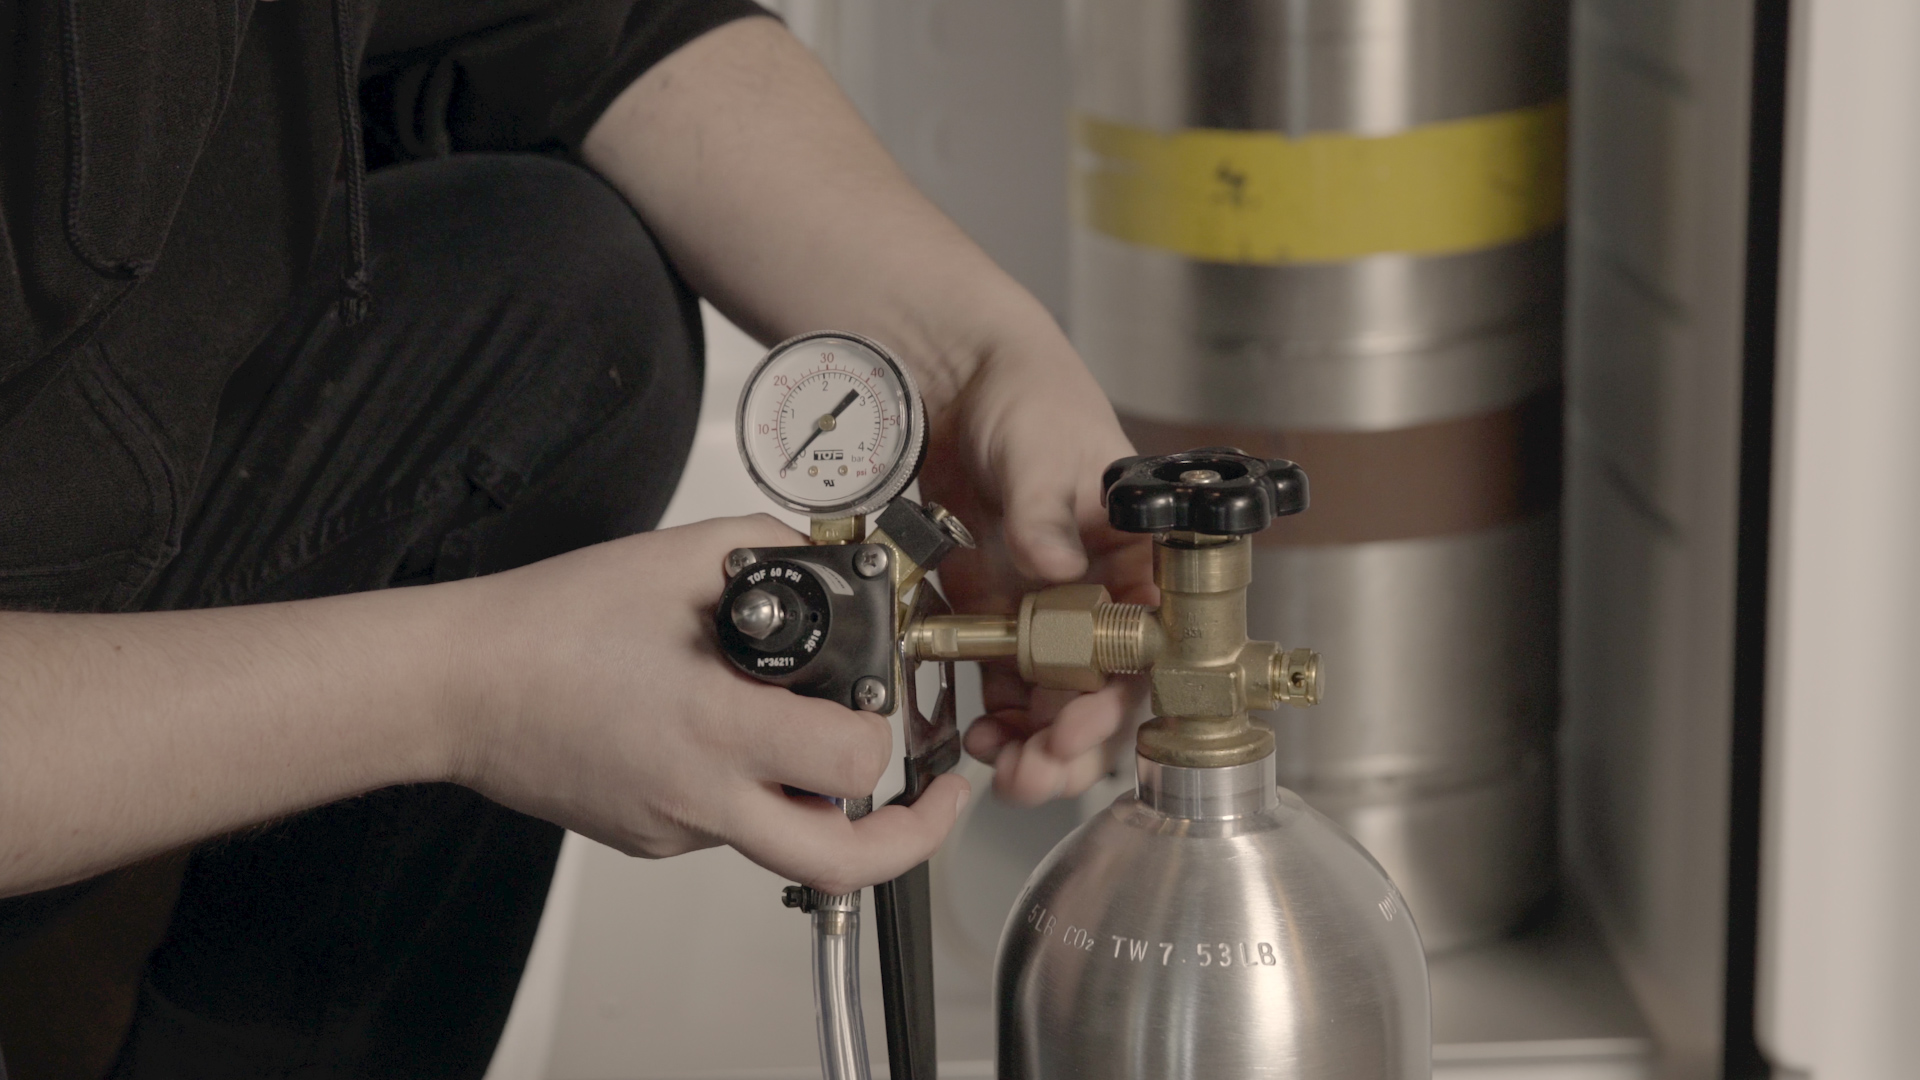
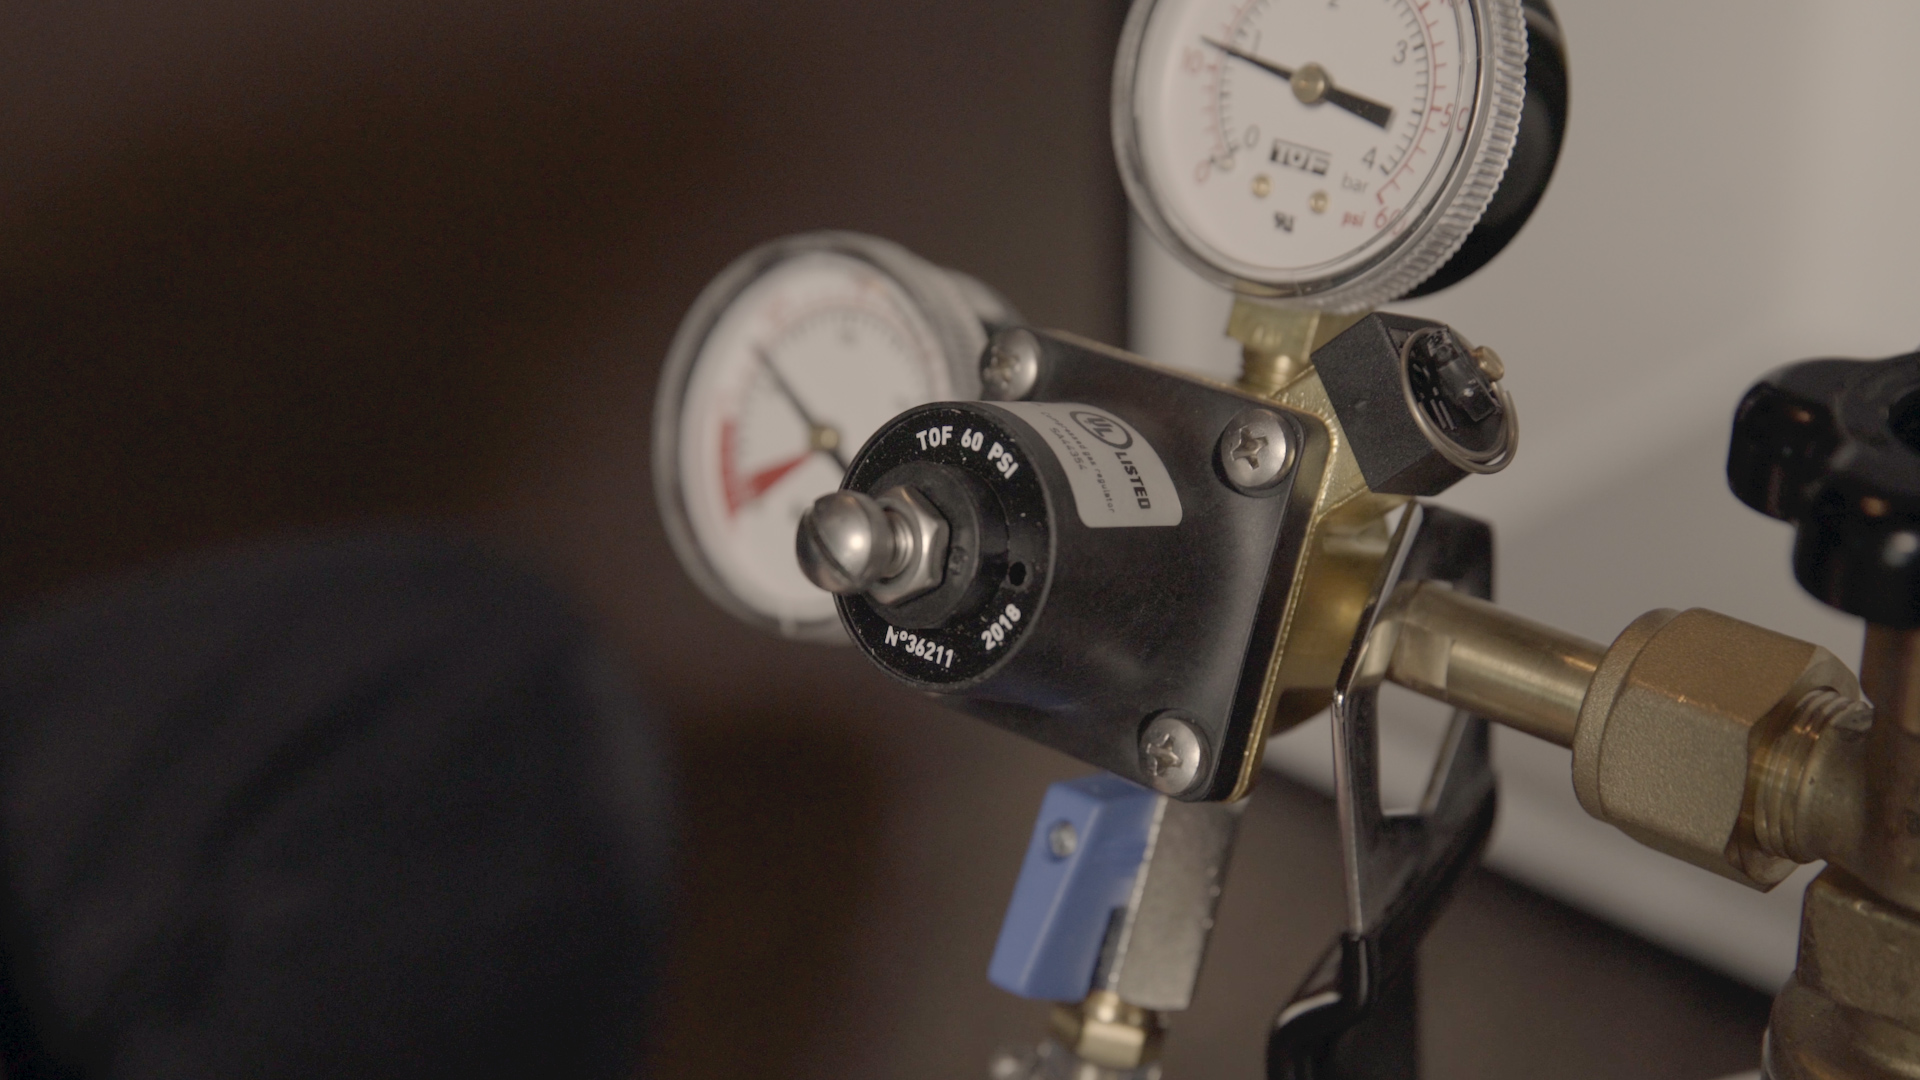
Step 8: Attach regulator to CO2 tank by CO2 inlet nut.
The nylon washer goes inside the regulator CO2 inlet nut. The inlet nut then screws directly into the CO2 air tank. Use the CO2 air tank wrench, which you can leave hanging down from the regulator afterwards, to screw the two pieces together. Single-gauge regulators show just the PSI level the beer is pouring at, while dual-gauge regulators also show the amount of compressed air remaining in the tank.
Step 9: Attach coupler to keg.
Assuming you're using the correct keg coupler for the beer style you're pouring out, your coupler will screw in relatively easily by fitting into the grooves atop the keg. Begin with the coupler's handle in a closed position, or facing diagonally and upright. After screwing the coupler into the keg, creating a firm seal, you can then push the coupler handler downwards, so that it is lowered and facing more straight out than diagonal. Some beer should enter the vinyl beer line at this point. Which keg to use? Learn about beer keg sizes to determine which one is the right fit for your kegerator, party, or tasting habits.
Step 10: Open up the air tank.
Two quick steps are needed to open up the compressed air tank and pump CO2 through your system. Turn the hand wheel to engage your compressed air tank, and move the shut-off valve at the bottom of the regulator to the ON position, which will mean it is facing downwards, or parallel to the regulator output barb and the air line attached to it. You will hear air entering the draft system when it's turned on. Check out our Video Guide to Regulators to learn the ins and outs of this vital part of your draft system.
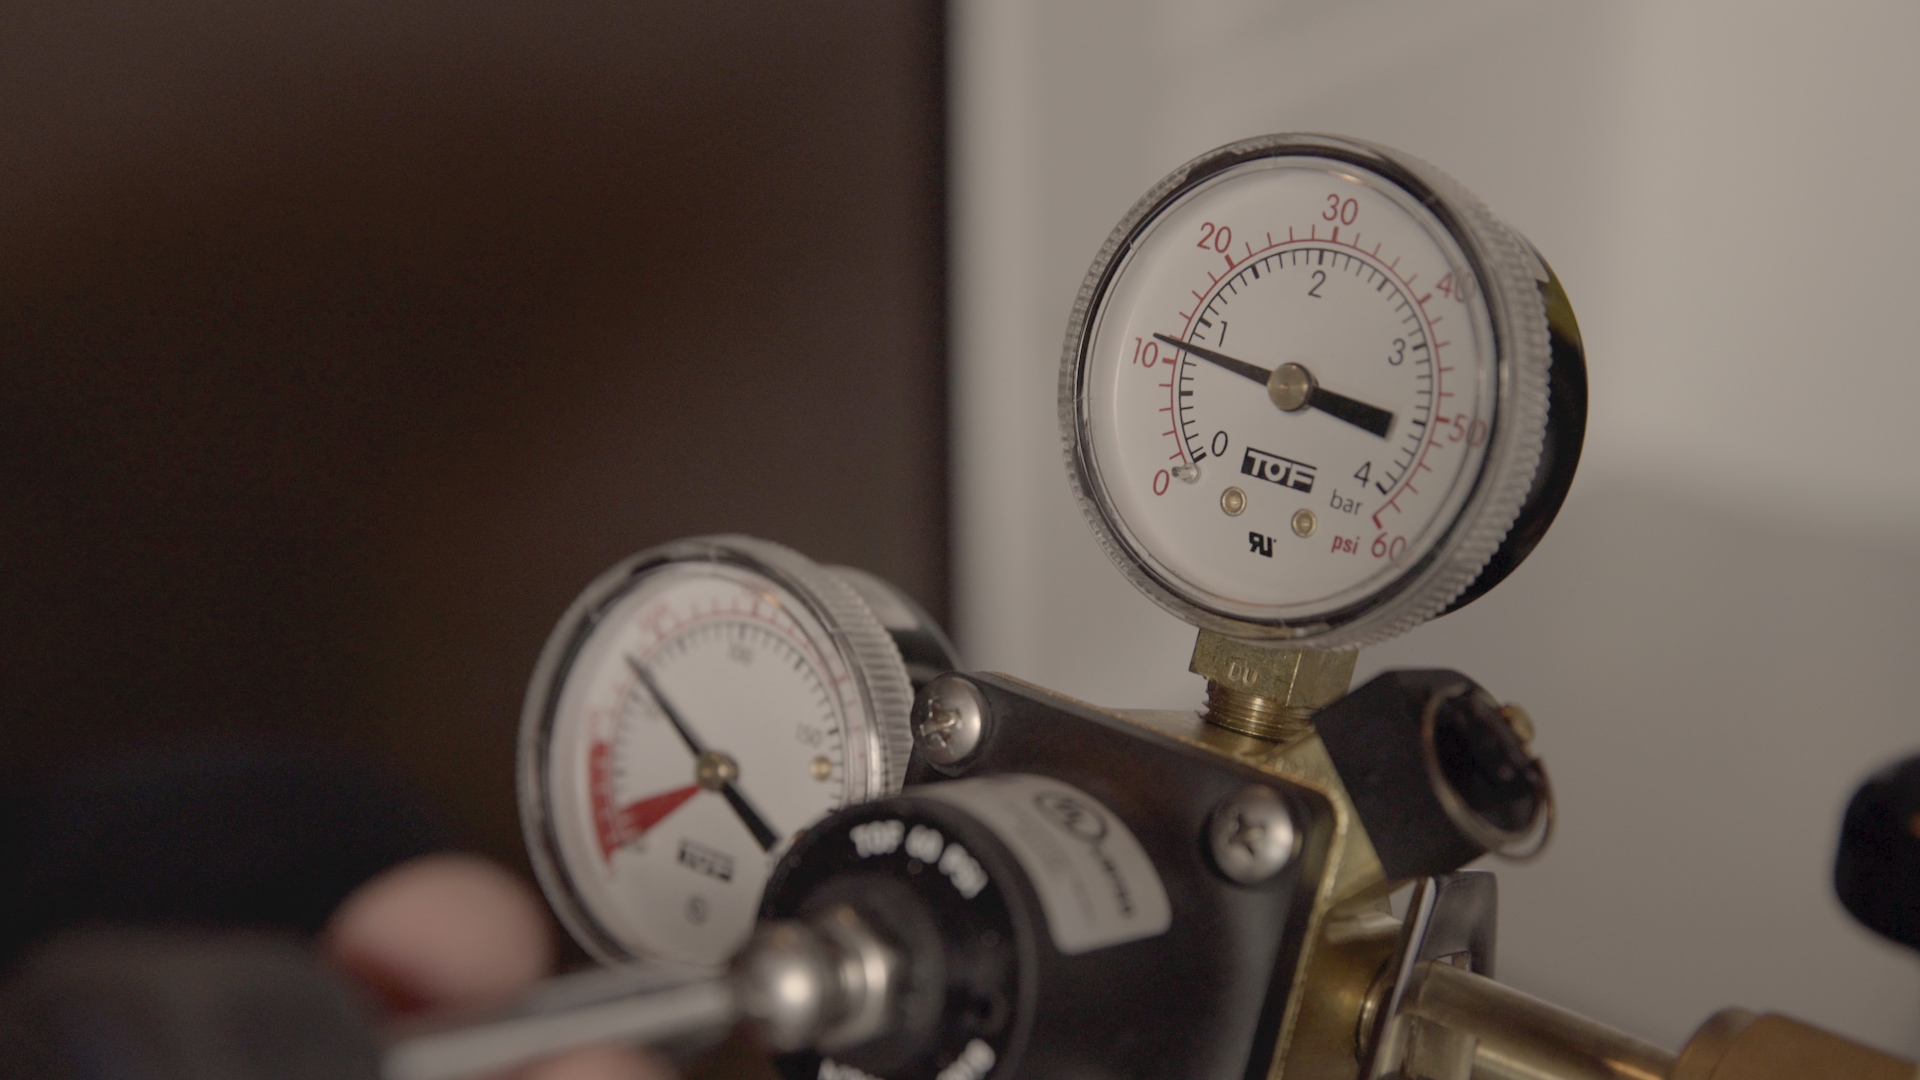
Step 11: Adjust the regulator to proper PSI level.
Turning the pressure adjustment with a flathead screwdriver will move the PSI level in your system upwards. Slowly adjust the pressure, which you will notice moving up on the 0-60 PSI low-pressure gauge. The 0-3000 high-pressure gauge will not be moving as you move the pressure adjuster, as this just measures the amount of compressed air remaining in the tank. The majority of CO2 beers are dispensed at around 12 PSI, and almost all CO2 beers are dispensed somewhere between 10-15 PSI. Having difficulty figuring out the right PSI? Check out our pressure guides based on the style of beer you’re serving and let us do the math for you to figure out the right pressure based on the length and diameter of your beer lines.
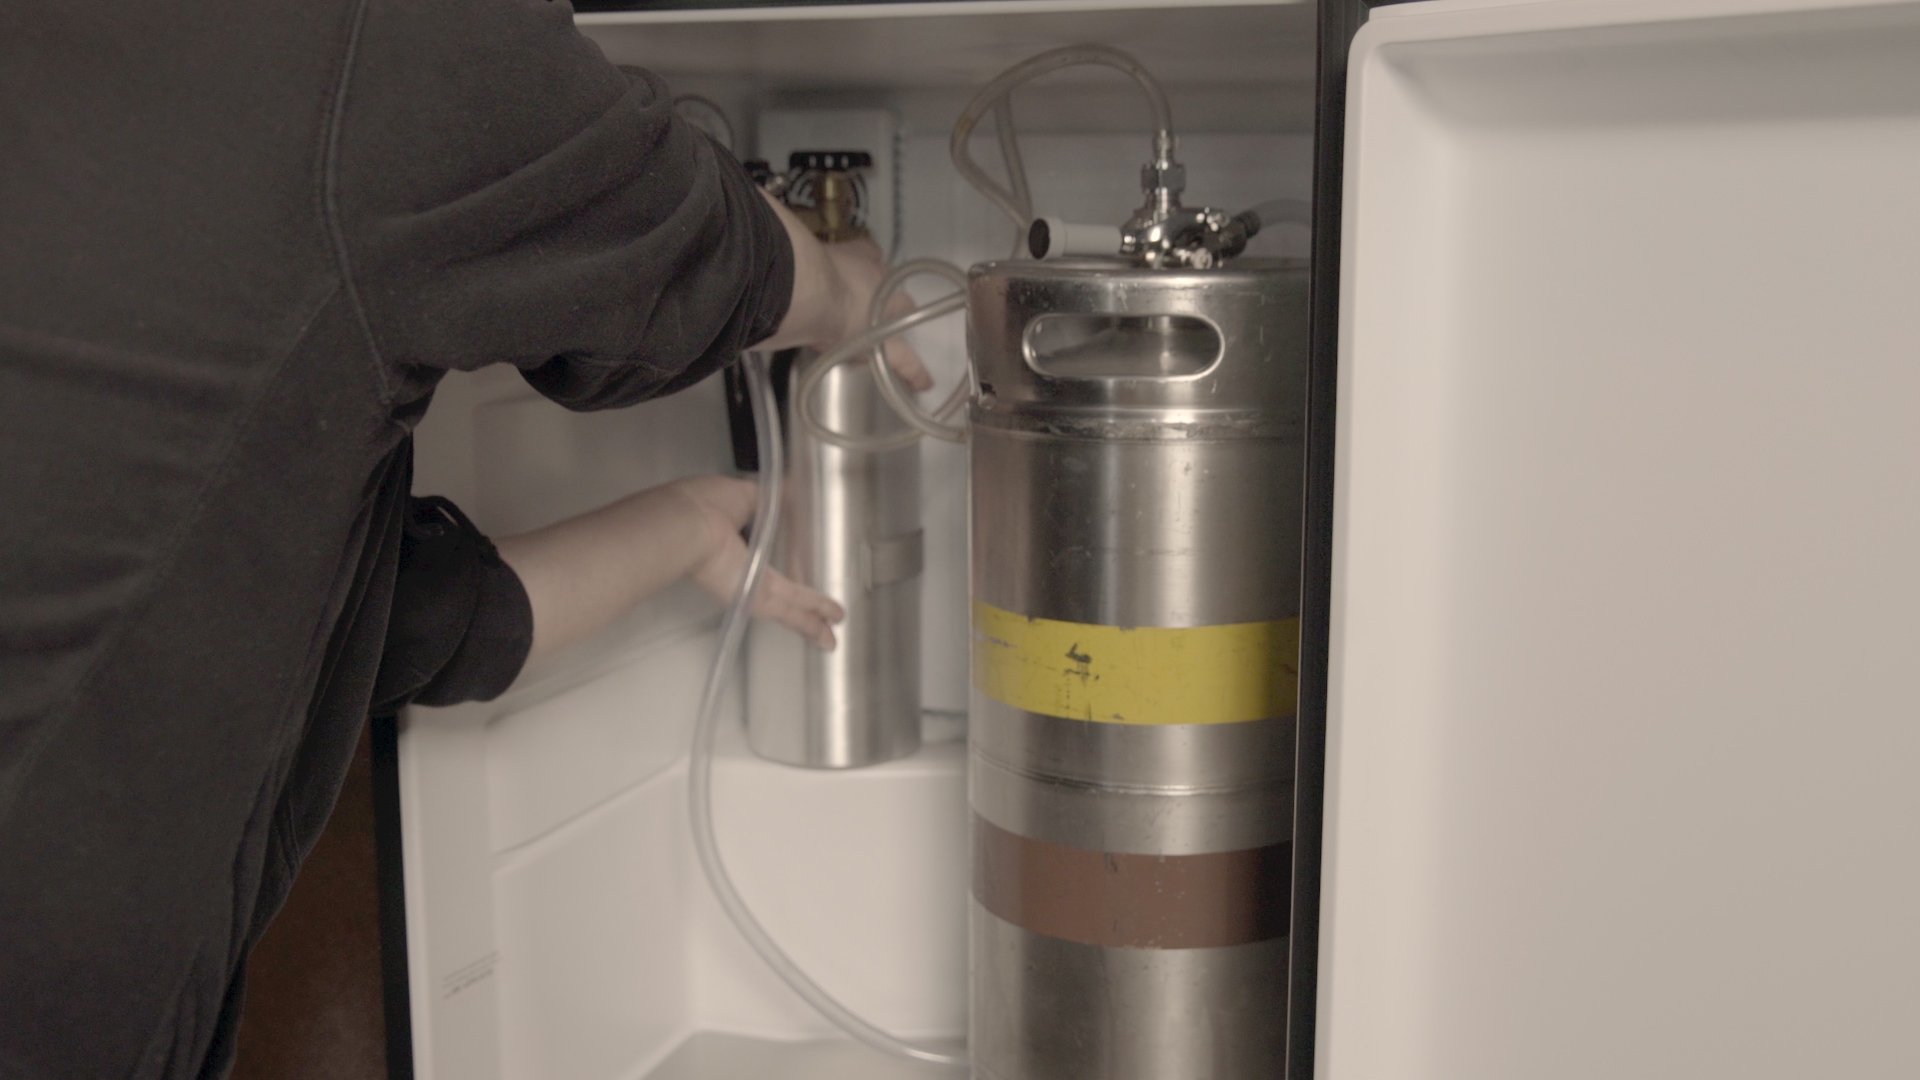
Step 12: Carefully place CO2 tank in kegerator fridge.
Remember, this is highly pressurized compressed gas in the tank, so be sure to handle to CO2 tank with care and place it in a spot where it will not tip over. Kegerator fridges typically include an air tank cylinder holder either outside or inside the fridge to secure the tank in place, so carefully attach your tank via the included tank holder.
Step 13: Set temperature.
To avoid foamy pours, set your kegerator at a temperature between 36° and 40°F. If you’re having trouble maintaining a cold pour, our Super Tower Cooler can help you maintain that temperature throughout the beer tower.

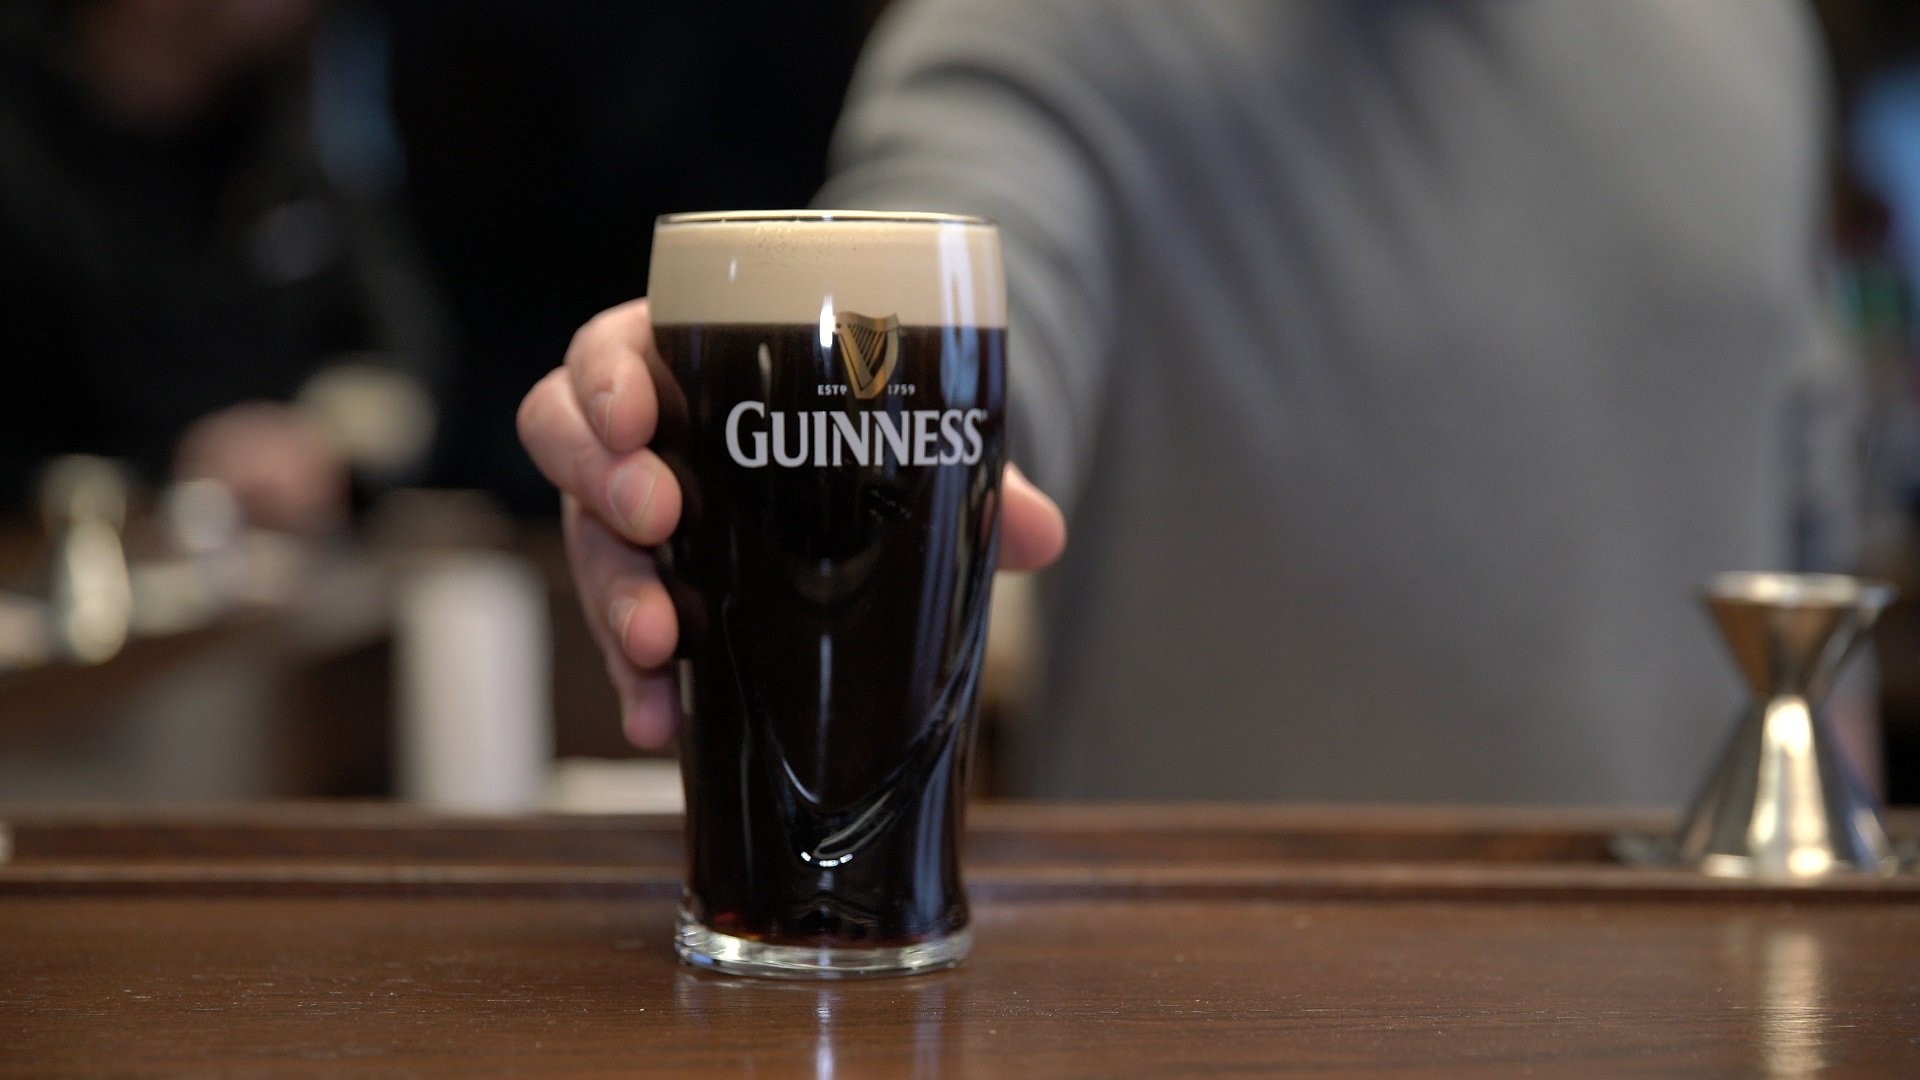
Step 14: Pour delicious beer!
Follow these steps, and you’ll soon complete your home bar with kegerator setup. Upon receiving your kit, it’s important that the initial kegerator assembly is done properly to avoid any problems or issues in pouring out delicious beer as soon as possible. If you’ve already set up your draft system and it isn’t functioning properly, be sure to check out our Draft Beer Troubleshooting Video Series.
Have your favorite beer on tap at all times without stepping foot outside. This setup will also work with large-batch cocktails. If you want to setup your kegerator for Nitro cold brew coffee, follow these same steps with a Nitrogen tank in place of a CO2 tank, a Nitrogen regulator, and a stout faucet. For kombucha or wine on tap, use barrier lines instead of vinyl lines. Cheers!
Download Instructions
Looking to shop kegerators?
There is a wide variety of kegerators depending on the setup you're looking for. Check out our Kegerator Buying Guide to find out which one is right for you. Already have an extra fridge on hand? Then you'll want to look at kegerator conversion kits. If you're going that route, check out our how-to video on installing a kegerator conversion kit here!
Leave a Comment