KegWorks Homepage
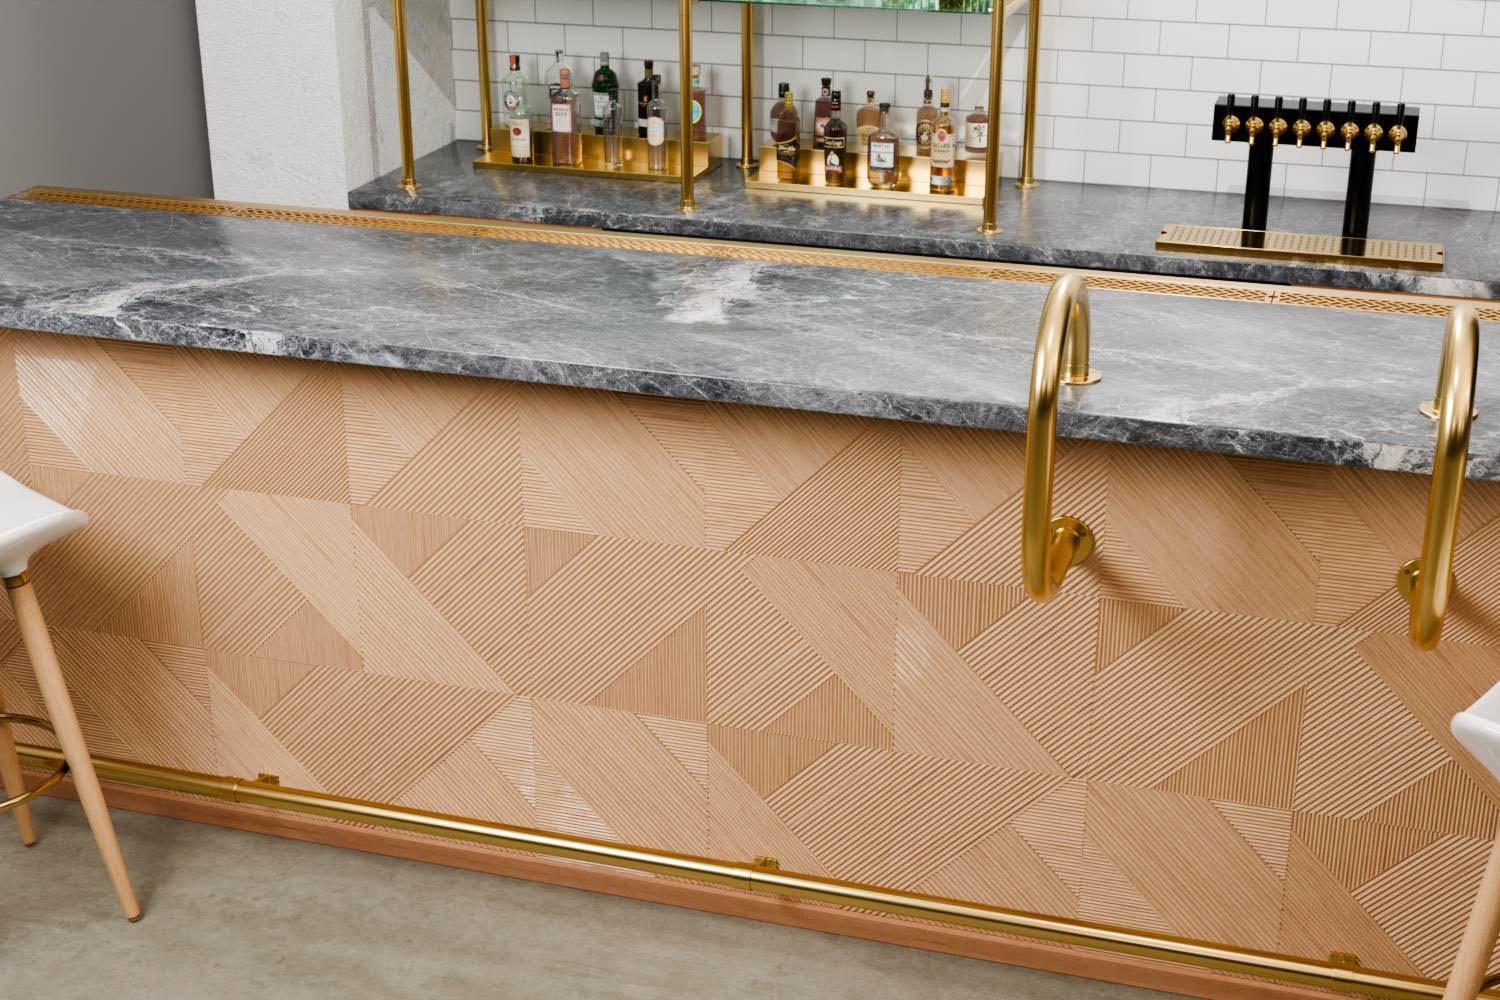
There is nothing like pulling a stool up to a well-designed and well-built bar. Few accessories can take your bar to the level of authenticity and comfort that bar foot rails can. Whether you’re building a home bar or a commercial establishment, foot rails add a touch of class that makes an ordinary bar extraordinary, and with Kegworks, they’re easy to order and install.

Table of Contents
What is Bar Foot Rail?
A bar foot rail is a horizontal bar installed at the base of a bar counter. It provides a comfortable place for patrons to rest their feet while standing at the bar or sitting on bar stools. The foot rail adds an element of comfort and enhances the overall aesthetic of the bar, giving it a polished and inviting look.
Bar Foot Rail Components
All bar foot rail projects will require three main components (tubing, brackets & end caps). Some installations may require as many as six components to complete the bar foot rail system. The size and shape of your bar will dictate the components you need:
Required Components
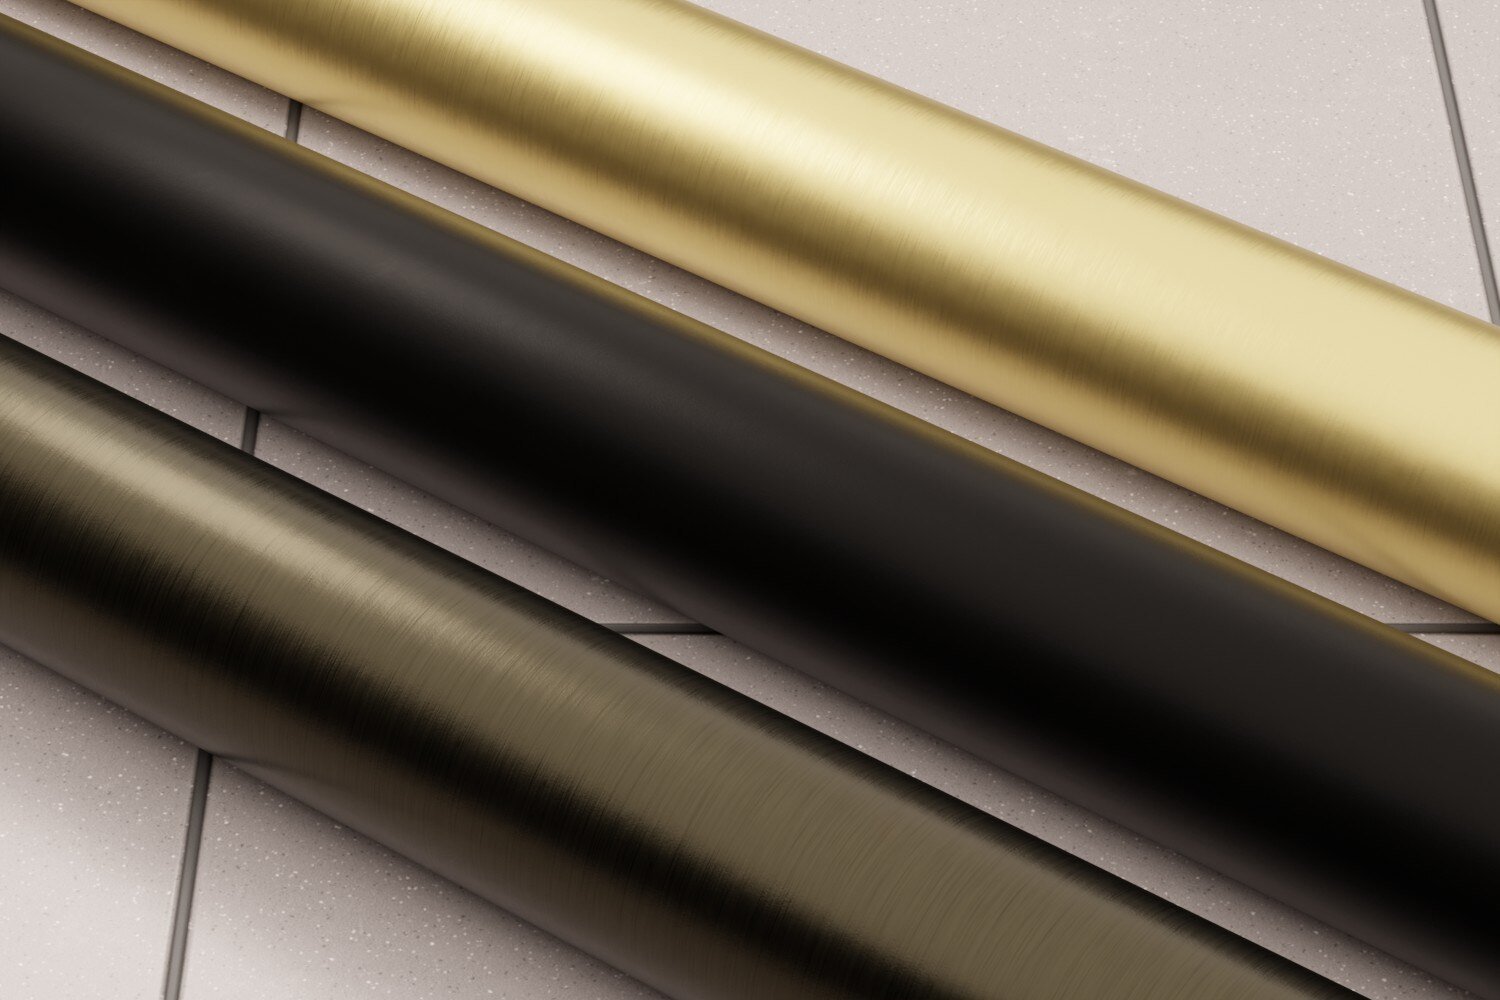
- Tubing: The bones of your foot rail project; tubing is the metal rail that serves as your footrest. At Kegworks, we offer a variety of tubing options to suit different styles and applications, ensuring durability and seamless integration into your bar design.
Kegworks carries 2” outside diameter (OD) tubing in brass and finished stainless steel, making it an ideal choice for both commercial and residential bar foot rails. This industry-standard size provides a polished, substantial look and is compatible with professional-grade brackets and components, ensuring easy installation and long-term strength. Its durability makes it especially suited for high-traffic environments.
For those seeking a more industrial-inspired aesthetic, we also offer 2” inner diameter (ID) black iron pipe and matching components, adding a rugged, utilitarian touch to your bar.
If you're designing a more modern or minimalist space, 1.5” OD square tubing is a great alternative. Available in Matte Black, Gunmetal Grey, and Brushed Brass, this style delivers a contemporary edge while maintaining the functionality of a traditional foot rail.
To ensure a perfect fit, Kegworks offers foot rail tubing in 2’, 4’, 6’, and 8’ sections, which you can cut to match your project’s exact specifications. We also provide custom bending services, allowing us to craft precision-curved foot rails for bars of any size or design. - Brackets: Bar foot rail brackets connect your tubing to your bar and/or the floor. There are a variety of options to match the look and setup you’re trying to achieve. Kegworks also offers custom brackets for unique installations. Custom brackets are fabricated to meet your project’s specifications, and then we apply the finish of your choosing to them.
- End caps: End caps attach to the end of the foot rail tubing to provide a finished look for your project.
Pro Tip: Bar Foot Rail Kits come with everything you need if you’re planning a straight run of foot rail. Kits are available in 6’ and 8’ lengths and include the required tubing, brackets, and end caps.
Optional Components
- Elbows: Elbows connect foot rail sections at a corner joint. They are available in 90-degree and 45/135-degree angles and adjustable fittings.
- Splicing sleeves: Splicing sleeves go on the inside of your bar rail tubing to connect two pieces when you need bar rail longer than 8 feet to fit your bar’s dimensions.
- Wall flanges: Wall flanges are needed when the end of the foot rail tubing meets a wall or any other flat surface.
Architectural Metal Additions For Bars
- Drink Rail: Drink rails attach to the interior of your bar and provide an area for servers to prepare drinks without having to worry about spills collecting on the bar top. They are mainly constructed from stainless steel and can have a drain installed to dispel spilled liquids. This is a must for commercial establishments and a nice add-on for home bars.
- Service Bar Rail: A perfect addition for any commercial bar project, service bar rail clears a space along your bar for servers to place and pick up drink orders without patrons' interference. It mounts easily to your bar and is available in finishes to match your project.
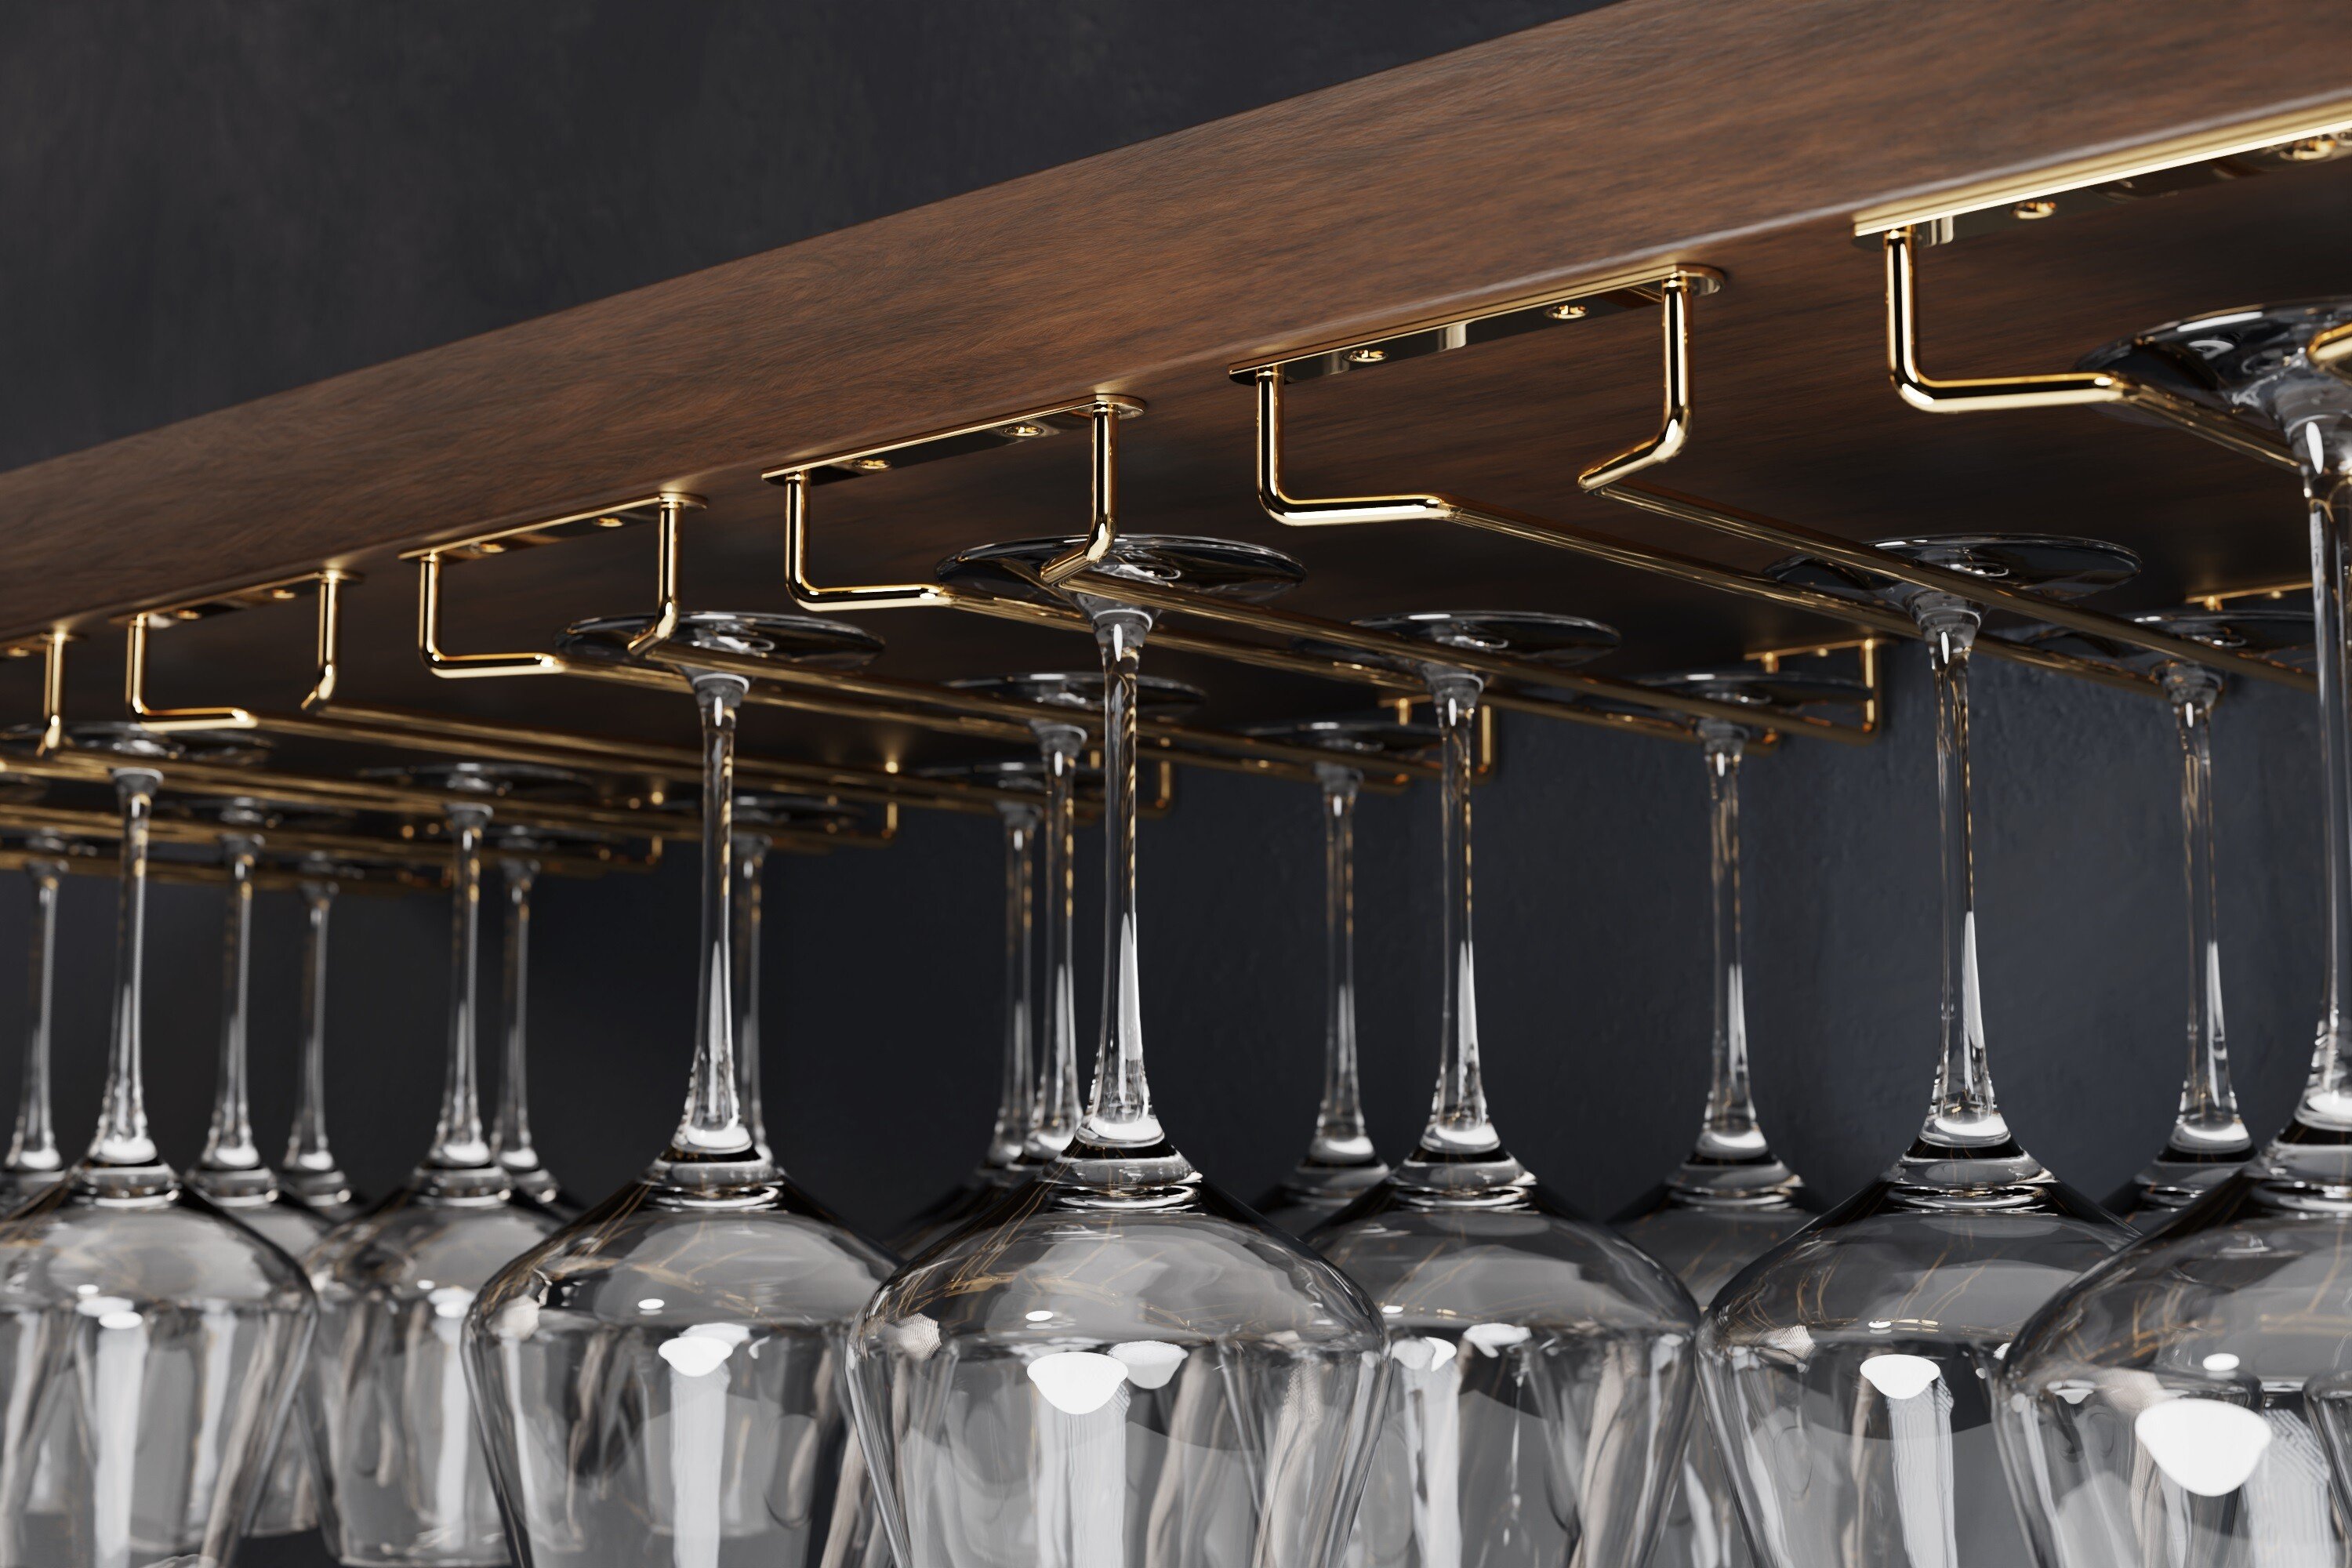
- Bar Shelving: Construct bistro-style brass pipe bar shelving to add stylish and functional storage for liquor bottles, glassware, and bar essentials to any bar area. This helps keep bar areas organized and improves the aesthetic of both commercial and home bars.
Each of these elements can be finished to match your bar foot rail, creating a cohesive and polished look. Whether you're designing a home bar or a commercial establishment, these details add durability, convenience, and a professional touch to your space.
Ordering Bar Foot Rail
Planning is essential to ensure you purchase the correct components for your foot rail. Remember that you will need at least three main components: tubing, brackets, and end caps. Depending on your bar's layout, you may also need splicing sleeves, elbows, or wall flanges.
Here are simple steps to take before you order to ensure that you get precisely what you will need for the perfect foot rail system.
How much bar rail tubing do you need?
You should measure very carefully before ordering tubing for your foot rail project. First, make a simple sketch by measuring each side of the bar that will have foot rail.
It’s helpful to make a virtual rail on the floor around your bar with string or painter’s tape; doing this will help you visualize how much space you’ll need for your foot rail.
Once you have laid out your design on the floor, measure each section to calculate the tubing you need. Tubing is sold in 2’, 4’, 6’ and 8’ lengths. If your bar is longer than 8’, you must join two pieces of tubing together to make a rail that fits your bar. Connecting the pieces is easy with a splicing sleeve, an internal connector that you insert into the end of each tube.
Pro Tip: Keep your tubing sections symmetrical when splicing together for stronger support and aesthetic appeal.
Measuring for corners
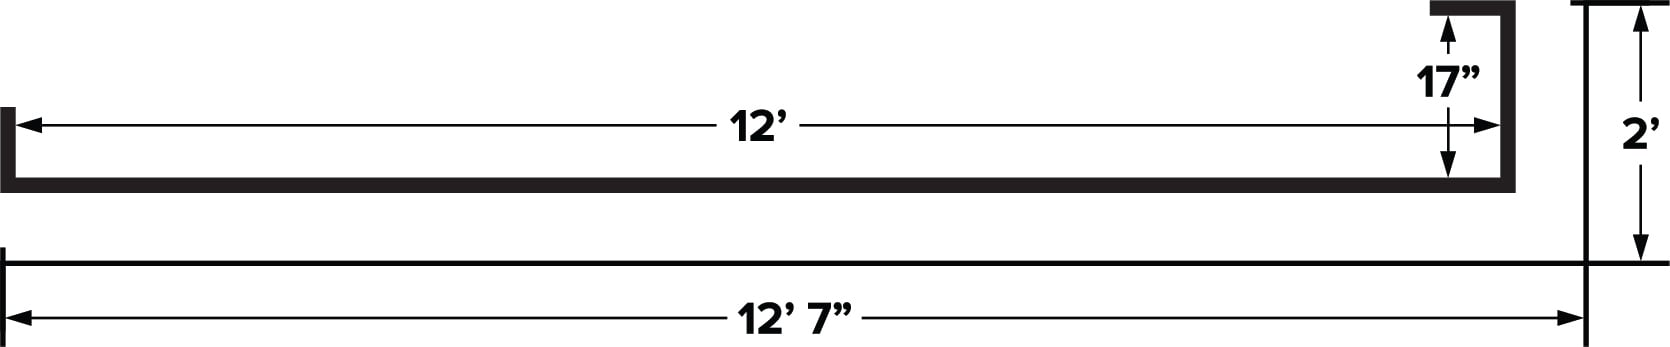
If your foot rail plans include turning a corner, you must factor in brackets and elbow fittings. To accurately measure foot rail tubing that will turn a corner, add the depth of the bracket minus the dimensions of the elbow you will be using. For example, if you select a bracket that holds the rail 6 inches from the face of the bar, that bracket will add nearly 6 inches to the overall length of the rail you will need. (6’ section of bar + 6” bracket depth - 3” elbow fitting size = 6’ 3” section of tubing needed)
Round up your measurement
When ordering tubing, it’s always wise to round up to the nearest foot. If your bar is not a full foot increment (i.e., 6′, 7′) but rather has some inch increment (i.e., 6’2″, 7’2″), you will need to order up to the next foot. So if your bar is 3’2″, you must order a 4-foot piece of tubing. If your bar is 7’2″, you must order an 8-foot piece of tubing, and so on. When installing your tubing, you must cut the rail with a saw. It’s much easier (and cheaper) to cut off excess tubing than it is to connect more.
How many bar rail brackets do you need?
You must install brackets to hold the tubing in place to support your foot rail. To ensure your foot rail has the right support, you’ll need a bracket 2-6 inches from the end of your tubing or elbow and an additional bracket for every 3-4 feet of tubing. For example, if you have 8 feet of tubing, you’ll need one bracket on each end and one in the center, for a total of three brackets.
Choosing your bracket style
Now is an excellent time to ensure your bar face and floor surface can support the brackets you want for your project. Combination brackets are the most popular option because they are relatively easy to install. A combo bracket is attached to the face of the bar, with the foot resting on the floor for support.
For those who want to use bar-mounted brackets, make sure you can access the back of the die face to secure it properly. To ensure adequate support, you may need to add depth to the face of your bar to support the weight of the rear bolt. It requires a solid backing at least ¾” deep.
Floor mounted brackets as well as rounded center post brackets (both standard and tall) give you the option to install bar foot rail without having to screw hardware into the face of the bar. Just ensure you can safely drill into the surface under the bracket to secure it properly.
Bracket Styles:
- Bar mount brackets
- Combination brackets
- Floor mount brackets
- 90-degree brackets
- Center post brackets
- Rounded center post brackets
- Tall rounded center post brackets
Consult our Bar Foot Rail Brackets Guide to learn about the look, height, and function of the many bracket styles we offer. Select brackets that best complement the look and feel of your bar. Most customers will order brackets in a finish that matches their bar rail, but you can also choose a contrasting finish to add a unique touch to your project.
What height and distance do you install bar foot rail brackets?
Bar foot rail typically sits 6-8” from the ground, depending on the style of bar rail brackets used. You can go higher to accommodate the height of your bar stools or countertop. We recommend using bar mounted brackets or ordering custom bar rail brackets for installations requiring a height greater than 8”.
While brackets that mount to the bar face create a fixed distance away from the bar that your foot rail can be installed, there is a bracket option that allows you some flexibility. Rounded center post brackets mount strictly to the floor, which allows you to choose how far from the bar you set up your bar rail. We recommend installing center post brackets 6” from the bar, but you can install them either farther away or closer as needed.
What other components do I need for my bar rail project?
Once you have sketched out the layout for your bar rail and determined how much tubing you will need, you should jot down the quantity and style of any other components you will need to complete your project.
A detailed list of the number of brackets, splicing sleeves, end caps, flanges, and/or elbows you’ll need for your project, including size, style, and/or finish, will be a huge help when ordering.
End Caps & Flanges
For a standard bar rail install, you will need two end caps, one for each end of the tubing. Depending on your taste or project specs, you can choose from domed, flush, or decorative end caps.
If you’re looking to use metal end caps with a wooden rail, just make sure to select end caps marked as “external fittings.” External fittings are components that fit around the outer diameter of the tubing, and since wooden rails are solid, your end caps need to fit around the wood.
If your bar area butts up to an adjacent wall, you can use wall flanges instead of end caps to secure the ends of your foot rail.
Elbows
For bar areas that are L-shaped or have multiple corners, elbow fittings will be needed to wrap the bar rail around a corner and connect the separate runs of tubing. Depending on the layout of your bar, you can choose from either 90 or 45/135-degree angle fittings or adjustable elbow fittings.
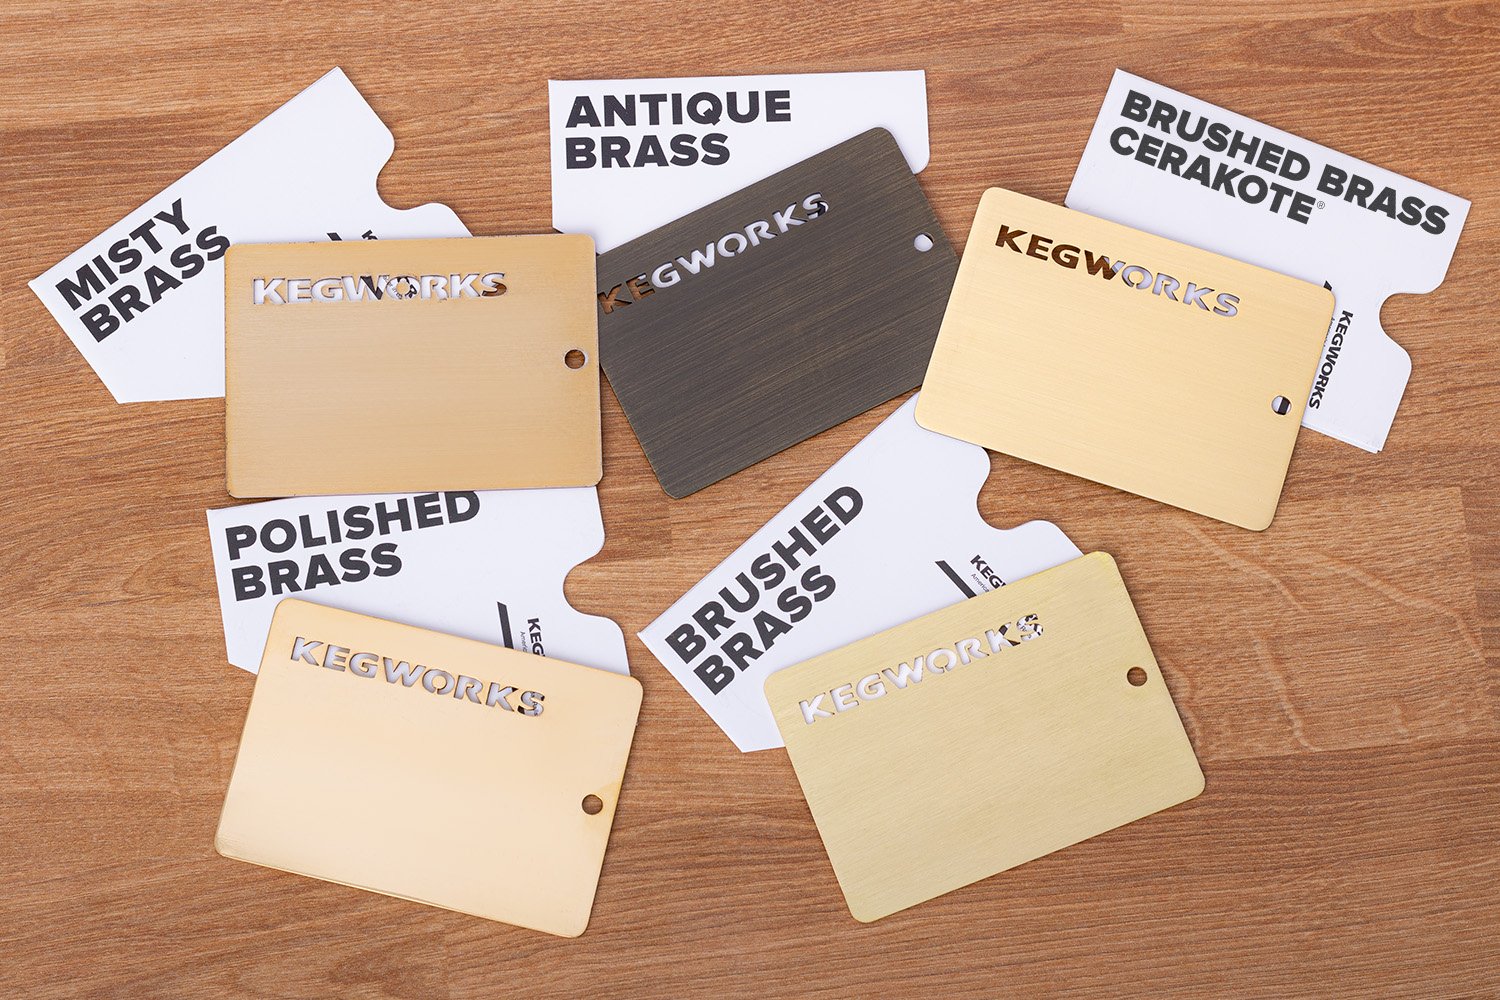
Selecting a bar foot rail finish
This is the most fun step. Choose a finish you like based on its look and one you are willing to perform the required amount of maintenance on. Some finishes are easier to maintain than others. Check out our Bar Rail Maintenance Guide to learn more about caring for the different finishes we offer.
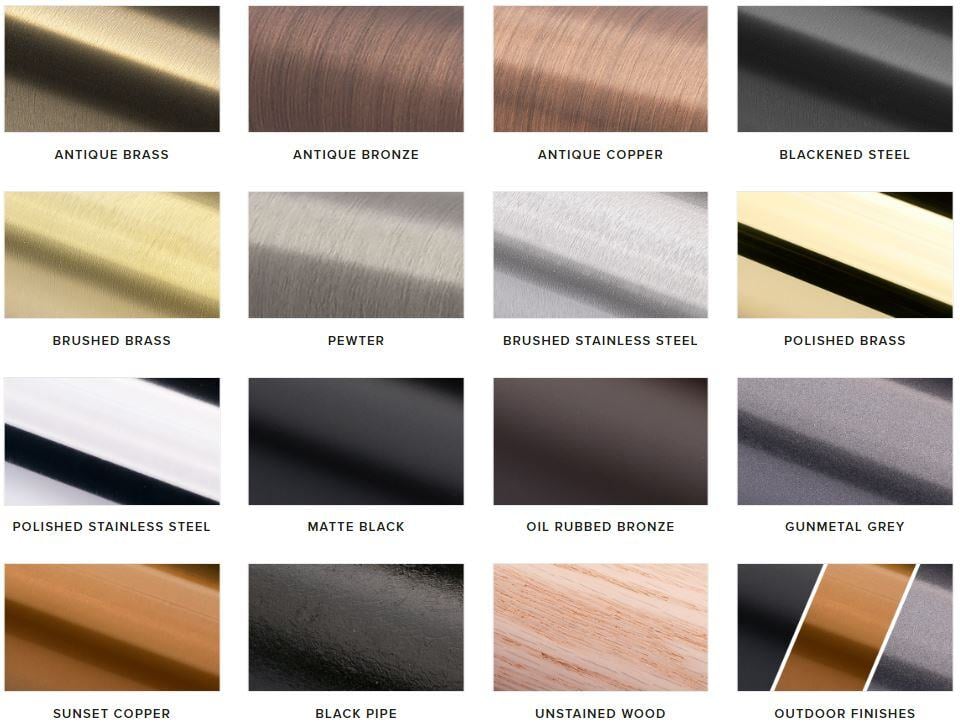
If you plan on installing your bar foot rail outdoors, choose a finish designed to withstand the elements. You can also choose to have our other finishes protected by a clear coat. This will allow you to maintain your bar rail’s shine over time, even if it is used for an outdoor bar.
In addition to our standard finish options, we also offer custom finishes. If you provide us with a sample of your desired finish or color, we can finish all of your tubing and components to match.
Example Bar Foot Rail Layouts
Based on the steps outlined above, let’s examine a few common examples of what you’d need to install foot rails on different bar layouts.
6’ Bar Foot Rail - Straight Bar
- (1) 6-foot bar rail tube
- (3) brackets
- (2) end caps
10’ Bar Foot Rail - Straight Bar
- (3) 4-foot bar rail tubes (two tubes will be cut down to 3’)
- (2) splicing sleeves
- (4) brackets
- (2) end caps
12’ Bar Foot Rail - Straight Bar
- (2) 6-foot bar rail tubes
- (1) splicing sleeve
- (5) brackets
- (2) end caps
10’ x 4’ Bar Foot Rail - L-shaped Bar
- (4) 4-foot bar rail tubes (two tubes will be cut down to 3’)
- (2) - splicing sleeves
- (6) - brackets
- (1) - elbow fitting
- (2) - end caps
4’ x 10 x 4’ Bar Foot Rail - U-shaped Bar
- (5) 4-foot bar rail tubes (two tubes will be cut down to 3’)
- (2) splicing sleeves
- (8) brackets
- (2) elbow fittings
- (2) end caps
How To Install Bar Foot Rail
Tools Needed For Installing Bar Foot Rail
- Electric Drill/Electric Screwdriver
- Saw - See instructions for type of saw needed for tubing material
- Phillips Screwdriver
- Metal file - For smoothing out cut tubing edges
- Channel Lock Pliers
- Adhesive for elbows and end caps

Pro Tip: Preparation is key when installing bar foot rails. A little bit of prep will eliminate waste and/or mistakes. Protect your tubing from scratches and dings during installation. If your tubing arrives wrapped in a layer of plastic film, keep this covering in place as long as possible to help protect it.
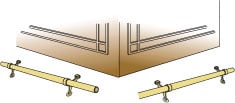
Step 1: Cutting Tubing (optional)

You may have to adjust the length of the tubing you purchase to make it the perfect size for your bar. You must make those adjustments before assembling your system. To do this, first, measure and mark where you will need to cut your tubing. When determining tube cut lengths, keep in mind that the splicing joints should be hidden within a bracket. Keep your sections of tubing symmetrical when splicing together for stronger support and better aesthetic appeal. Make sure that you double-check all of your measurements before you cut.
Cutting Brass Tubing:
- You can use either a hacksaw or a powered radial arm saw to cut brass tubing.
- It is very important that your cuts be square to the length of the tube.
- If you use a hacksaw, use a miter box to be sure your cuts are straight.
- If you are using a powered radial saw arm, use a fine-toothed blade or an abrasive wheel.
- After cutting the rail, file it to smooth the edge.
Cutting Stainless Steel Tubing:
- Stainless steel is a harder alloy than brass, so you’ll want to use a powered radial arm saw with a carbide tip blade for stainless steel tubing.
- It is very important that your cuts be square to the length of the tube.
- After cutting the rail, file it to smooth the edge.
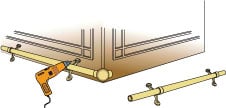
Step 2: Loosely Assemble Foot Rail
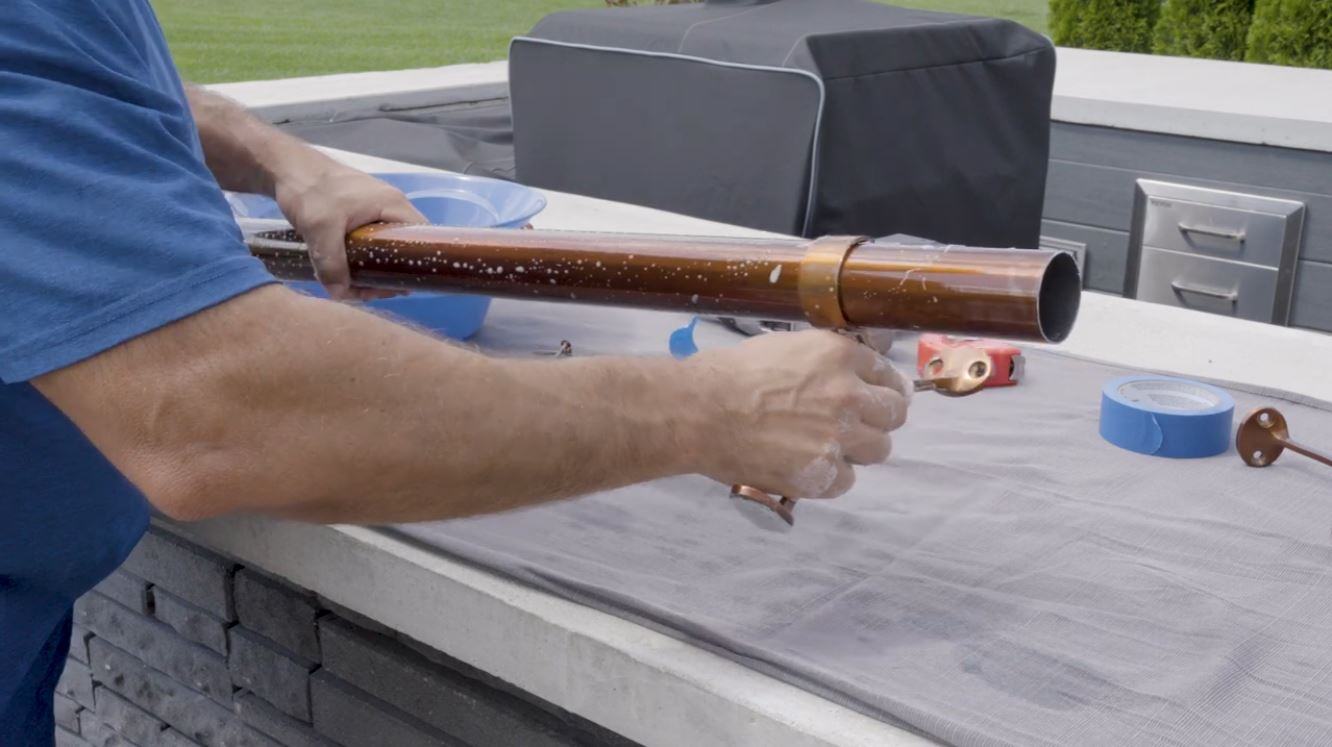
Once your tubing is the ideal length, loosely assemble the foot rail by applying soapy water with rag or a water-based lubricant and sliding the tubing through the brackets. It’s important to do this before splicing so you don't have to slide brackets down a long length of tubing.
Pro tip: Make sure the openings of your brackets are clean and smooth to avoid scratches when sliding them into place.
Don’t get too excited and get ahead of yourself, you don’t want to attach tubing to the brackets with set screws, or attach the brackets to the wall just yet.
Step 3: Splice Tubes Together (optional)
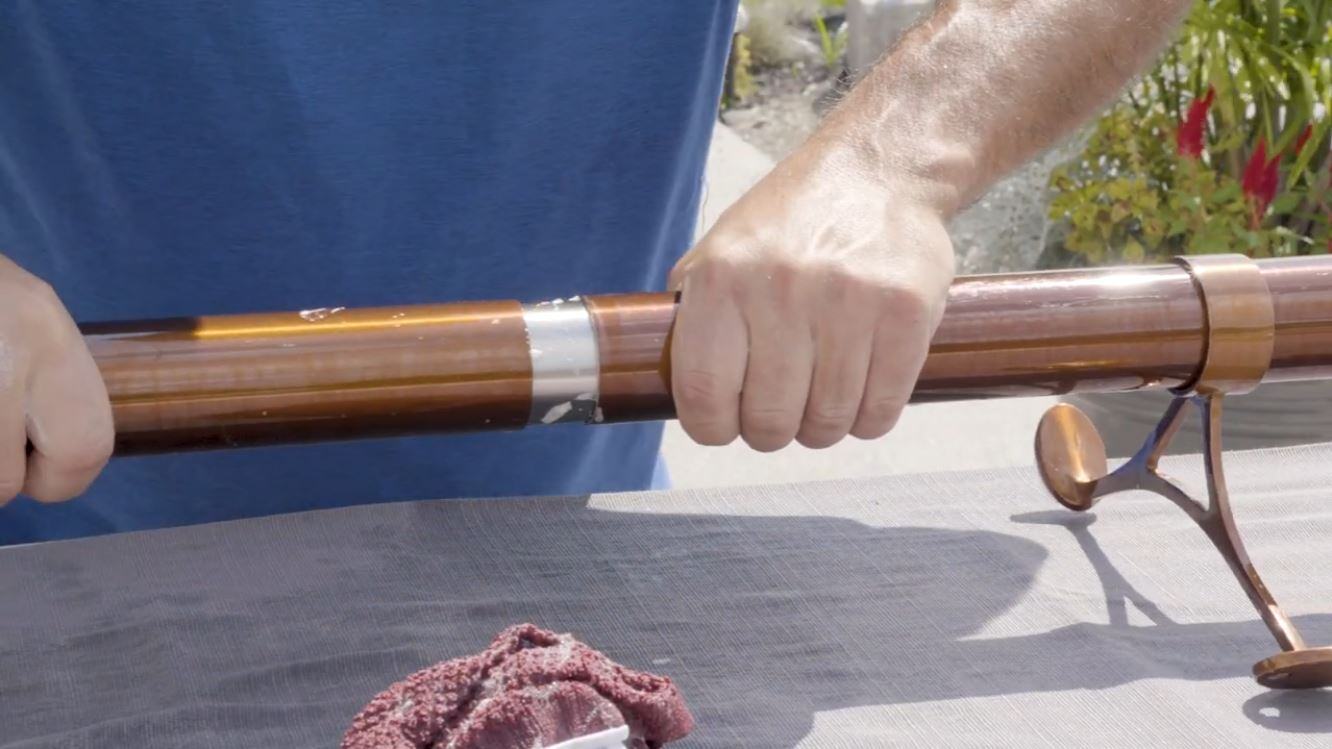
To join two pieces of tubing together, you will need to insert internal connectors called splicing sleeves. These metal pieces are inserted into the end of each tube. To insert a splice into a tube, compress the splice with a pair of channel lock pliers and push it into the end of the first piece of tubing. Then, do the same with the other end of the splice and insert it into the second piece of tubing that you want to connect. Using soapy water will make it easier to slide the tubes onto the splice.
A best practice is to place your brackets where tubes are spliced together. This provides added stability and strength to your foot rail and a neater look where the joints are concealed by your bracket.
Step 4: Mark Where Your Brackets Will Go
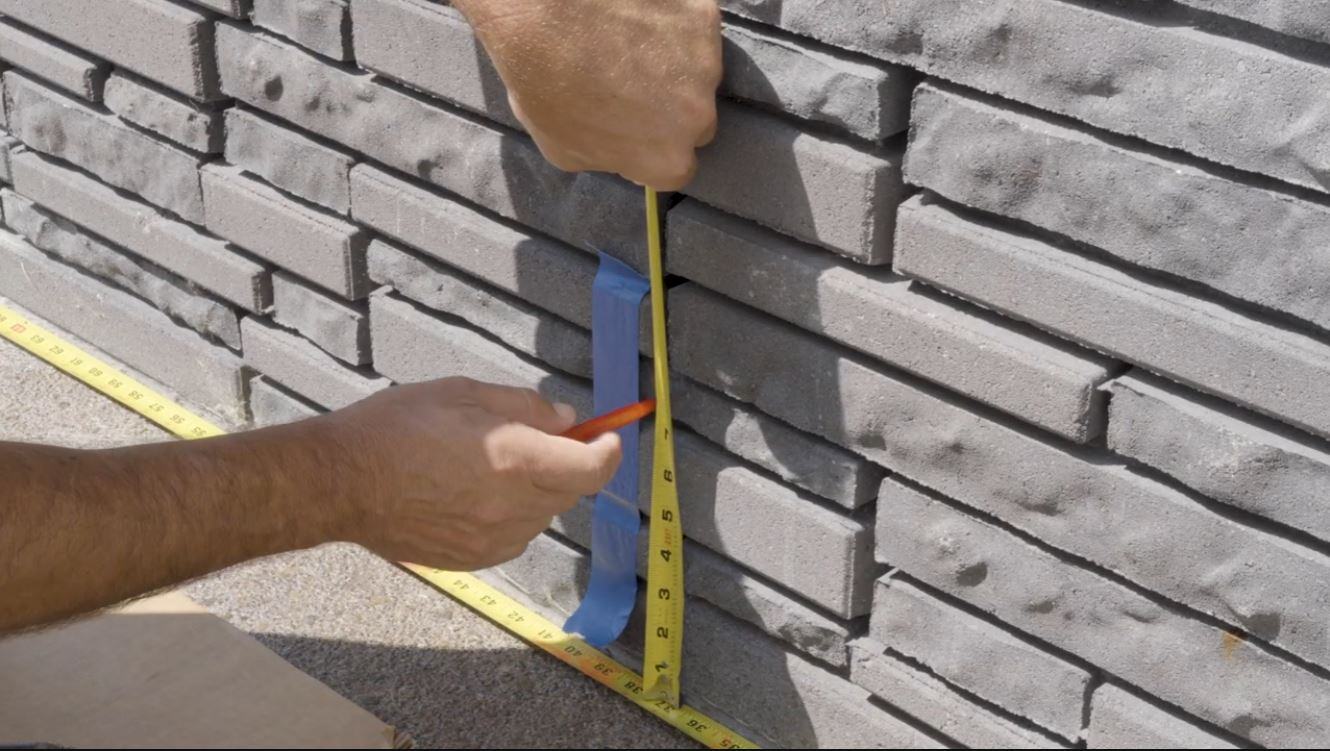
Use a pencil to mark where your brackets will go on the bar face. To ensure a level and stable foot rail, you’ll need a bracket 2-6 inches from the end of your tubing or elbow and an additional bracket every 3-4 feet thereafter. For example, if you are installing an 8’ run of bar rail, you’ll need one bracket on each end and one in the center, for a total of three brackets.
To hold the screws in place, the bracket requires a solid backing at least 3/4-inch deep. Now is a good time to double-check that your bar can support the brackets (if you didn’t check when you originally ordered them).
If you are using a wall to secure your bracket, finding a wall stud for mounting is ideal. If studs aren’t possible, you can use a wall anchor instead; however, it is important to determine the correct size and type that you need.
Should you require wall anchors, we suggest a trip to your local hardware store. Wall anchors come in a variety of sizes and types. The professionals at the hardware store should be able to answer any questions that you might have regarding the best wall anchor for your job.
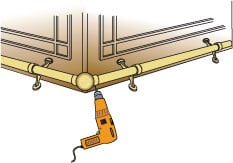
Step 5: Install & Secure Brackets
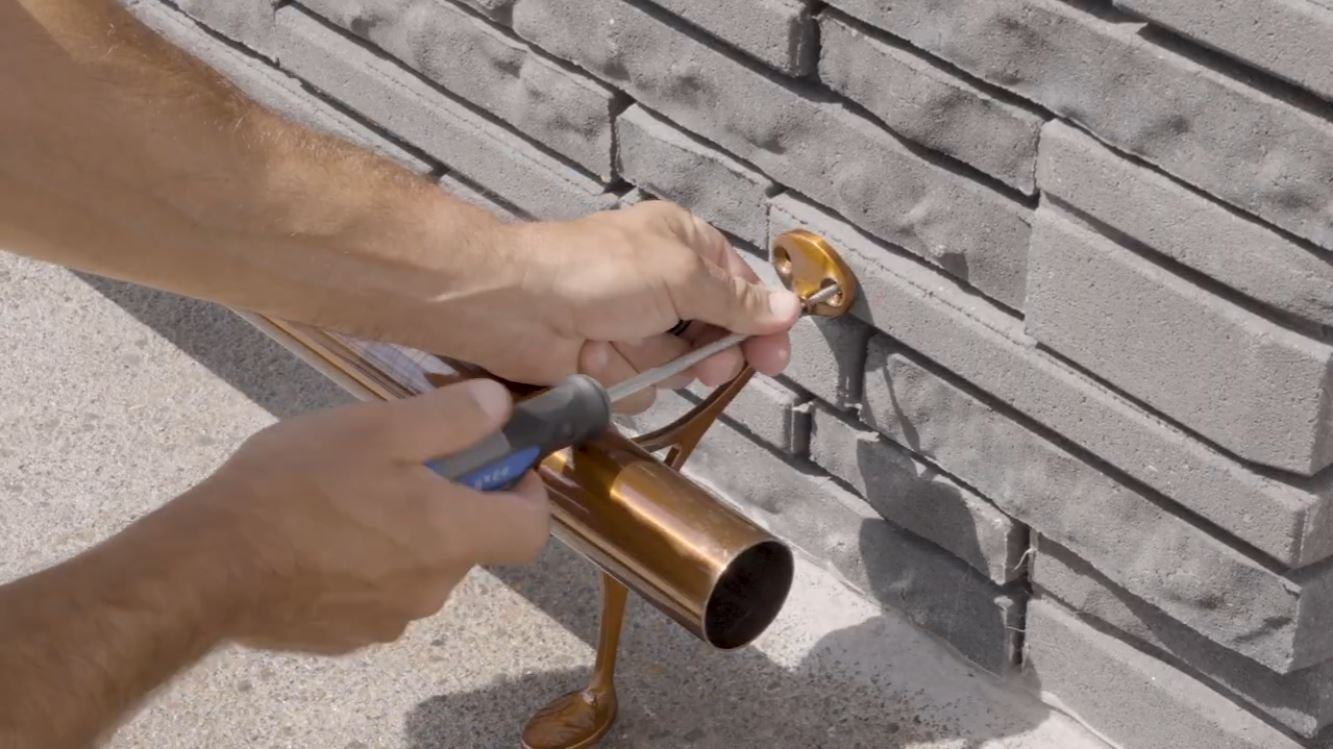
Once you are comfortable with the placement of your brackets and rails, you’re ready to attach them to your bar or wall. Start by pre-drilling all the holes in your bar and floor (if applicable).
Once all of your pilot holes are drilled, attach the brackets to the wall and floor with mounting screws along the first straight section of your bar, leaving a little wiggle room to adjust as you go. Once all the mounting screws are in place, tighten them to ensure your bar foot rail is properly secure.
Pro Tip: If you’re using a wall flange in place of a support bracket, slide the flange onto the tube before securing that section of foot rail to the bar. Remember that you can only replace a support bracket with a flange if the flange is mounted to a solid backing.
Step 6: Secure Tubing To Brackets
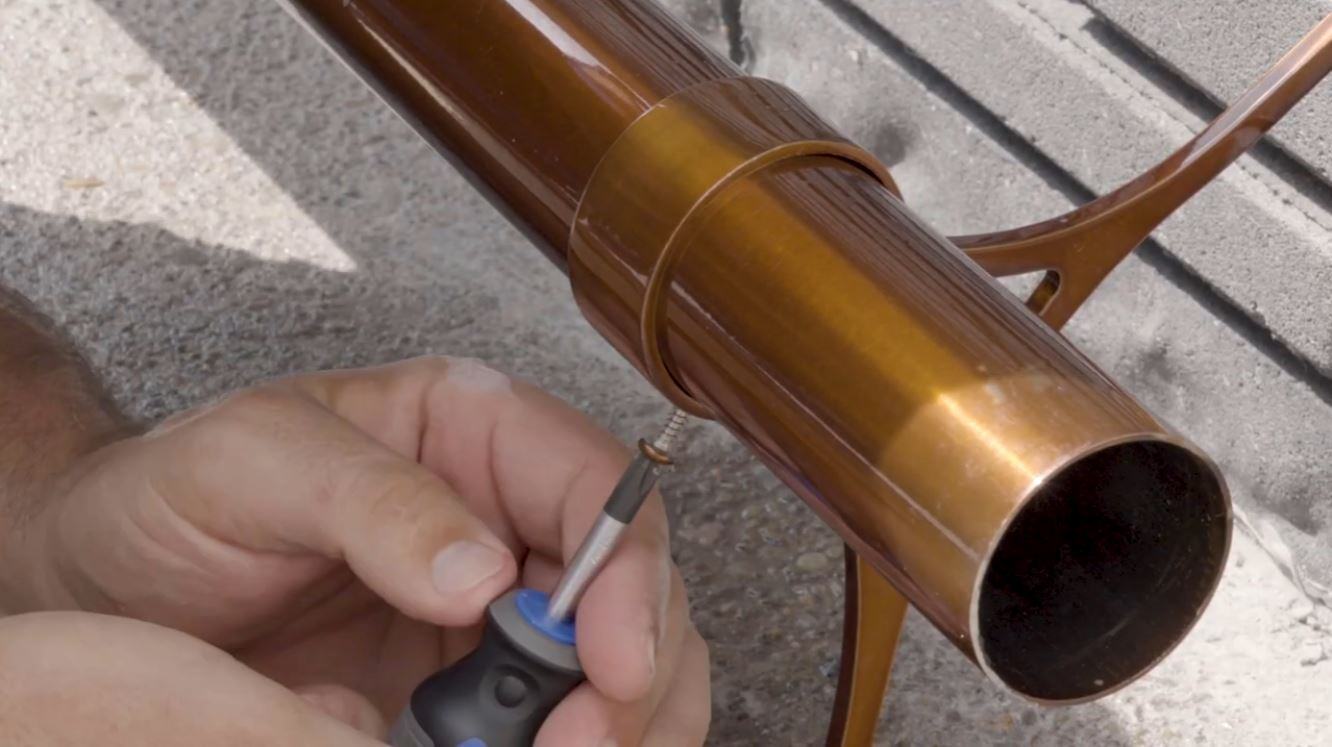
Secure the loose tubing to the brackets with set screws. We’re all about convenience here at Kegworks, so when you buy foot rail components from us, the set screws that come with them are self-drilling/self-tapping. For added convenience, you may want to pre-drill any necessary holes for set screws before mounting brackets to the bar, depending on the amount of room you have to work with.
Step 7: Install Elbows
If you're installing your rail around a corner, you'll need to attach the elbow to the installed foot rail securely. Then, attach the second loosely assembled foot rail section to the elbow.
Step 8: Attach End Caps
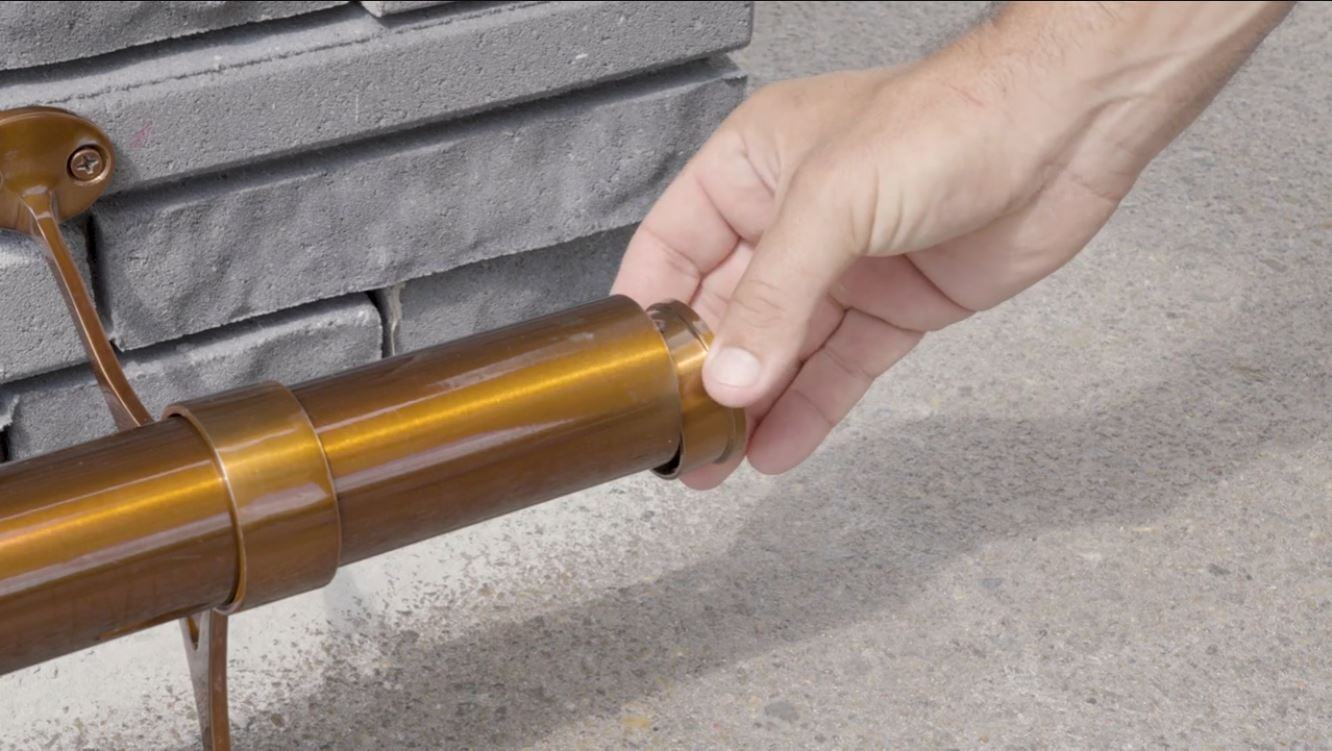
Bar foot rail end caps are designed to fit loosely to allow room for error during the manufacturing process. To attach bar foot rail endcaps, simply slide the end cap into the end of the tubing. We recommend coating the inside of the end of your tubing with an adhesive, such as Loctite Red or JB Weld SuperWeld, before inserting the end caps for a permanent bond. You can also wrap the stem of the end cap with masking tape or electrical tape several times before sliding it into the tubing for a snug fit.
And there you have it! Your bar now has a classy and comfortable foot rail installed for you to enjoy. Now, take a step back, pour yourself a drink, and admire your handiwork!
Maintaining Your Bar Foot Rail
Depending on the type of metal and finish, there are different ways to care for and clean your foot rail. Using improper cleaning methods or products may damage the finish. To keep your bar rail looking as good as it did when first installed, read our cleaning and maintaining bar rail for proper cleaning techniques for every type of bar rail finish.
Kegworks
Kegworks has been transforming hospitality spaces since 1998 with expertly crafted architectural metalwork and professional draft beer equipment, helping designers, architects, and bar professionals bring their visions to life.Comments
Anne
June 26, 2015, 12:08 am
Could the basic bar bracket be screwed into a wall stud with a lag bolt screw? You mention the need to access the back of the bar, but my bar is actually a cabinet with a counter 4" below a taller bar counter that rests on traditional half wall (with wall studs). I need the rail about 14" from the floor, so the basic bracket is the only option that would work.
Caleb Houseknecht
June 26, 2015, 1:42 pm
Hi there, Anne. That is a pretty technical questions, so I'm going to recommend you call one of our bar rail specialists at 1.888.737.6317. They will definitely be able to help you!
john willman
February 12, 2016, 9:54 am
I need to install a rail on a wall four feet up from the floor. This is to be used to steady a handicapped person during therapy. Traditional handrail brackets put the rail too close to the wall.
How far up from the floor does a footrail bracket leave the rail? I need the measurement from floor to the bottom surface of the rail. I'm guessing this a standard height for bar rails. Thanks--john
Dan Edwards
April 2, 2016, 5:45 pm
Can u tell me the dimensions of all bracket types you sell. What is the standard distance from the bar wall and the height of the top of foot rail. When I know these measurements I'm ready to order. Thanks. Dan
Caitlin Hartney
April 6, 2016, 2:49 pm
Hi, Dan. The dimensions for each bracket can be found on the individual product pages. As for your second question, the height from floor to rail is determined by the chairs you are going to use, but combo brackets are 6" to center. If you need more specific help on product selection and home installation and product selection help, I recommend calling our Customer Care department at 877-636-3673. They have many years of experience helping people plan out their bar rail systems.
Jose Pilar
June 6, 2016, 5:31 pm
Can the supports be screwed into a tile floor?
Scott
July 8, 2016, 12:11 am
How would I install your "Rounded Center Post Bracket - Polished Brass - 2" OD
Item # 00-336/2" on a tile floor that is layed on concrete slab? Do I need to embed threaded inserts in the slab first to accept the screws that will hold down the bracket's bottom flange?
Caitlin Hartney
July 8, 2016, 6:21 pm
Hi, Scott. Our specialists recommend getting brass-plated flat-head concert screws and concrete anchors, and advise that you pre-drill the holes with a concrete drill bit first. The other option is to insert anchors into the floor that they could score into. Either way, pre drilling will be required. But do exercise caution if drilling tile so as not to crack it. A diamond tipped drill bit would help with that.
Let us know if you need any other help!
http://www.thebuilderssupply.com/Richelieu-FKCS316114VP-Flat-Head-Concrete-Screw?gclid=CLmGvZSK5M0CFRNahgodwloN4w
Ron DiFranco
November 11, 2016, 1:54 pm
My bar owner has a curved bar, can the tubing be ordered curved?
Caitlin
November 15, 2016, 2:03 pm
Hi, Ron. Yes, bar rails can be curved to order and customized to the shape of your bar. If you want more information, you can speak to one of our bar rail specialists at 877-636-3673.
Joe
March 16, 2017, 7:20 pm
Question on support brackets: I have a carpeted floor with padding and concrete slab underneath. Will combination brackets hold sufficiently on the carpet so I won't have to cut into the carpet & padding and drill into the concrete?
Caitlin
March 17, 2017, 6:21 pm
Hi, Joe. Combination Brackets are only mechanically fastened to the wall of the bar, not the floor. The lower leg only sits on the floor, so there would be no need to cut into the carpet. An alternative is our bar mount bracket if you have a way of fastening them properly.
Patty
March 26, 2017, 12:44 pm
I am installing the rail on a typical bar height island in my kitchen. I'm using the simple bracket. How far should the rail be mounted from the floor?
Caitlin
April 3, 2017, 8:25 pm
Typically 7-8" is a comfortable height for the rail to be above the floor. Hope this helps!
How was your issue resolved.
April 11, 2017, 3:46 am
Hi Anne, I currently have the same issue, so I would like to know how yours was resolved. I actually bought the wrong style so I am thinking of exchanging for the basic bracket so I can install at my required height.
Steve
May 11, 2017, 3:40 pm
On the end caps, how are they secured in the end of the rails? When I put them in they fit loosely.
On the brackets there is a hole on the underside of the bracket, is there a set screw that screws into that hole to secure the railing and what size would it be?
Caitlin
May 17, 2017, 2:45 pm
Hi, Steve. An adhesive can be used to secure the end caps. There are adhesives suitable for use on metal at any hardware store. Another easy way to rectify loose end caps is taking electrical tape and wrapping it tightly around the sleeve portion of the end cap. About 1.5 turns does the job and makes for a snugger fit. The brackets do have a holes for a screw. It is a self-drilling pan head screw which is supplied with the hardware that is included in the bracket.
Hope this helps! Let me know if you have any other questions.
Herb Schick
June 19, 2017, 10:57 pm
When dealing with a bar that has a 45 on the corner, where would you place the brackets? The 45 is about 2 1/2 feet long.
Caitlin
June 21, 2017, 5:22 pm
Hi, Herb. If you are using 2 brackets along a 45 corner on a bar that's 2'-6" long, we suggest having each bracket approximately 6" from each corner.
Randy
July 22, 2017, 11:27 pm
When using a combination bracket, is it necessary to screw down the part that rests on the floor. My floor is concrete.
Claudia
April 8, 2018, 6:28 pm
My bar is 61 1/2 long. I do not have access to the back. How many combination brackets would I need?
Pete Polonsky
July 12, 2018, 7:18 pm
Hi, my bar is on a carpeted floor. I was planning on using the brackets that go onto the bar and onto the floor. I am assuming I would need to go through the carpet and into the floor underneath?
Elliott Schwab
August 28, 2018, 2:07 am
What is the height of the finished rail from the floor? Also, how far out from the bar from is the rail?
Chris
September 25, 2018, 2:15 pm
Hi Elliott,
Check out our Bar Foot Rail Brackets Guide for exact dimensions from floor to rail and from rail to bar. They vary depending on the type of brackets you're using, and that article mentions all of them. Please give our bar rail experts a call if you have any additional questions at 1.866.249.2337 or you can fill out this form on our website.
John
October 3, 2018, 9:35 pm
What size drill bit should I use to create the pre-drilled holes for the self tapping set screws for the stainless steel tubing?
Chris
October 4, 2018, 2:55 pm
Hi John,
We would recommend using a 1/16 drill bit to make the pre-drilled holes. Then use the self tapper screws but do it SLOWLY. Drilling the self tapping screws at too high a speed will cause the screw to just spin. We recommend going slow with the drill or even hand screwing it with an actual screwdriver once the holes are pre-drilled. Hope that helps!
Chris
April 3, 2019, 8:02 pm
Hi Claudia,
We recommend at least one bracket for every 4 feet of rail tubing, as well as one placed 6" from each end of the tubing. In your case, 16 brackets should do the trick, though with corners in your bar, you may want to add extra support on either side of bar rail elbows.
Chris
April 4, 2019, 1:12 pm
Hi Pete,
Yes, for combination brackets, you would drill into the facing of the bar as well as the floor. To avoid drilling into the floor, you could go with bar mount brackets, though you would need back access to your bar molding to install those. Other options, such as center post brackets, just drill into the facing of the bar.
Check out our Bar Foot Rail Brackets Guide or feel free to contact our Customer Care team at 877.636.3673, Monday through Friday, 9:00 am - 6:00 pm EST with any additional questions. Cheers!
Chris
April 4, 2019, 2:17 pm
Hi John,
We do offer ADA compliant handrails in a grippable, diamond scale design. They are not recommended for use as a commercial bar foot rail though. For ADA compliance, handrails should be between 34-38 above walking surfaces, stair nosings, and ramp surfaces. They should also be at a consistent height.
Rick
May 26, 2019, 10:00 pm
I think you're kidding me about the self-tapping screws. I have the brushed stainless rail and have already drilled it with 1/16" with no joy, snapped the screw off. Then 1/8" hole and the screw still will not thread in, gets stuck and threatens to snap again. What's the next idea?
Katie Johnson
May 28, 2019, 6:19 pm
Hi Rick, Drilling a pilot hole and then using self-tapping screw should work. The only other suggestion would be to use a small amount of lubricating oil in the pilot hole before screwing the self tapper in. Stainless steel is meant to be drilled into very slowly. If you go too fast, you end up heating it and hardening it.
Cheers!
Thomas Jameson
July 30, 2019, 2:14 pm
It's good to know that foot rails are available in different styles and finishes. My brother wants to open a bar and install a matching foot rail. I'll pass this information along to him for his consideration.
Jacob Sells
September 24, 2019, 1:48 am
How easily will a foot rail bend
Terry
September 24, 2019, 2:13 pm
I am installing a bar foot rail on our bar. Currently bar stools set on carpet but im Installing tile so the stools set on tile. Since most brackets set out 7 inches front he bar how far out would i need to install the tile from the bar? Is 36 inches sufficient?
Katie Johnson
October 7, 2019, 2:53 pm
Hi Jacob, tubing doesn't bend very easy and is best done professionally with a tube bending machine so that the radius of the bend matches the radius of the bar. Thankfully, Kegworks has the machine and the professional to bend tubing, so we'd be happy to help.
Katie Johnson
October 7, 2019, 2:55 pm
Hi Terry, we assume that 36 inches should be fine, but we'd suggest speaking to on of our bar rail reps to just make sure we understand what you're trying to accomplish. 1.866.249.2337
Paul
January 30, 2020, 9:12 pm
We are using the standard footrest, with attachment to the Bar die wall and floor.
The Bar die wall finish is a porcelain tile. Can the footrest be directly attached to the surface of the porcelain tile?
Dave Buchanan
January 31, 2020, 8:55 pm
Hi Paul, we wouldn't really recommend screwing the bracket into the ceramic tile as it will crack it. The best bet is to drill a hole in the tile, put an anchor in the hole and then screw the bracket into the anchor.
Kentland Holcomb
April 21, 2020, 6:07 pm
I am planning on using combination brackets for my bar foot rail. The floor is tile. I do not plan to screw the bracket into the floor. Is the point loading of the bracket on tile an issue. That is, is the bracket likely to cause the tile to crack?
Thanks
Dave Buchanan
May 22, 2020, 1:32 pm
Hi Kentland, the load won't crack the tile. It may mark the tile up which is why some people will put felt under the feet. Sorry for the delay in responding to your question. Cheers!
Richard Merkle
September 16, 2020, 4:57 pm
Q1: Your installation directions only reference corners that cover the pipe (similar to a bracket). I have 45 deg SS corners that insert into the pipe ends. How do I secure those?
Q2: Your install direction only call fro gluing endcaps. Is there any reason I shouldn't pre-drill a hole at the end of the pipe into the end-cap and insert a screw to fasten the end caps? IN lieu of glue or, perhaps in addition to the glue?
David Buchanan
September 22, 2020, 5:42 pm
Hi, Richard. All of our elbow fittings insert into the pipe so you can use the method to secure them that is mentioned in the post. You could screw the end cap in place. We don't specifically call that method out because some people don't like having the screw visible in their bar rail. Cheers!
Joe Kokernak
February 27, 2021, 3:56 pm
Good morning. At what height should I install blocking between the studs on the bar to support the bar foot brackets? Thank you.
David Buchanan
March 1, 2021, 2:26 pm
Hi, Joe. Since the bolt attaches through the blocking to the bracket about 2-1/2" below the top of the tube. If you wanted the top of tube to be 6" off the floor, then you'd want to make sure the blocking was 3-1/2" off the floor. Cheers!
William Grant
June 4, 2021, 3:12 pm
I am installing a footrest on an outside bar
what is the best material for outdoor
David Buchanan
June 4, 2021, 3:18 pm
Hi, William! We have a selection of bar rail that are designed to be installed outdoors - https://www.kegworks.com/bar-rails/shop-by-finish/outdoor-finishes/
These are all made from stainless steel tubing with a powder-coated finish. You can also special order any of our tubing with a clearcoat finish to protect it from the elements - https://content.kegworks.com/commercial-sales/commercial-bar-rail/bar-rail-custom-bends.
Cheers!
Robert Needham
September 1, 2021, 12:19 am
Wanting to install bar foot rest.the bar is horse shoe shaped with about 5' radius. With two 10' straight. 2" brass. Is that something you can do. Thanks
David Buchanan
September 1, 2021, 4:11 pm
Hi, Robert! Yes, we do custom bends. The best way to start the process would be to fill out a custom bend request and then a member of our bar rail team can reach out to you. https://content.kegworks.com/commercial-sales/commercial-bar-rail/bar-rail-custom-bends
Cheers!
Raymond Miller
December 18, 2021, 11:34 pm
Looking to order a 12 Bar Foot Rail
Combination brackets
Round dome style caps
Brushed Brass
Residential
Looking for a quote, and shipping lead time.
Thanks in advance for your help
Brad Miller
Capstone Custom Homes
(603)547-5389
David Buchanan
December 20, 2021, 1:26 pm
Hi, Raymond. I've forwarded your information to our commercial sales team. They will be reaching out to you. Cheers!
Jeff
September 7, 2022, 3:19 pm
Hi - I purchased the 8' Bar Foot Rail Kit - Polished Stainless Steel - 2 OD - Combination Bracket + Flush Flat End Cap and it's great, but I'm trying to figure out how to stop it from spinning/sliding in the brackets. It seems like it slides back and forth very easily, as well as spins when people have their feet on it. Any suggestions would be great!
David Buchanan
September 7, 2022, 3:35 pm
Hi, Jeff!
The brackets in your bar rail kit should have come with self-tapping set screws to help secure the tubing in place. Theres a small hole in each bracket that you drill the set screw through and then it goes into the tube to keep it still.
If your kit didn't come with the screws or if you can't find them, then please reach out to our Customer Care team at 877-636-3673 or email us at customercare@kegworks.com, and we'll get some sent out.
Thanks for being a KegWorks customer. Cheers!
Mike Turgeon
February 22, 2023, 5:54 pm
I used a 1/16 drill bit. It did not do the job ; the screw did not go in. Then I used a 3/32 drill bit and it was not sufficient. I will try a 1/8 drill bit. I hope it will be sufficient to drive the screws. What do you think ?
H. Cantor
September 2, 2023, 12:45 pm
The center section of the bar rail I am installing is about 6.5. What water based lubricant do you recommend I use to slide the center support into position without scratching half the tube?
David Buchanan
September 5, 2023, 12:35 pm
Liquid dish soap works just fine for sliding brackets across the tubing.
michael bronsky
August 12, 2024, 4:26 pm
Hello: Looking for ideas for my bar which is in the basement. The floor is concrete with a 7mm thick hardwood laminate over top. The face of the bar is dry-stack stone so I would need a free standing foot rail design with one wall mount. The bar is ten foot long with a two foot side wing. So I would need one elbow to make the 90 degree turn and one end cap but I haven't seen a free standing design on your website! Could you offer any ideas.
David Buchanan
August 12, 2024, 5:33 pm
Hi, Michael. To help you find the best solution we recommend reaching out to one of our representatives so they can better understand your needs. https://content.kegworks.com/commercial-sales/meet-the-kegworks-sales-team
More Topics
Related Posts
Fast Shipping
Quick Turnaround Times
Hassle-free Returns
60-Day Return Policy
Secure Shopping
Through SSL Protection
Expert Support
Call 877.636.3673