KegWorks Homepage
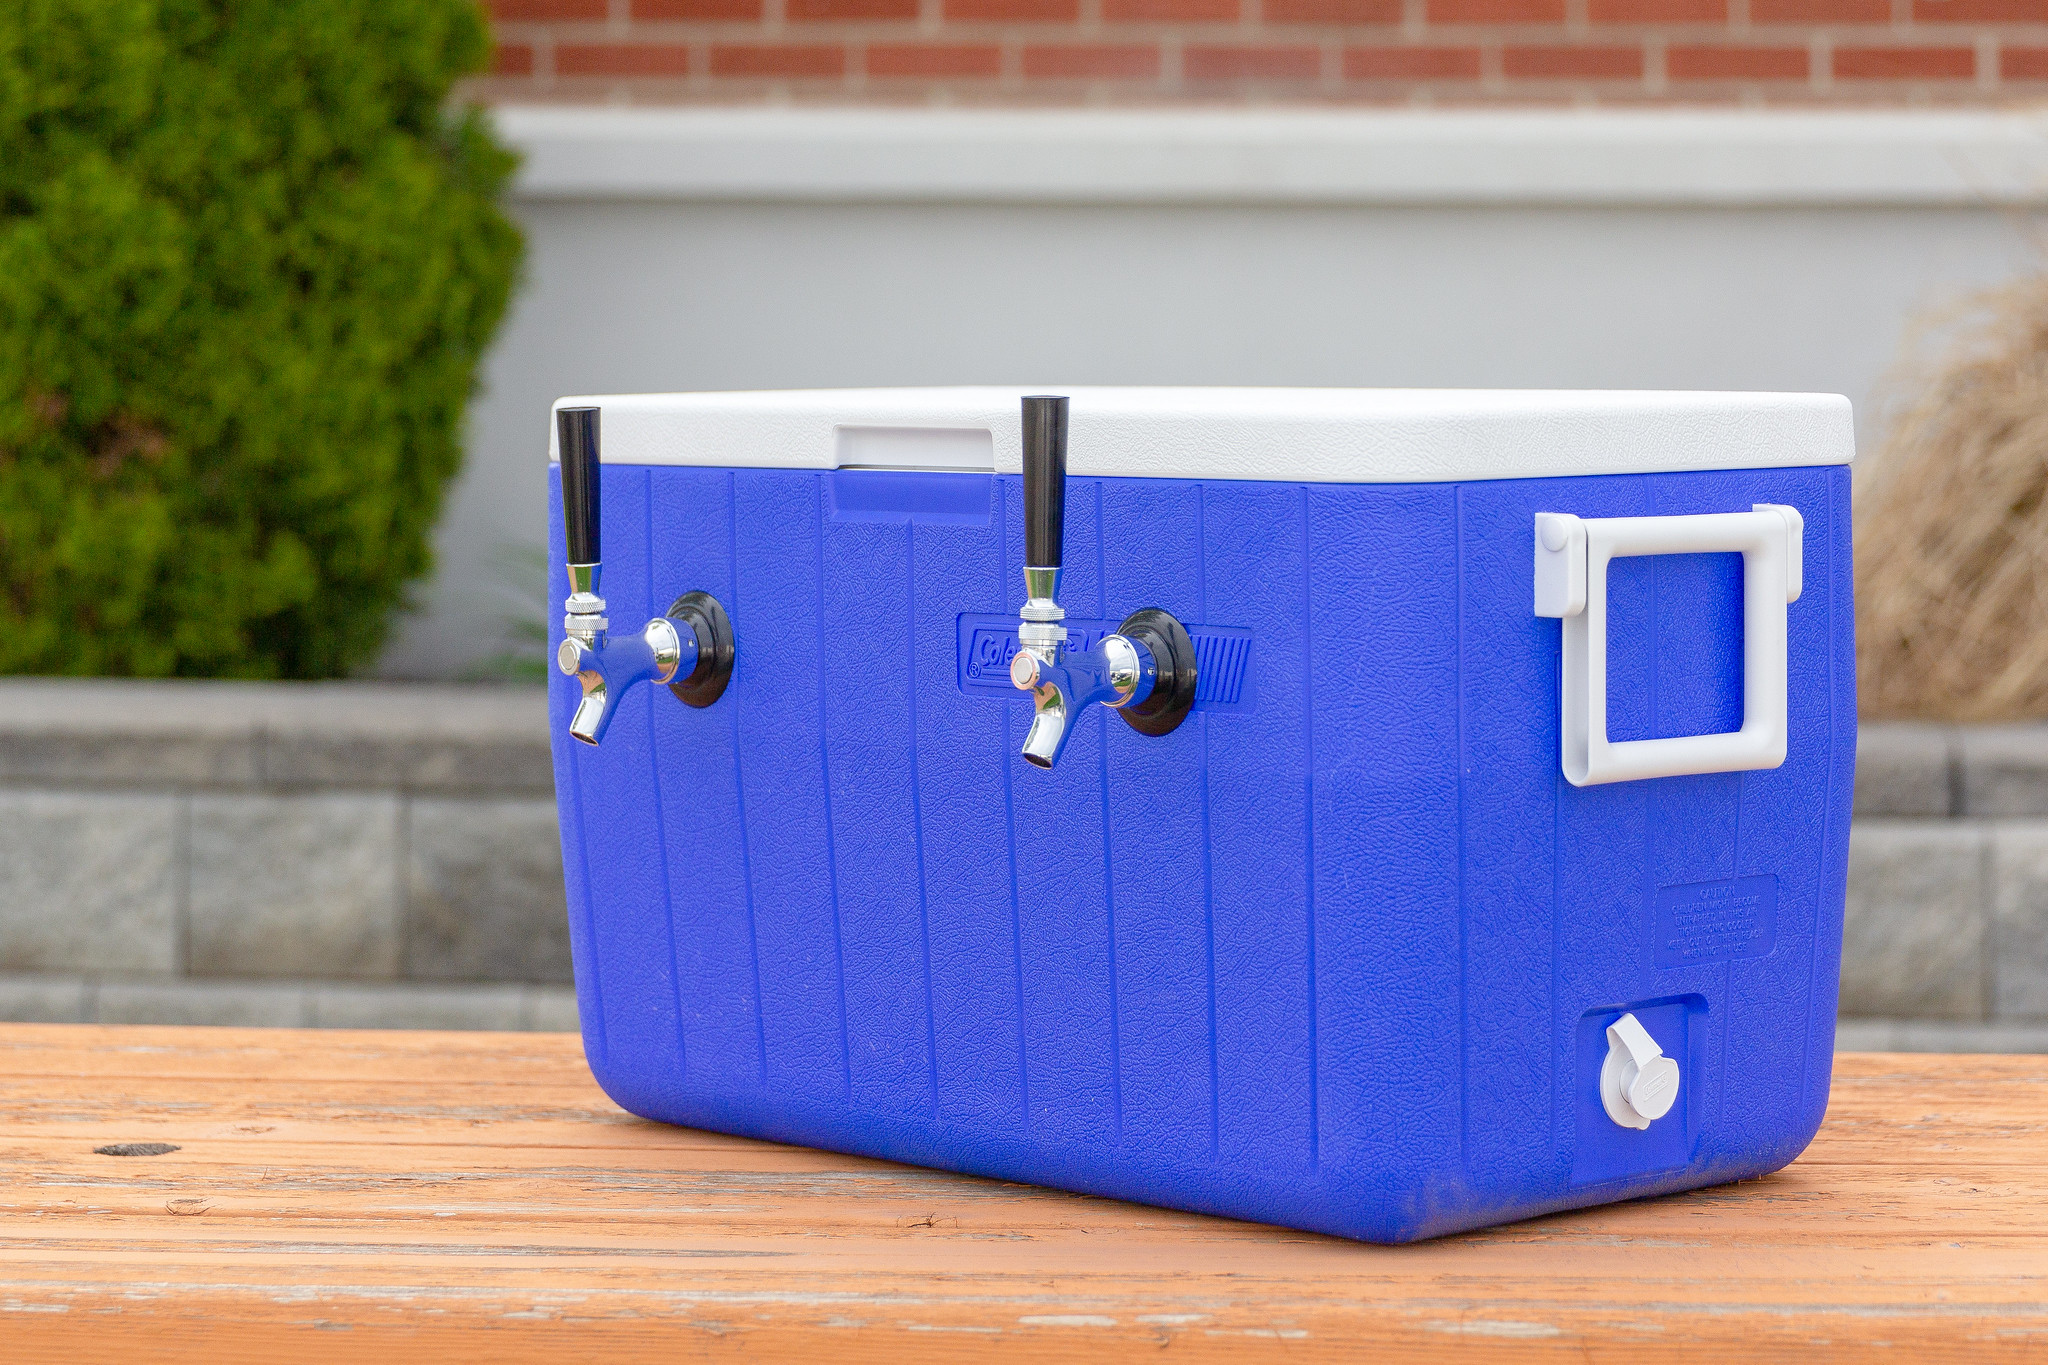
If you’re looking for ultimate portability and ice-cold draft beer in even the warmest weather, you’ll get it all with a jockey box.
This on-the-go draft beer option fills the large void between the keg party pump's simplicity and a kegerator's convenience. It combines many of the qualities of each while allowing you to bring it anywhere. It’s unique, like an outdoor kegerator you can take to any party or event. It can also be more than just a tailgate or camping option. You can even "dress up" your jockey box by building a jockey box cover that lets it double as functional decor at weddings or formal events.
Table of Contents
What is a jockey box?
A jockey box is a mobile draft beer system built into a standard, insulated ice cooler. It relies solely on ice for refrigeration, so it doesn’t require any electrical power to operate. Beer travels from a keg (which must be cooled) into one end of the cooler, through the jockey box coils to a draft faucet at the other end of the cooler, and into your waiting cup. Offered in full or conversion kits, they can be set up from scratch or built into an old cooler.
Jockey box dispensing is a step up from a standard party pump keg. Its patented design does a much better job at keeping your beer at the perfect temperature helping to reduce foaming, it uses CO2 to push the beer out properly (fresher beer with no more pumping!), and it stands up better to high-pour situations.
The name "jockey box" comes from the fact that you can move (or jockey) the unit easily from place to place. It's ideal for serving draft beer outdoors, such as picnics, tailgates, and beer festivals.
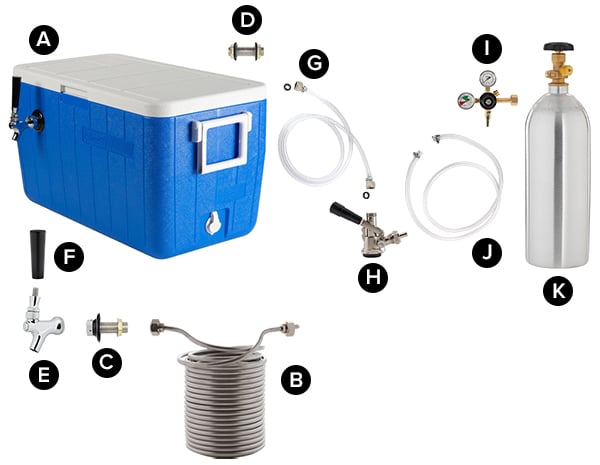
Parts of a Jockey Box
A. Blue cooler with drain
B. Stainless steel coil
C. Steel shank
D. Cooler coupling
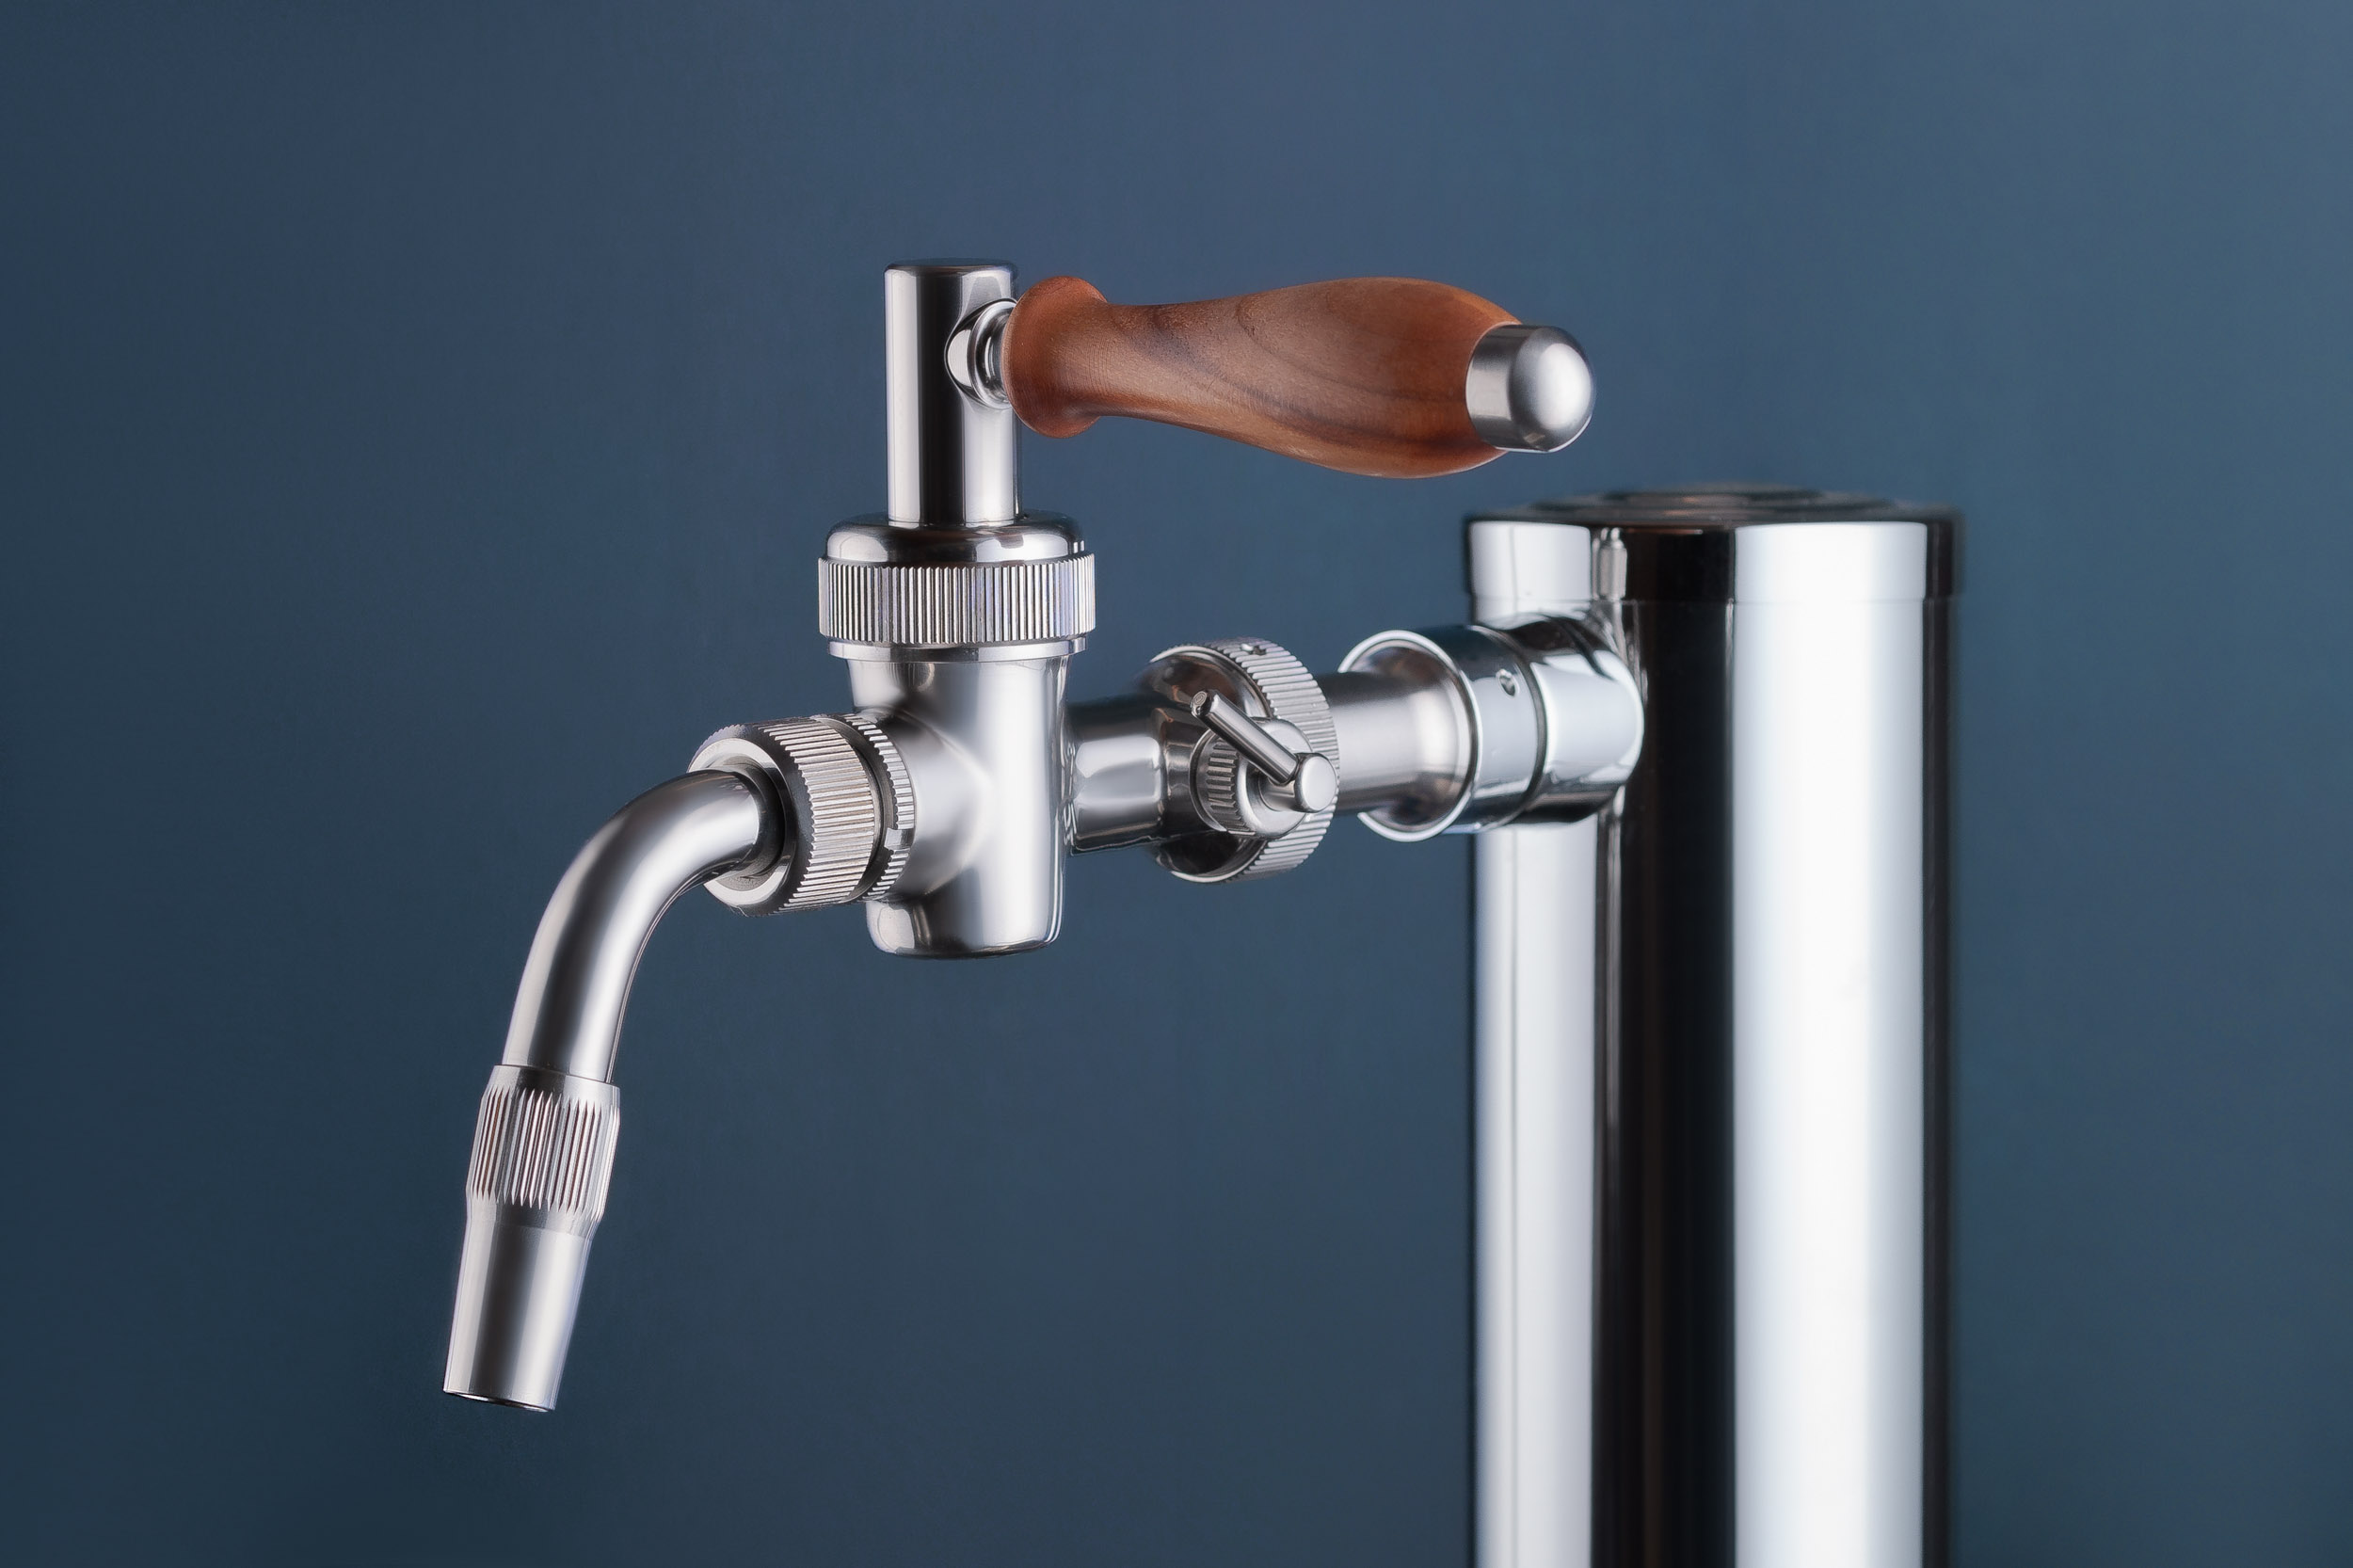
E. Chrome faucet
F. Black faucet handle
G. Beer line jumper
H. US Sankey coupler
I. Double gauge CO2 regulator
J. Air line jumper
K. New aluminum CO2 tank (empty)
The Classic Conundrum: Jockey Box vs. Kegerator
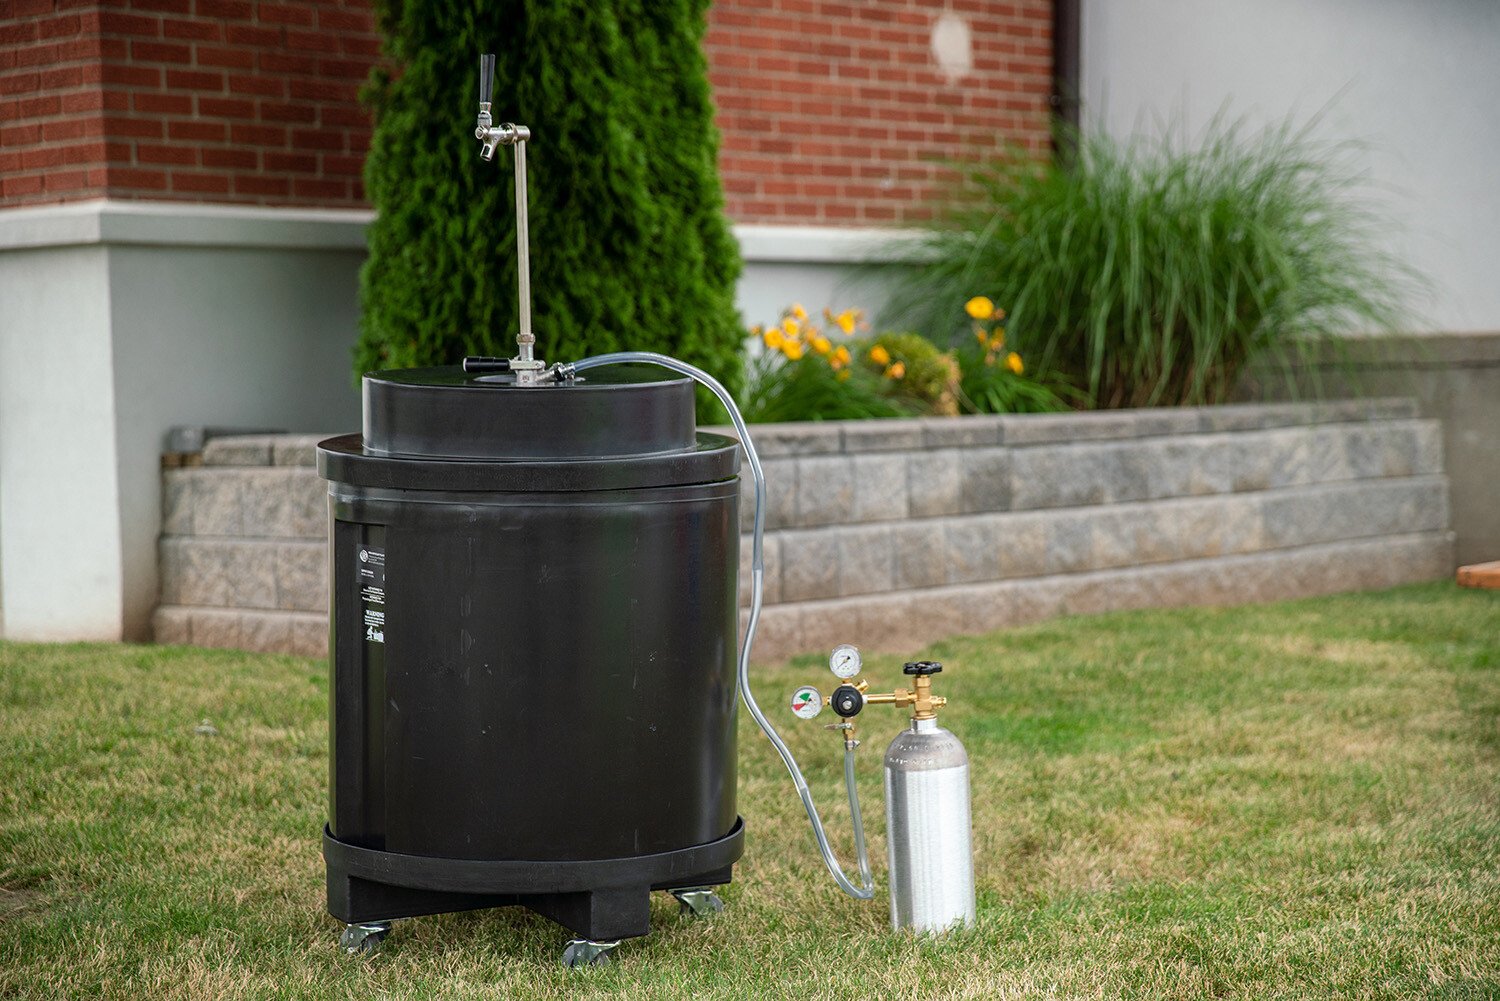
A kegerator is a fixed setup. It is a great choice for someone who enjoys draft beer at home from a sturdy unit. There are also a variety of outdoor kegerators for your backyard entertainment. Choose kegerators if you like to entertain at your house. They can be transported, but they’re not ideal for lugging around every time you go to a party.
Jockey boxes derive their name from the phrase “jockey around,” which means they’re easy to move from place to place. Ideal for outdoor events where cold beer and quick pouring is key, jockey box coils cool the beer as it travels through them. This gives you a perfectly chilled beer every time the tap is pulled. There are many places where a kegerator isn’t feasible, such as tailgate parties, festivals, commercial bars that want to bring their beer to an event, or camping. That’s where the jockey box comes racing in upon its trusty steed.
Which jockey box coil size & shape to choose?
Stainless steel jockey box coils come in a variety of shapes and sizes. It depends on your event or situation as to which to go with.

Jockey Box Coil Lengths
50-Foot Jockey Box Coils
The 50-foot coil is best used for smaller parties or events, where the beer will not be continuously poured throughout.
70-Foot Jockey Box Coils
The 70-foot coil offers more surface area giving you more cooling power, which is useful in busier events where the beer flows a little faster.
120-Foot Jockey Box Coils
These extra-long coils are perfect for brewers working offsite events where continuous pouring is necessary, such as a beer festival or huge party.
Jockey Box Coil Shapes
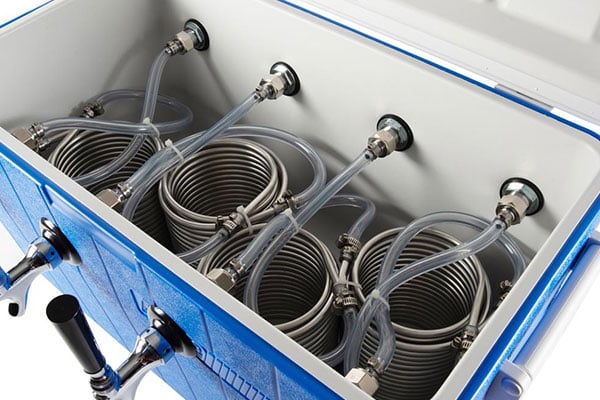
Circular Jockey Box Coils
For the majority of setups, you’ll be just fine using a standard-sized circular coil. If you plan to serve three or more beers, you’ll need a larger 60-quart cooler or multiple coolers to accommodate standard coils.
Square Jockey Box Coils
High-efficiency square coils include a spacer between each coil for a more uniform cool. The spacer keeps the 304 stainless steel coils slightly elevated so that each and every inch is in contact with the ice bath, keeping your beer extra cold.
Mini Jockey Box Coils
Mini circular coils are great for smaller, 9-quart coolers or multi-tap jockey boxes. You can fit up to 4 taps in a 48-quart cooler using mini jockey box coils, which makes transportation much easier. In addition to maximizing space, the extra compact design provides some extra cooling power, as you will have more space to pack in ice water.
Using jockey box coils vs. cold plate
An additional method for chilling beer inside a jockey box is using a cold plate. A cold plate is a thin metal box containing a stainless steel tube for beer to flow through to the faucet. Ice comes in contact with the plate, which chills the beer-filled tube inside.
While simpler in design than a coil, a cold plate is an inferior method for keeping your beer cold, especially if you're serving at an event where the beer is being poured frequently because a cold plate holds less liquid than a jockey box coil. The need for the cold plate to be constantly in contact with ice also requires you to keep adding more ice to your cooler and drain the melted ice water.
We recommend using coils for your jockey box because they are better at keeping your beer cold, so you don't lose as much from foamy pours.
How to set up a jockey box
For the easiest installation, a full jockey box setup with all the amenities included will likely cause the least headaches.
Parts You’ll Need
- A cooler large enough to comfortably fit coils submerged in an ice bath
- Stainless steel jockey box coils - size and shape of your choice
- Two (2) hex nuts
- Two (2) metal ferrules
- Two (2) rubber grommets
- Faucet shank
- Cooler coupling
- Draft beer faucet
- Tap handle of your choice
- Beer line jumper
- Air line jumper
- Keg Coupler
- CO2 regulator
- CO2 tank - filled
- A full keg
Tools You’ll Need
The hex nut and spanner wrench will be useful for attaching your beer faucet and the jockey box coils to the shank and cooler coupling. Rubber washers should be used in any location where two pieces of metal come into contact with one another throughout any draft beer system to prevent leaks. A CO2 tank wrench will fasten the regulator to the CO2 air tank. You’ll also need a flathead screwdriver to adjust the PSI level on your CO2 regulator and secure screw clamps.
Step 1: Chill your keg!
To keep your beer from getting too foamy, make sure you keep your keg on ice the whole time you're using the jockey box, even as the coil cools the beer as it travels inside the cooler to the tap. A Super Cooler offers full insulation and a colorful look and will keep your keg cold all weekend with just three bags of ice. An insulated keg jacket or sleeve works great too. An old-fashioned ice and bucket will work if you don’t have either of those options, but continue to add ice to the bucket throughout the day and keep your keg out of direct sunlight.
Step 2: Connect beer line jumper from cooler coupling to keg coupler.
Connect one end of the beer line jumper to the cooler coupling located on the back of the cooler, opposite of the shank and faucet. Tighten the connection with the hex nut wrench. Connect the other end of the beer line jumper to your coupler. Be sure to consult a keg coupler list to be sure you’re using the right coupler type for your beer.
Step 3: Attach air line jumper to both CO2 regulator and keg coupler.
Attach one end of the air line jumper to the CO2 regulator and the opposite end to the hose barb of the keg coupler. Use the flathead screwdriver to tighten each connection to avoid leaks.
Step 4: Attach regulator to CO2 tank by CO2 inlet nut.
Use the CO2 air tank wrench to connect the regulator to the CO2 tank by the inlet nut.
Step 5: Attach coupler to keg.
Begin with the coupler’s handle in a closed position or facing diagonally and upright. After screwing the coupler into the keg, creating a firm seal, push the coupler handler downwards so that it is lowered and facing more straight out than diagonal. Some beer should enter the vinyl beer line at this point.
Step 6: Open up the air tank.
Turn the hand wheel to engage your compressed air tank, and move the shut-off valve at the bottom of the regulator to the ON position, which will mean it is facing downwards or parallel to the regulator output barb and the air line attached to it. You will hear air entering the draft system when it’s turned on.
Step 7: Adjust the regulator to the proper PSI level.
Depending on your setup, your jockey box's PSI level could be between 20-60(!) PSI. Start at around 25-30 PSI and see how the beer is pouring. Gradually adjust upwards to eliminate large bubbles in your beer or excess foam until the beer is pouring out with a proper head. The warmer the keg gets as the day goes on, the higher you may need to increase the pressure you’re pouring it at.
Step 8: Run some beer through the system to the faucet, then give the coils an ice bath.
Run your beer through the jockey box coils up to the faucet prior to submerging it in ice water. Otherwise, any water left inside the coils from previous use can freeze up. Once the beer flows through the coils, submerge it in water and ice. Use cubed or crushed ice to fill the cooler, and then add water until the coils are completely covered.
Step 9: Enjoy.
Cheers! But after the party, don’t forget that keeping your jockey box clean is necessary.
How to make a DIY jockey box
If you have an old cooler lying around and collecting dust, you can use a jockey box conversion kit to turn it into a DIY jockey box. Or, if you’re someone who has a few extra draft beer items, you might want to purchase a few jockey box parts to complete your system.
Step 1: Install the cooler coupling and shank.
Start by drilling a hole on either side of the cooler large enough to fit your cooler coupling (back of the unit) and beer shank (front of the unit). Firmly attach the cooler coupling and shank to the jockey box with the lock nut and rubber washers sealing each part.
Step 2: Attach draft beer faucet.
Attach your faucet with the spanner wrench. The tap handle will screw on atop the faucet.
Step 3: Connect the coils.
Slide the hex nut onto either end of the coil, followed by the metal ferrule, and finally, the rubber grommet. Connect the jockey box coil to each side with the hex nut wrench. To complete your DIY jockey box kit, follow the remaining steps above.
Check out our How To Make Your Own Jockey Box post for more detailed instructions and to watch our how-to video on building a DIY jockey box.
Download the Jockey Box Setup Instructions (pdf)
How to clean jockey box coils
As with any other draft beer system, regular beer line cleaning of your jockey box coils is necessary. This should be performed after each and every use. Otherwise, disgusting gunk and residue will build up, ruining your precious new jockey box beer dispenser in a hurry.
Step 1: Flush out remaining beer.
Use a standard beer line cleaning kit to flush all the remaining beer out of the lines after use.
Step 2: Clean faucet.
Remove your faucet with a spanner wrench and clean thoroughly in beer line cleaning solution.
Step 3: Rinse system well.
Rinse the entire system with water.
Step 4: Clean the coils.
Clean the outside of the stainless steel coils with mild soap, rinse, and wipe dry.
How to save leftover beer from a jockey box
Leaving your beer pressurized at 30+ PSI overnight will over-carbonate it, ruining its flavor. Pull the pressure relief valve (PRV) on your keg coupler to release excess pressure when shutting it down for the night. Then, repressurize the beer to 12-14 PSI. Immediately place the keg in refrigerated storage to maintain its quality.
Kegworks
Kegworks has been transforming hospitality spaces since 1998 with expertly crafted architectural metalwork and professional draft beer equipment, helping designers, architects, and bar professionals bring their visions to life.Comments
jiri
April 5, 2020, 9:04 am
hallo, could you be so kind and give me an advice; we need during 3-4days the beer should be cooled in jockey box. is it possible to put the ice without watter to sustain the beer cooled for that time? is there danger that the beer get freeze inside in snail there? or we have to poor the water inside at each time?
thank you for your reply.
Jiri
Vicky Suto
April 14, 2020, 9:46 pm
Hello. You definitely want to use an ice bath rather than just all ice. Using a mix of ice and water actually ensures that the lines stay consistently cold and will prevent your lines from freezing. Cheers!
Tim Pell
February 14, 2021, 12:32 pm
When I am traveling with a keg how long should it sit before trying to pour beer.
David Buchanan
February 15, 2021, 2:19 pm
Hi, Tim. Letting it sit for 2-3 hours should be fine. Cheers!
Michelle deBLanc
August 8, 2021, 5:26 pm
can you attach a jockey box to a draft beer tower on top of a counter?
David Buchanan
August 9, 2021, 1:14 pm
Hi, Michelle. It wouldn't be easy to do because the jockey box coils are designed to connect directly to the shank on the back of the cooler. You'd have to try and connect a beer line to the coil and then run it outside of the cooler up to the draft tower. But, then you have to worry about the beer in the line getting warm unless it was properly insulated. It would pour foamy if the beer got warm. So, to make a long story short, it's possible with a little ingenuity but we wouldn't recommend it. Cheers!
Brad K
September 9, 2022, 2:12 am
I have a Jockey Box keg cooler and my beer always seems to come out flat. I typically have the PSI at 20. Should I simply increase the PSI to get my beer to have more carbonation? I noted you said 30-60 PSI above. But how can you tell what PSI is required for your beer?
David Buchanan
September 9, 2022, 2:16 pm
Hi, Brad. We recommend starting a jockey box at 25-30 PSI and adjusting from there. We also have a blog post on recommended pressures for different beer styles. https://content.kegworks.com/blog/determine-right-pressure-for-your-draft-beer-system/
Racine Oliveira
October 31, 2023, 9:42 pm
Hi there, I intend to have a jockey box on my food truck and wanted to ask how far can the kegs be from the jockey box? I was hoping I could hold the kegs behind the food truck, about 2 meters away. Would that affect the quality of the pour at all?
Cheers
David Buchanan
November 1, 2023, 3:59 pm
Hi Racine. That should be ok. The beer sitting in the lines between the kegs and jockey box cooler could get warm, especially if left there for a while, which could cause foamy pours, but if you're pouring frequently, then it shouldn't be an issue. Cheers!
sam burrows
May 30, 2024, 4:02 pm
Hi,
Typically how long would a half used keg be good for if kept i cool spot out of direct sunlight. Jockey box looks great for how i would use it, but worried about beer going bad if i dont come back to use it within a couple of weeks etc. Thanks.
David Buchanan
June 10, 2024, 1:27 pm
Hi, Sam. Leaving your beer pressurized at 30+ PSI overnight will over-carbonate it, ruining its flavor. Pull the pressure relief valve (PRV) on your keg coupler to release excess pressure when shutting it down for the night. Then, repressurize the beer to 12-14 PSI. Immediately place the keg in refrigerated storage to maintain its quality.
More Topics
Related Posts
Fast Shipping
Quick Turnaround Times
Hassle-free Returns
60-Day Return Policy
Secure Shopping
Through SSL Protection
Expert Support
Call 877.636.3673